Turning little hands into festive turkeys is a classic Thanksgiving craft, and placing those handprints on an apron makes the memory both practical and sentimental. This guide walks you through creating a turkey handprint apron that your family can wear year after year while cooking the holiday meal.
Beyond being adorable, handprint crafts help children develop fine motor skills and creativity through painting, pressing, and decorating. Involving kids in holiday activities can also strengthen family bonds and build positive traditions.
Why Make a Handprint Turkey Apron?
A dedicated Thanksgiving apron decorated with handprint turkeys offers more than cute photos. It becomes a time capsule of your child’s growth and a symbol of shared family rituals.
- Lasting keepsake: Fabric projects can be washed and re-used every year if you choose durable paints and follow care instructions.
- Encourages participation: Wearing their own apron can motivate kids to help safely with simple kitchen tasks.
- Simple supplies: You only need basic art materials and a plain apron.
- Customizable: Add names, dates, and messages to document each holiday season.
Supplies You Will Need
Gather your materials before you invite children to join; this keeps the activity smooth and prevents paint-covered dashes across the house.
| Item | Purpose | Tips |
|---|---|---|
| Plain fabric apron (child or adult size) | Canvas for your handprint turkey design | Choose cotton or cotton-blend for better paint adhesion. |
| Fabric paint in fall colors | Creates permanent, washable prints | Look for non-toxic, child-safe labels. |
| Small paintbrushes or foam brushes | To apply paint to hands and add details | Use separate brushes for each color to prevent muddy colors. |
| Fabric markers or permanent markers | Draw eyes, beaks, and write names or dates | Test markers on a hidden corner first. |
| Palette, paper plate, or scrap cardboard | Surface to hold and mix paints | Keep near the apron to reduce drips. |
| Baby wipes or damp cloth | Quick hand cleanup after printing | Especially helpful when working with toddlers. |
| Protective covering (old sheet, newspaper, or craft mat) | Protects your table or floor from spills | Secure edges with tape to prevent slipping. |
| Cardboard insert | Placed inside apron to prevent paint bleed-through | A cereal box panel often works perfectly. |
Preparing the Apron and Workspace
Preparation is key to a low-stress craft session, especially with young children.
- Pre-wash the apron: Launder and dry the apron without fabric softener so that paint adheres better.
- Iron if needed: A smooth surface helps create crisp handprints.
- Insert cardboard: Slide a piece of cardboard under the area where you will print the hands to stop paint from soaking through.
- Protect surfaces: Cover your work area with newspaper, plastic tablecloths, or a washable mat.
- Set up a cleaning station: Place a bowl of soapy water or wet wipes nearby to remove paint from hands immediately after each print.
Step-by-Step: Creating the Handprint Turkey
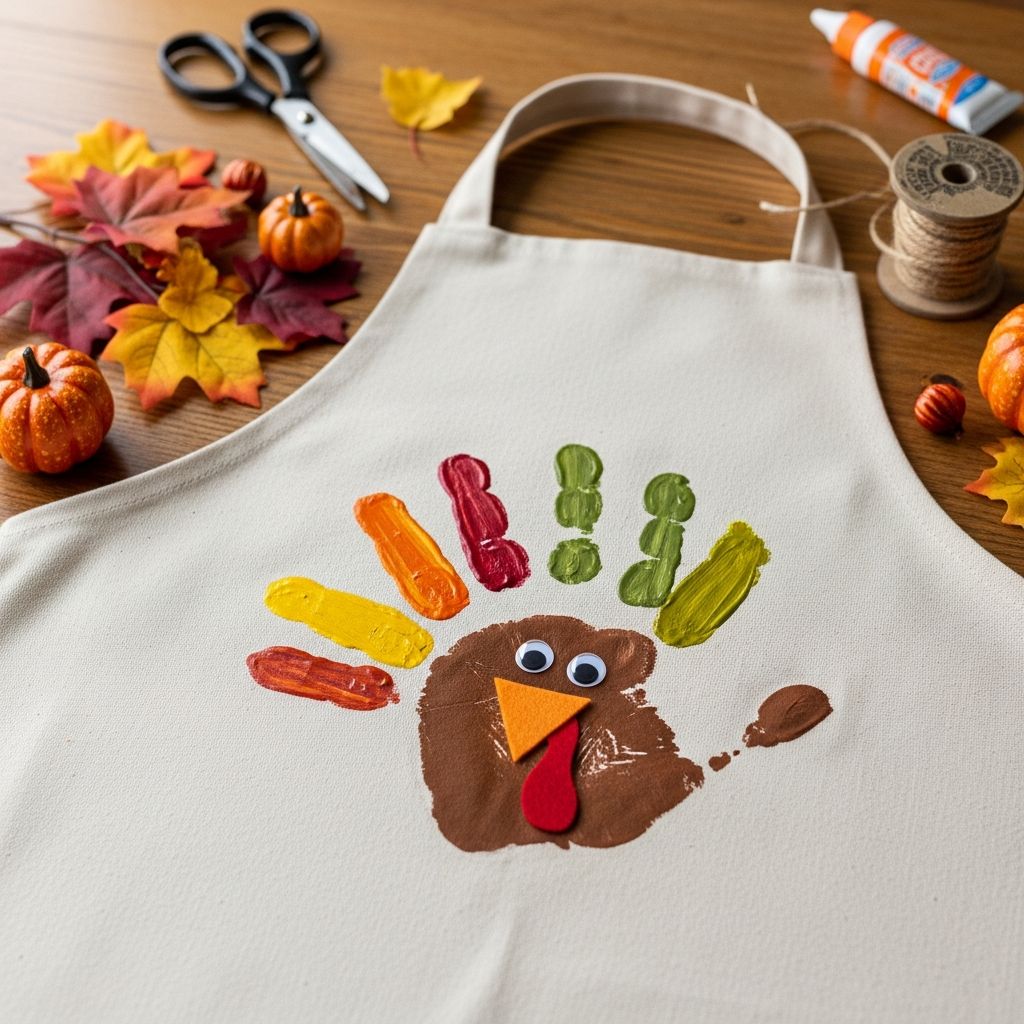
The basic idea is to paint your child’s hand and press it onto the apron so that the fingers become colorful feathers and the thumb becomes the turkey’s head and neck.
1. Plan the Layout
Before opening the paint, decide where the turkey (or turkeys) will go.
- Single turkey: Centered on the chest area for a large, bold design.
- Row of turkeys: Several smaller handprints along the bottom edge or hem.
- Family flock: One handprint from each family member in a cluster, labeled with names and ages.
2. Paint the Hand
Ask the child to spread their fingers slightly. Use a brush or foam applicator to paint each part of the hand.
- Coat the palm and thumb with brown paint for the turkey’s body and head.
- Paint each finger in a different bright color (red, orange, yellow, green, or even purple) to represent tail feathers.
- Apply paint generously but evenly so the print is solid without drips.
- Work quickly, as thin layers of paint can begin to dry on the skin.
3. Make the Handprint
Guide the child in pressing their painted hand onto the apron.
- Help them position the thumb horizontally or slightly upward; this will become the turkey’s head and neck.
- Press down on each finger individually to ensure full contact with the fabric.
- Lift the hand straight up to avoid smudging.
- Immediately help the child wash their hand or wipe it clean.
4. Add Turkey Features
When the handprint is partially dry to the touch, begin decorating the turkey.
- Use a black fabric marker or paint to draw a small eye near the tip of the thumb.
- Add an orange triangle for the beak pointing outward from the thumb.
- Paint or draw a red wattle (the dangling shape beneath the beak).
- Sketch two legs and feet with thin black or brown lines extending from the bottom of the palm.
- Optional: outline each finger feather with contrasting color for extra definition.
5. Personalize with Text
Handprint keepsakes are more meaningful when they include context.
- Write the child’s name near their turkey.
- Add the year so you can track growth over time.
- Consider a short phrase such as “Our Little Turkey Helper” or “Thankful Hands.”
- Older kids can write one thing they are grateful for along the bottom hem.
Drying, Heat-Setting, and Care
Most fabric paints and markers list specific drying and heat-setting instructions; follow these closely to keep your apron looking bright even after washing.
- Air-dry: Lay the apron flat in a safe place for the recommended drying time, often 24 hours.
- Heat-set: If instructed on the label, place a thin cloth over the painted area and press with a dry iron for the indicated duration to fix the colors.
- First wash: Turn the apron inside out and wash on a gentle, cold cycle, then hang to dry.
- Ongoing care: Avoid harsh bleach or high-heat drying, which can fade colors faster.
Safety Tips for Crafting with Kids
Painting on skin can be safe and fun when done carefully. Many craft paints and markers are labeled non-toxic, but they are not intended for ingestion. Supervision helps ensure that young children use the materials appropriately.
- Choose non-toxic products: Look for labels indicating compliance with safety standards for children’s art materials.
- Supervise at all times: Stay close, especially when paint containers, scissors, or hot irons are nearby.
- Limit skin contact: Keep paint away from faces, especially eyes and mouths, and wash skin promptly after the craft.
- Ventilation: Work in a well-ventilated area when using paints or permanent markers to minimize fumes.
- Kitchen safety: If kids wear their aprons while cooking, give them age-appropriate, low-risk tasks such as washing vegetables or stirring cool ingredients.
Fun Variations on the Turkey Apron
Once you master the basic handprint turkey, you can adapt the idea to match your family’s style, ages, and traditions.
Family Flock Apron
Create a multi-generation keepsake by inviting everyone to contribute a handprint turkey.
- Place the largest handprints (adults) toward the bottom or sides.
- Add children’s prints toward the center, showing a “flock” of sizes.
- Label each turkey with the person’s name and age or role (e.g., “Grandma,” “Cousin”).
Gratitude Feathers Design
Turn the apron into a visual gratitude list. After printing one or more turkeys:
- Use markers to draw extra feathers around the turkey’s tail.
- Inside each feather, write something your family is thankful for.
- Invite guests to add their own feathers with gratitude messages at your gathering.
No-Paint Alternative
If you prefer not to paint directly on skin, you can still achieve a turkey look using cut-out shapes.
- Trace each child’s hand onto felt or fabric, cut out the shapes, and arrange them as feathers.
- Sew or fabric-glue the shapes onto the apron in a fan pattern.
- Add a separate oval or circle for the turkey body and decorate with buttons or embroidery.
Season-Spanning Apron
Design an apron that grows with the year’s holidays.
- Start with the Thanksgiving turkey in one area.
- Add a winter handprint (like a snowman or mitten) later in the year.
- Include small notes or dates near each design to chronicle family celebrations.
Making It an Educational Activity
Handprint aprons can double as a simple learning experience. Early childhood education research highlights the value of hands-on creative activities for developing fine motor skills, problem-solving, and self-expression.
- Color recognition: Ask young children to name each paint color as you apply it.
- Counting: Count fingers, feathers, and turkeys together.
- Language development: Encourage kids to describe how the paint feels and what the turkey might be doing.
- Responsibility: Involve children in cleanup to promote independence and cooperation.
Ideas for Using Your Turkey Apron
Once the apron is finished and fully dry, there are many ways to incorporate it into your seasonal traditions.
- Holiday cooking uniform: Let the child wear their apron whenever they help prepare Thanksgiving dishes.
- Photo tradition: Take an annual picture of the child wearing the apron, then compare how they grow from year to year.
- Gift for relatives: Children can create aprons as gifts for grandparents, teachers, or caregivers.
- Display: Hang the apron on a decorative hook in the kitchen as part of your fall décor.
Frequently Asked Questions (FAQs)
What kind of paint is best for a turkey handprint apron?
Use non-toxic fabric paint designed for textiles. These paints are formulated to bond with fibers and remain flexible after washing, unlike standard poster paints which can crack or wash away.
How do I keep the handprint from smudging?
Make sure the child presses straight down and lifts their hand straight up. Place cardboard under the fabric, avoid moving the apron during printing, and let each print dry before adding more nearby.
Can toddlers safely participate in this craft?
Yes, with close adult supervision and child-safe materials. Apply the paint yourself, keep supplies out of the mouth, and wash hands thoroughly afterwards to remove any residue.
How long will the design last?
If you follow the manufacturer’s drying and heat-setting instructions and wash the apron gently in cool water, the colors can remain vibrant for many seasons of wear.
What if I make a mistake?
Small smudges can often be disguised by turning them into extra feathers, grass, or decorative swirls. If an entire print goes wrong, consider adding another layer of handprints to create a more abstract, colorful background.
References
- Guidance for Using Art Materials Safely — U.S. Consumer Product Safety Commission. 2018-11-01. https://www.cpsc.gov/s3fs-public/5015.pdf
- Family Routines and Rituals — American Academy of Pediatrics. 2018-10-12. https://healthychildren.org/english/family-life/family-dynamics/pages/family-routines-and-rituals.aspx
- Kitchen Safety for Kids — U.S. Department of Agriculture, Food Safety and Inspection Service. 2020-11-19. https://www.fsis.usda.gov/food-safety/safe-food-handling-and-preparation/food-safety-basics/food-safety-tips-children
- The Arts and Creative Problem Solving — National Endowment for the Arts. 2015-03-30. https://www.arts.gov/sites/default/files/Research-Art-Works-Emma-Flynn.pdf