Tu BiShvat, often called the “New Year of the Trees,” is a beautiful opportunity to help children connect Jewish tradition with the natural world right outside their window. This guide walks you through creating vibrant tree sun catchers that celebrate growth, seasons, and light in a way that is simple enough for young artists yet satisfying for older kids and adults.
Why Tu BiShvat Is Perfect for Art Time
Tu BiShvat centers on honoring trees, fruits, and the earth, making it an ideal moment to create art that literally glows with natural light. A window craft turns an abstract idea—respecting nature—into something children can see and touch every day.
As kids trace branches, choose colors, and watch sunlight pour through their creations, they absorb core values: gratitude for the environment, curiosity about seasons, and the joy of bringing beauty into shared spaces. The finished sun catchers become a visual reminder of the holiday long after the day itself has passed.
Project Overview at a Glance
Before diving into details, use this quick overview to decide how the craft will fit your family or classroom time.
| Aspect | Details |
|---|---|
| Recommended age | 3–10 (with adaptations for toddlers and tweens) |
| Estimated time | 30–60 minutes, plus optional dry time if using paint or glue-heavy designs |
| Skill level | Beginner; no drawing experience required |
| Mess factor | Low to medium, depending on whether paint and glitter are included |
| Best setting | Home family night, Hebrew school classroom, or holiday playdate |
Materials: Simple Supplies, Big Impact
These sun catchers are intentionally designed with easy-to-find materials, so you can pull the project together with items you already have or can grab quickly from a craft aisle. Choose paper-based or more durable options depending on how long you want to display the finished art.
Core Materials
- Black or dark construction paper, cardstock, or thin cardboard for the tree silhouette
- Transparent or semi-transparent material for the “stained glass” sections, such as colored tissue paper, cellophane, or colored plastic wrap
- Clear contact paper, laminating sheets, or thin transparency film for the window-friendly base
- Child-safe scissors appropriate for your artists’ ages
- Glue stick or liquid school glue
- Tape (clear or painter’s tape) for attaching to windows
- Optional: twine or thin ribbon if you want to hang from a hook instead of taping
Optional Extras for Personalization
- Markers or paint pens for writing blessings, names, or short messages on the trunks
- Glitter glue for sparkling fruit or blossoms
- Leaf-shaped hole punch or small cookie cutters to trace leaf and fruit shapes
- Pre-cut foam or sticker shapes (leaves, hearts, fruits) for very young crafters
- Natural elements such as pressed leaves or tiny dried flowers (works best with clear contact paper)
Designing the Tree: Shapes That Tell a Story
The tree shape you choose can reflect the theme you want to emphasize: rootedness, abundance, community, or seasonal change. Instead of aiming for realism, think in terms of bold, recognizable silhouettes that are easy for children to cut and decorate.
Tree Style Ideas
- Classic branching tree: One trunk that splits into several large branches, ideal for filling with colorful “fruit” or leaves.
- Round canopy tree: A sturdy trunk topped with a simple circle or oval canopy, perfect for younger kids who are just learning to cut shapes.
- Family tree: A wide-trunk tree with many branches that can hold family members’ names or photos in the leaves or fruit shapes.
- Four-seasons tree: Divide the canopy into quarters and assign each section a different season to highlight the cycle of the year.
Step-by-Step: Creating Your Tree Sun Catcher
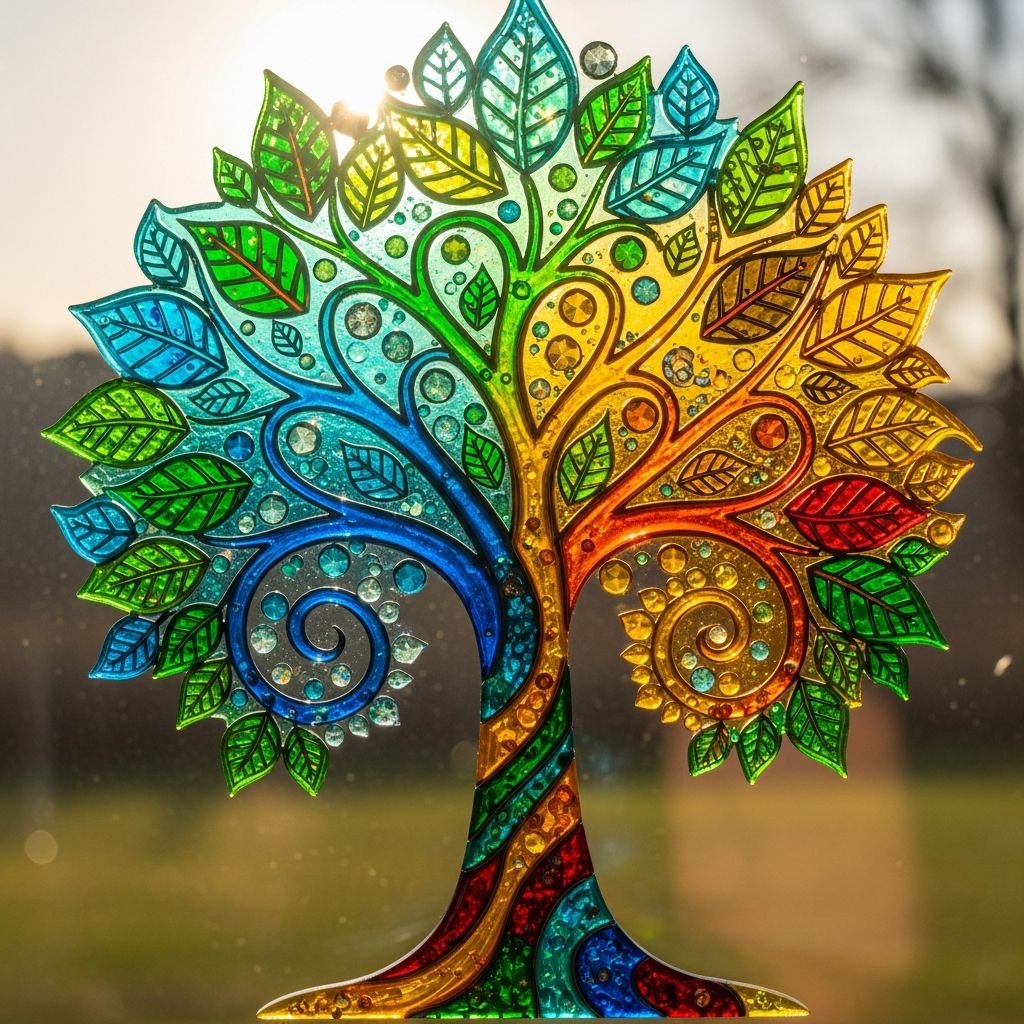
This step-by-step process is flexible; feel free to adapt it to the materials and time you have available. The key is to create a dark outline that frames colorful, translucent sections, just like a mini stained-glass window.
Step 1: Prepare the Base
- Cut a rectangle or circle of clear contact paper or transparency film to the size you want your sun catcher to be.
- If using contact paper, peel off the backing and tape the sticky side up onto the table so it stays in place while kids work.
- For non-sticky bases (such as transparency film), plan to use glue to adhere the tissue paper later.
Step 2: Make the Tree Silhouette
- Draw a large tree trunk and branches on dark paper. Encourage kids to keep the shapes thick so they are easier to cut and more visible in the window.
- Cut out the outside of the tree shape first, then carefully cut “windows” or open spaces between branches where the light will shine through.
- For younger children, pre-cut the tree shapes or provide templates they can trace with help.
Step 3: Add Colorful “Glass” Pieces
- Tear or cut small pieces of colored tissue paper or cellophane in a variety of colors. Irregular shapes work well and add interest.
- Invite kids to arrange the colored pieces on the sticky base (or on the clear sheet if using glue) so they fill the open spaces where the tree’s leaves or fruits would be.
- Overlap colors to create new shades when sunlight passes through. Encourage experimentation: blues over yellows make greens, reds with yellows produce warm oranges, and so on.
Step 4: Attach the Tree
- Place the tree silhouette on top of the colorful pieces, pressing firmly so it adheres to the base.
- Make sure the branches frame the colors, like lead lines in stained glass.
- If using contact paper, you can seal the back with a second piece of clear contact, sticky side down, to protect the tissue or leaf pieces inside.
Step 5: Add Personal Touches
- Use markers or paint pens to write short phrases near the trunk, such as “New Year of the Trees,” “Grow in kindness,” or family names.
- Add small fruit or leaf shapes made from paper or stickers to represent gratitude for specific things (for example, each child writes something they are thankful for on a fruit).
- Trim any excess clear plastic or contact paper around the edges for a neat finish.
Step 6: Display with Intention
- Use clear tape to attach the sun catcher to a bright window. South- or west-facing windows often produce the strongest colors.
- If you prefer to hang it, punch a small hole at the top, thread ribbon or twine through, and tie a knot before hanging on a hook or suction cup.
- Invite kids to say a short blessing, wish, or hope for the trees and the earth as they place the artwork in its final spot.
Connecting the Craft to Tu BiShvat Values
While children work, weave in short, age-appropriate explanations about why trees matter in Jewish tradition and in daily life. Linking conversation to the craft deepens meaning without turning the activity into a lecture.
Conversation Starters While You Create
- Ask kids to name the ways trees help people: providing shade, fruit, oxygen, homes for animals, and materials for books and houses.
- Talk about how Tu BiShvat is like a birthday for trees and what it means to celebrate a “birthday” by caring rather than by receiving gifts.
- Invite children to share one small change they can make to help the environment, such as wasting less paper or remembering to recycle.
Adaptations for Different Ages and Settings
One of the strengths of this project is how easily it scales up or down in complexity. With a few tweaks, you can make it safe and satisfying for toddlers, grade-school artists, or a multi-age group.
For Toddlers and Preschoolers
- Pre-cut tree shapes and tissue pieces; allow children to simply stick the colors onto contact paper.
- Skip small, detailed cuts and focus on large, bold shapes that are easy to recognize.
- Offer chunky stickers or foam shapes that tiny hands can place without frustration.
For Elementary-Age Children
- Encourage them to design their own tree shapes, including roots, nests, or fruit clusters.
- Let them experiment with patterns such as color gradients, stripes, or rainbow branches.
- Invite some research time: kids can choose a real tree from Israel or their local area and base their design on its shape or fruit.
For Tweens and Family Groups
- Create larger, collaborative pieces where each person decorates a branch or section of a giant tree.
- Incorporate writing prompts: have participants write brief reflections or wishes on translucent paper before adding them to the branches.
- Add layering techniques, such as outlining fruit with dark markers or including pressed natural materials between layers of clear film.
Eco-Friendly and Safety Tips
Tu BiShvat highlights the importance of caring for the planet, so consider making the craft itself as eco-conscious and safe as possible. Simple choices in materials and setup can reduce waste while keeping the activity kid-friendly.
Making the Craft Greener
- Reuse packaging plastic as the clear base instead of buying new sheets whenever possible.
- Cut tree trunks from old cereal boxes or paper scraps rather than fresh sheets of cardstock.
- Encourage children to save unused tissue pieces in a small envelope for future projects.
Keeping Everyone Safe
- Use blunt-tip or spring-loaded child scissors for younger artists and supervise cutting closely.
- Choose non-toxic, washable glue and markers to simplify cleanup and prevent irritation.
- Keep very small embellishments, like sequins or beads, away from toddlers who might put them in their mouths.
Extending the Experience Beyond the Craft
The sun catcher can be the starting point for a whole Tu BiShvat-themed afternoon or family night. Linking the art to actions and rituals reinforces the idea that creativity and values go hand in hand.
Ideas to Build On the Project
- After finishing the craft, read a child-friendly story about trees, nature, or Tu BiShvat while the artwork dries.
- Plan a short “tree walk” in your neighborhood or yard, inviting kids to compare real trunks and branches to their designs.
- Create a simple blessing or gratitude circle where each person thanks the earth for something specific—shade, fruit, flowers, or favorite outdoor memories.
Frequently Asked Questions
How long will the sun catchers last?
If you seal the design between layers of clear contact paper or laminate it, the sun catcher can last through multiple seasons without much fading. Tissue paper may gradually soften in color under constant sun, but this can be a nice way for children to see how time and light affect materials.
Can this project work in a classroom with many children?
Yes. Prepare tree templates, pre-cut tissue pieces, and clear bases in advance to streamline the process. Setting up stations—one for cutting, one for coloring, and one for assembly—helps groups move smoothly and keeps the project manageable for teachers or group leaders.
What if my child is not confident about drawing trees?
Offer a few simple outline options to trace, such as a basic trunk and circle canopy. Remind children that real trees come in many shapes, and abstract or imaginative trees are just as meaningful as realistic ones.
Is there a way to involve very young siblings?
Let toddlers press pre-cut tissue pieces onto contact paper, even if their designs are loose and abstract. Older children or adults can later add a tree silhouette on top, turning the toddler’s random colors into a shared family artwork.
Can we reuse the sun catchers next year?
As long as they are stored flat in a dry place away from heavy objects, many designs can be reused. Some families enjoy making new ones each year and hanging older ones in a different window as a record of how their children’s skills and ideas have grown.
Bringing Light, Color, and Meaning to Tu BiShvat
Tree sun catchers are more than a seasonal decoration; they are a hands-on way for children to see how light transforms simple shapes and scraps into something beautiful. As the sun shifts through the day, the changing colors on your walls quietly echo the message of Tu BiShvat: that growth, renewal, and care for the natural world are ongoing processes.
Whether you craft alone with one curious toddler or with a bustling group of students, each glowing tree becomes a reminder that every small creative act—and every small act of environmental kindness—adds up to a brighter, more hopeful world.