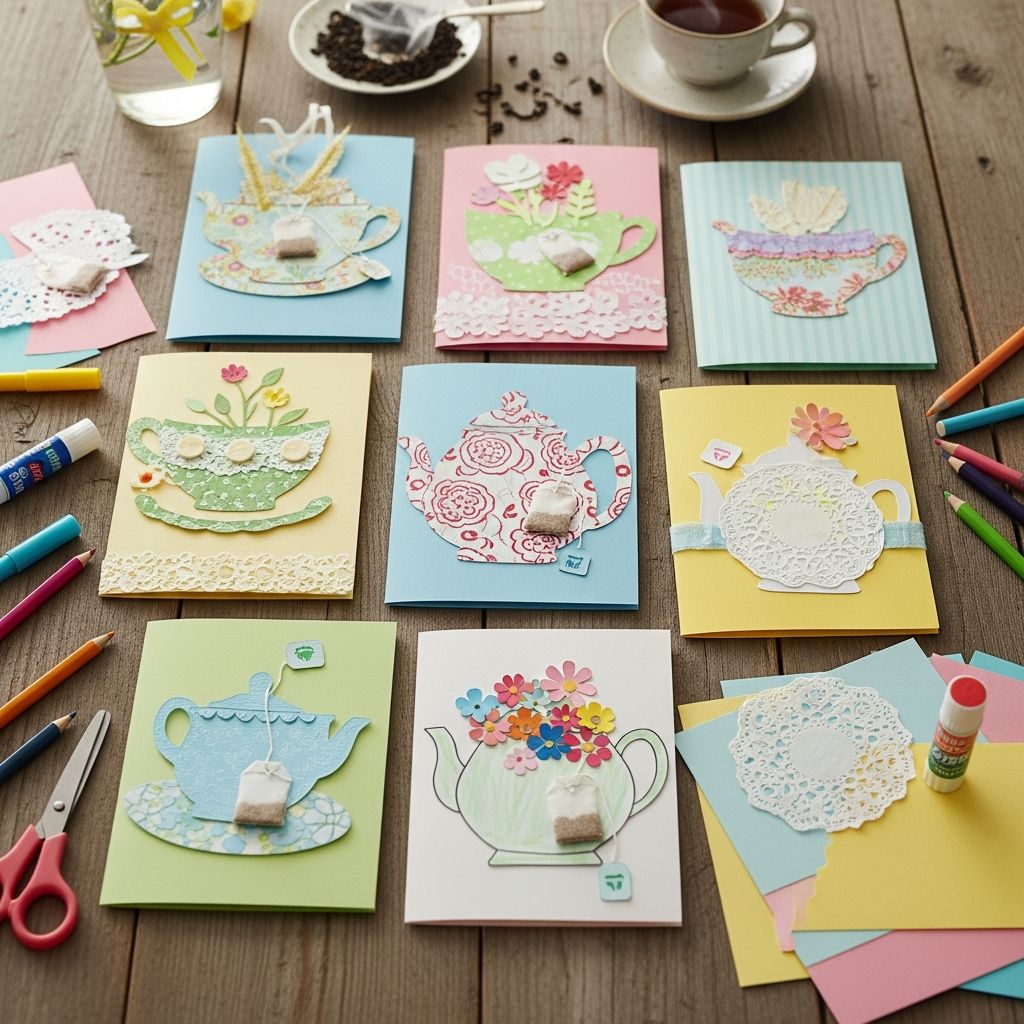
Teachers pour so much time, energy, and care into our kids that a simple, handmade card can mean more than any store-bought gift. A playful, tea-themed card is an easy way to say “thank you” while giving children a fun crafting project and a chance to practice expressing gratitude in their own words.
This guide walks you through creating charming tea-inspired teacher appreciation cards using basic supplies and kid-friendly steps. You will also find wording ideas, variations for different ages, and tips to make the activity meaningful as well as creative.
Why Handmade Cards Matter for Teacher Appreciation
Before diving into the tea theme, it helps to remember why handmade cards are so powerful.
- Personal connection: A card created by a child, in their own handwriting or drawing style, feels more heartfelt and memorable than a generic note.
- Emotional benefits for kids: Research on gratitude practices in children suggests that expressing thanks can support social connection, emotional regulation, and overall well-being.1
- Low cost, high impact: Unlike many gifts, a card does not require a big budget but can still make a big difference for a teacher’s day.
- Built-in learning: Kids practice writing, planning, fine motor skills, and even a bit of design thinking while crafting.
Getting Started: Basic Supplies for Tea-Themed Cards
You do not need specialty tools to make charming tea-inspired cards. Most of the following can be found at home or in a basic craft drawer.
- Cardstock or construction paper (white plus a few bright colors)
- Colored pencils, crayons, or washable markers
- Glue stick or child-safe liquid glue
- Scissors with blunt tips for kids
- Ruler and pencil for simple measuring and sketching
- Optional decorative items: stickers, washi tape, ribbon, buttons, sequins
- Clean tea bags (individually wrapped work best) if you want to attach a real tea treat
If you are working with a group, consider setting up a small “card-making station” with labeled containers for paper scraps, embellishments, and writing tools so children can easily choose what they need.2
Design Idea 1: Classic Teacup Thank-You Card
This design uses a simple teacup shape as the focal point. It works well for preschoolers with help, and older kids can add more detail or lettering.
Step-by-Step Instructions
- Prepare the card base.
Fold a piece of cardstock in half to make a standard greeting card. Place it horizontally if you want a wide teacup, or vertically if you prefer a taller design. - Draw and cut a teacup.
On a separate sheet of colored paper, sketch a simple teacup: a wide U-shape with a flat top and a small handle on one side. Cut it out carefully. - Add details to the cup.
Invite kids to decorate the teacup with stripes, dots, hearts, or classroom-related icons like tiny books or pencils. - Glue the cup onto the card.
Position the teacup near the bottom center of the card front and glue it down. - Create steam swirls.
Use a marker or crayon to draw curly lines rising above the cup. Older children can hide tiny words like “kind,” “smart,” or “patient” inside the steam lines. - Write a tea pun.
Above or below the cup, help kids write a playful message, such as:- “You’re a tea-riffic teacher!”
- “Thanks for pouring your heart into our class.”
- “You’re my cup of tea-ching!”
- Finish with an inside note.
Encourage children to write one or two specific things they appreciate about their teacher inside the card.
Teacup Card Variations
- Photo cup: Glue a small photo of the child onto the cup so it looks like they are “inside” the teacup.
- Patterned cup: Use scrapbook paper or recycled wrapping paper for a fancier look.
- Pop-up cup: Older kids can fold and glue a simple paper stand behind the teacup to make it pop out slightly when the card opens.
Design Idea 2: Tea Bag Pocket Note
This idea combines a card and a tiny, usable gift—perfect for teachers who enjoy a quiet tea break.
How to Make a Tea Bag Pocket Card
- Create your base.
Fold a piece of cardstock to make a standard card. - Design a pocket.
Cut a rectangle from colored paper slightly wider than a tea bag and about two-thirds as tall. Cut the top edge in a gentle curve to mimic a mug or keep it straight for a simpler pocket. - Attach the pocket.
Apply glue along the left, right, and bottom edges only, leaving the top open. Press onto the front of the card to form a pocket. - Slide in a tea bag.
Once the pocket is dry, tuck a wrapped tea bag inside. Herbal teas with kid-friendly packaging often look especially cheerful. - Add a message.
Above or below the pocket, children can write phrases such as:- “You deserve a tea-rrific break!”
- “Have a cup of calm on us.”
- Include a safety reminder.
If you are sending cards home from a classroom, consider a small line inside reminding adults to check ingredients for allergies or preferences.
Optional Embellishments
- Attach a tiny paper “tag” on string to look like a tea bag label hanging from the pocket.
- Use metallic pens for a “steam” outline to give the illusion of warmth.
- Add a small printed label with the child’s name and year; teachers often save cards as keepsakes.
Design Idea 3: Warm Mug of Gratitude
For younger children who prefer bold shapes and simpler details, a large mug design is ideal. It provides a big area to write the teacher’s name or a short word like “THANKS.”
| Step | Action | Child Skill Focus |
|---|---|---|
| 1 | Fold card base and sketch a large mug shape. | Planning, spatial awareness |
| 2 | Cut out and glue mug to card front. | Cutting, gluing, hand strength |
| 3 | Write teacher’s name or a big “Thank you.” | Letter formation, spelling |
| 4 | Add steam lines, hearts, or classroom doodles. | Creative expression, detail work |
Inside the card, suggest that kids complete a sentence starter such as:
- “My favorite thing you taught me was…”
- “You helped me when…”
- “I like your class because…”
Sentence starters can help younger writers organize their thoughts and practice composing short, meaningful messages, which supports early literacy development.3
Helping Kids Write Heartfelt Messages
Many children find the art part easy and the writing part hard. Simple guidance can turn a short note into a cherished keepsake.
Three-Part Gratitude Formula
Encourage children to include three elements in their message:
- Greeting: “Dear Ms. Patel,” or “Hi Mr. Green!”
- Specific gratitude: Name one concrete thing the teacher did or taught.
- Closing: “From,” “Love,” or “Your student,” followed by the child’s name.
For example: “Dear Ms. Patel, thank you for helping me understand fractions and for always making math fun. From, Eli.”
Prompts to Spark Ideas
If a child gets stuck, read them one or two prompts and let them answer out loud first:
- “What is something your teacher does that makes you smile?”
- “When did your teacher help you with something hard?”
- “What’s your favorite memory from this class?”
Turn their spoken answers into short sentences for them to copy or adapt, depending on their age and writing level.
Adapting the Project for Different Ages
One of the best parts of this tea-inspired idea is how well it scales for mixed ages or family groups.
For Preschool and Kindergarten
- Pre-draw cup or mug outlines for kids to color.
- Let children focus on scribble art, stickers, and simple shapes.
- Invite them to dictate a message for an adult to write inside.
For Early Elementary
- Encourage them to cut their own teacups with safety scissors.
- Provide short word banks with phrases like “thank you,” “kind,” and “smart.”
- Have them sign their names and write at least one sentence.
For Upper Elementary and Middle School
- Challenge older kids to design their own tea-related pun or quote.
- Introduce simple layout ideas, like centering text or adding borders.
- Ask them to mention something specific they learned or appreciated during the year.
Group and Classroom Ideas
These tea-themed cards also work beautifully as a class project. Here are a few ways to adapt the activity for multiple students:
- Card bouquet: Each student makes a small tea-themed mini-card. Collect them all in a decorated envelope or gift bag.
- Gratitude collage: Have each child write one word or short phrase on a tea tag shape. Glue all the tags around one large teacup on poster board.
- Rotating station: Set up a drawing station, a cutting station, and a writing station so students can move through in small groups.
Cooperative craft projects like these encourage teamwork and shared responsibility, which many schools highlight as part of social-emotional learning.4
Practical Tips for a Smooth Craft Session
To keep the activity fun for everyone, a bit of preparation helps.
- Pre-cut some shapes: For large groups or younger children, cut a few basic cups and pockets ahead of time.
- Protect surfaces: Use old newspaper or a plastic tablecloth to make cleanup easier.
- Offer choice, but not too much: A limited selection of colors and decorations can prevent kids from feeling overwhelmed.
- Plan drying space: Dedicate a flat area where finished cards can dry without being disturbed.
- Label backs: Write the child’s name and year on the back; teachers often save cards in memory boxes.
Frequently Asked Questions (FAQs)
Q: When is the best time to give teacher appreciation cards?
A: Many families and schools celebrate during Teacher Appreciation Week in the United States, which is typically in early May, but a handmade card is welcome at any point in the school year—especially around report cards, holidays, or the last day of class.5
Q: What if my child’s teacher does not drink tea?
A: You can still use the tea imagery and wordplay without including a real tea bag. Emphasize the warm, cozy symbolism of a cup of tea rather than the beverage itself, or adapt designs to coffee, cocoa, or simply a generic mug.
Q: Are food or drink items allowed in all schools?
A: Policies vary. Some schools restrict edible gifts due to allergies or health guidelines.6 If you are unsure, skip the actual tea bag and focus on the illustrated elements and written message.
Q: How can I make this accessible for kids with fine-motor challenges?
A: Provide larger shapes, wide markers, pre-cut pieces, and sticker options. You might also let the child direct an adult or peer helper: they choose colors and placements, and the helper does the cutting or gluing.
Q: Can we turn this into a digital card instead?
A: Yes. Older children can design a digital teacup or mug in a drawing app and type their message. You can still print it out for the teacher or send it via email if that is more convenient for your school.
References
- Gratitude in childhood and adolescence: The development and benefits of gratitude. — Froh JJ, Emmons RA, Card NA et al., Journal of Positive Psychology. 2011-09-01. https://doi.org/10.1080/17439760.2011.605913
- Helping Your Child Learn Through Everyday Activities. — U.S. Department of Education. 2021-08-01. https://www2.ed.gov/parents/academic/help/learn/learn.pdf
- Teaching Elementary School Students to Be Effective Writers. — Institute of Education Sciences, What Works Clearinghouse. 2012-06-01. https://ies.ed.gov/ncee/wwc/PracticeGuide/17
- Promoting Positive Social and Emotional Development for Young Children. — Centers for Disease Control and Prevention. 2023-04-06. https://www.cdc.gov/ncbddd/childdevelopment/positiveparenting/
- National Teacher Appreciation Week. — National Education Association. 2024-04-10. https://www.nea.org/resource-library/teacher-appreciation-week
- Food Allergies in Schools and Early Care and Education Programs. — Centers for Disease Control and Prevention. 2013-10-01. https://www.cdc.gov/healthyschools/foodallergies/index.htm