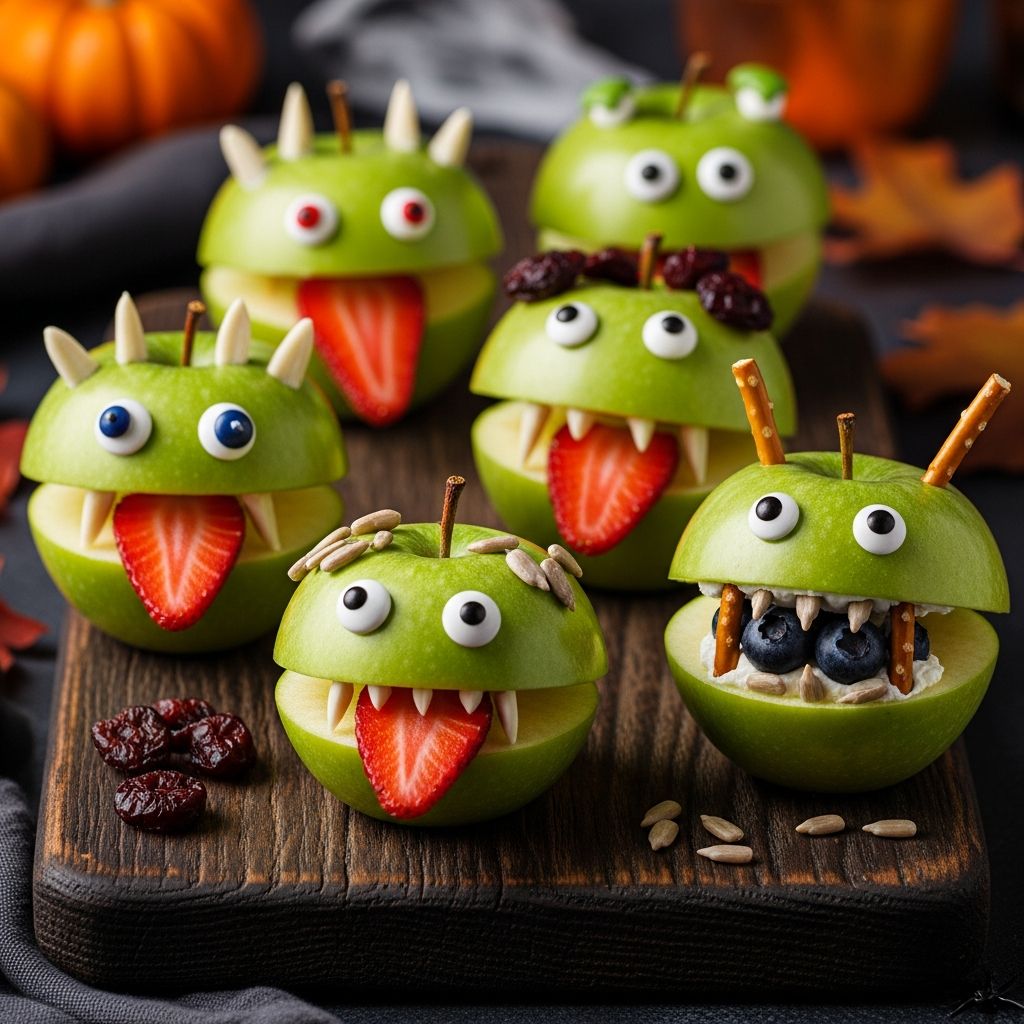
If Halloween usually means a mountain of candy at your house, these spooky apple monsters are a playful way to balance the sugar overload with something fresh, crunchy, and still delightfully creepy. This guide walks through everything you need to know to turn plain apples into edible monsters that kids will be excited to create and proud to serve.
Why Apple Monsters Are the Perfect Halloween Treat
Apple monsters are more than just a themed snack; they are a hands-on activity, a craft project, and a nutrition upgrade wrapped into one. They let kids play with their food in a structured, creative way while still keeping prep straightforward for busy parents and teachers.
- They use simple, widely available ingredients you can find at any grocery store.
- They are easy to adapt for allergies and food preferences.
- They make fruits and healthy toppings feel special and exciting.
- They work just as well for party platters, classroom celebrations, or weekday snacks.
Ingredients and Tools You Will Need
The exact mix of toppings and fillings is flexible, but starting with a basic list helps the process go smoothly. Use this as a shopping checklist and adjust it to suit your family’s tastes.
Core ingredients
- Firm apples (green apples give a spooky look, but any color works)
- Creamy spread (peanut butter, almond butter, sunflower seed butter, or cream cheese)
- Small “teeth” pieces (mini marshmallows, sunflower seeds, almond slivers, or tiny cracker sticks)
- Monster eyes (candy eyes, chocolate chips, small round cereal pieces, or sliced grapes)
- Monster tongues and details (strawberry slices, thin apple wedges, carrot sticks, or fruit leather strips)
Helpful tools
- Sharp knife for adults to slice apples
- Cutting board
- Small butter or table knives for kids to spread fillings
- Spoons or small spatulas
- Lemon juice or diluted lemon water to prevent browning
- Serving plate or tray for arranging the monsters
Step-by-Step: How to Build an Apple Monster
Setting up a simple assembly line keeps the process organized, especially when several kids are involved. Adults handle the cutting, while children take charge of decorating each monster’s face and personality.
1. Prepare the apple “mouths”
- Wash the apples thoroughly and dry them with a clean towel.
- Cut each apple into thick wedges. Larger wedges give more space for teeth and tongues.
- On the skin side of each wedge, carefully slice out a small triangular or oval notch to form an open mouth shape.
- Brush the cut surfaces lightly with lemon juice or dip them in a bowl of diluted lemon water to slow browning.
2. Add the sticky “gums”
- Spread a layer of your chosen creamy filling inside the cut-out mouth area of each wedge.
- Keep the layer thick enough to hold the teeth but thin enough that it doesn’t ooze out when kids handle the snack.
- Arrange the prepared apple mouths on a tray, ready for decorating.
3. Create creepy teeth and tongues
- Press your chosen teeth pieces—mini marshmallows, seeds, or nuts—into the spread along the bottom edge of the mouth.
- For a jagged, monster-like grin, mix large and small pieces instead of keeping them uniform.
- Slide a slice of strawberry, a strip of fruit leather, or a thin carrot piece into the center to act as a tongue sticking out.
4. Finish with monster eyes and details
- Place a small dot of spread on top of the apple wedge where you want each eye to go.
- Attach candy eyes, chocolate chips, or cereal pieces to the dots so they stick firmly.
- Experiment with one-eyed, two-eyed, or three-eyed monsters for variety.
- If desired, add eyebrows or horns using pretzel pieces, seeds, or small fruit bits.
Kid-Friendly Kitchen Safety Tips
Apple monsters are an excellent way to invite kids into the kitchen, but a little planning keeps the experience safe and calm. Decide which tasks are for grown-ups and which are perfect for little hands.
- Assign all cutting jobs to adults or older teens, and keep sharp knives out of reach when not in use.
- Give younger children blunt butter knives or small spoons for spreading fillings.
- Use non-slip cutting boards and keep the work area dry to avoid slips and spills.
- Have kids wash their hands before handling any ingredients and again if they lick their fingers.
Simple Variations for Different Diets
Because Halloween gatherings often involve children with different dietary needs, it helps to design monster snacks everyone can enjoy. A few swaps can transform the same basic idea into a safe option for multiple kids.
| Need | Swap for the Spread | Swap for the Teeth | Swap for the Eyes |
|---|---|---|---|
| Nut-free | Sunflower seed butter or cream cheese | Pretzel pieces or small crackers | Nut-free chocolate chips or small fruit rounds |
| Dairy-free | Seed butter or smooth hummus | Seeds, crunchy cereal pieces, or marshmallows | Dairy-free chocolate chips or candy eyes labeled dairy-free |
| Lower sugar | Unsweetened nut or seed butter | Almond slivers, sunflower seeds, or plain cereal | |
| Gluten-free | Any gluten-free spread | Nuts, seeds, or gluten-free cereal | Gluten-free candy eyes or fresh fruit pieces |
Making Apple Monsters a Party Activity
Instead of presenting finished snacks, try turning monster-building into the main event at your Halloween gathering. Kids love the freedom to design their own bizarre creations, and it doubles as a structured craft that keeps small hands busy.
- Set up a “Monster Bar” with bowls of fillings, toppings, and eyes, plus a tray of pre-cut apple mouths.
- Place small name cards near each child’s work area so they can keep track of their monsters.
- Offer a mix of spooky and silly options—some ingredients that look creepy, and others that are just colorful and fun.
- Provide aprons or old t-shirts to protect costumes from sticky spills.
Encouraging Picky Eaters with Playful Food
For kids who usually avoid fruit, apple monsters can feel like a game rather than a nutrition lesson. Giving them control over how their snack looks often makes them more willing to take a bite.
- Let hesitant eaters handle only the decorating at first; tasting often follows naturally once they are proud of their creation.
- Offer a range of textures—crunchy seeds, soft fruit, and smooth spreads—to make the experience more sensory and interesting.
- Invite kids to name their monsters and tell a quick story about them before eating, turning snack time into a mini storytelling session.
Tips to Keep Apple Monsters Fresh and Presentable
Because apples brown quickly, timing and storage make a big difference in how attractive your monsters look on the platter. With a few simple tricks, you can prepare them in advance without losing that bright, fresh color.
- Dip sliced apples in a solution of water and lemon juice, then pat dry before decorating.
- If making them an hour or two ahead, assemble the monster mouths and refrigerate them on a covered tray.
- Add delicate details like marshmallow teeth and candy eyes closer to serving time to prevent them from softening.
- For travel, pack decorated monsters snugly in a shallow container so they do not roll around and lose their features.
Fun Theme Ideas Using Apple Monsters
These snacks fit easily into almost any Halloween theme, from cute and silly to mildly spooky. A little planning with colors and props helps your apple monsters blend into the rest of the decor.
- Mad scientist lab: Serve the monsters on metal trays or glass dishes labeled as “specimens” alongside beakers of colored juice.
- Monster mash dance party: Give each monster headphones made from pretzel loops and small cereal pieces.
- Haunted forest: Arrange the apple creatures around celery or pretzel stick “trees” on a wooden board.
- Classroom monster parade: Line decorated monsters on a long tray and invite children to walk by and vote for the funniest, scariest, or silliest one.
Frequently Asked Questions About Apple Monsters
Can apple monsters be made the day before?
It is possible to prepare parts of the snack in advance, but for the best texture and appearance, it is safer to slice and assemble them closer to serving time. If you need to work ahead, prep the spreads and toppings the day before and slice the apples the morning of your event.
What apples work best for this recipe?
Firm apples that hold their shape are ideal. Green varieties give a classic monster look, but red or bi-colored apples also create fun contrasts, especially if you are serving a whole tray of different characters.
How do I prevent the spread from sliding off?
A slightly thicker, creamy filling holds teeth and eyes more reliably than a very runny spread. Dry the apple slices lightly after dipping them in lemon water, and avoid stacking monsters on top of each other once decorated.
Are there options without added candy?
Yes. You can make entirely fruit- and nut-based monsters by using sliced grapes, berries, seeds, nuts, and cereal pieces instead of packaged candy. The result is still colorful and cute while keeping added sugar to a minimum.
Can toddlers help make these snacks?
Toddlers can safely help place teeth and eyes as long as all small parts are age-appropriate and supervised. Adults should handle all cutting and keep choking hazards in mind when choosing toppings for very young children.
Bring Halloween to Life with Edible Monsters
Turning crisp apples into silly, toothy monsters is an easy way to add excitement to Halloween without relying solely on candy. With a few simple ingredients and a bit of imagination, children can build an entire cast of characters that doubles as a snack and a creative activity.
Whether you are hosting a full costume party, planning a low-key family movie night, or organizing a classroom celebration, these apple monsters offer a festive centerpiece that invites kids to play with their food, share their creations, and enjoy a treat that feels special, seasonal, and just creepy enough.