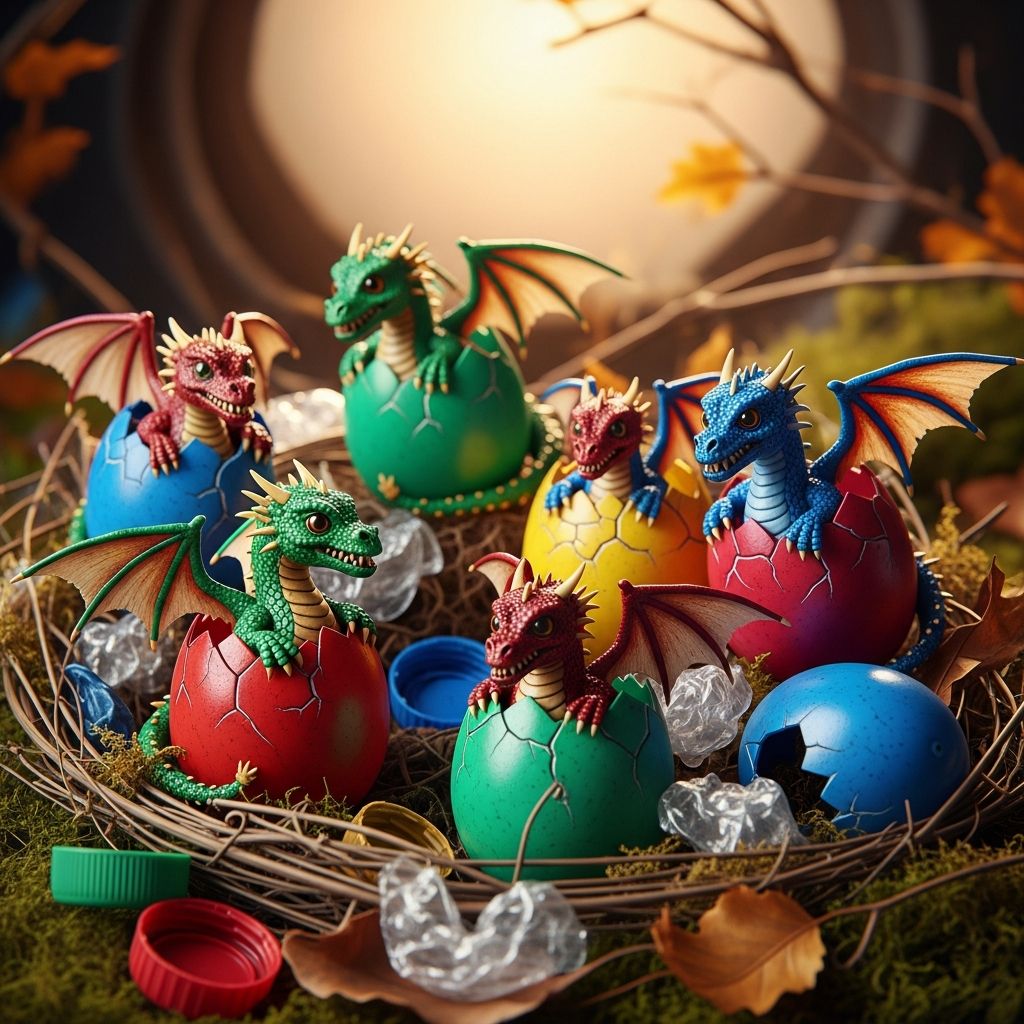
Plastic Easter eggs tend to multiply in storage bins year after year, but they do not have to stay boring. With some paint, glue, and imagination, those hollow eggs can become a whole clutch of dragon hatchlings ready to guard treasure, decorate your holiday table, or star in a homemade fantasy story.
Why Turn Eggs into Dragons?
Dragons fit naturally with the idea of eggs, which makes them a perfect fantasy twist on a traditional Easter or spring craft. Instead of tossing old plastic eggs, you can give them a second life as durable, lightweight dragon figures that kids can play with long after the holiday is over.
- They are an excellent way to reuse plastic eggs that might otherwise be thrown away.
- They work for a wide range of ages, from preschoolers who love painting to older kids who enjoy adding tiny details.
- You can adapt the designs to different themes: cute baby dragons, fierce guardians, or colorful, glitter-covered fantasy creatures.
Materials and Tools
This project relies on simple, easily accessible materials and basic craft tools. Most items can be mixed and matched depending on what you already have on hand.
| Item | Use | Alternatives |
|---|---|---|
| Plastic Easter eggs | Base body for each dragon | Wooden eggs, cardboard eggs, or foam eggs |
| Acrylic craft paint | Color for the dragon body and details | Spray paint (for adults), washable paint for young kids |
| Craft foam or cardstock | Wings, horns, spikes, and ears | Felt, thin cardboard from cereal boxes |
| Glue | Attaching wings and embellishments | Low-temp glue gun, tacky glue, or school glue |
| Markers or paint pens | Drawing eyes, nostrils, and scales | Fine brushes and paint |
| Embellishments | Texture and sparkle | Sequins, rhinestones, glitter, stickers, tiny beads |
Preparing the Egg Base
Before adding dragon details, take a few minutes to prepare the plastic eggs. This makes painting and gluing much easier and helps your dragons last through plenty of playtime.
- Snap each egg firmly closed and, if the seam is loose, seal it with a thin line of glue along the inside before closing.
- Lightly scuff the surface with fine sandpaper or a scrubby sponge so the paint has something to grip.
- Wipe away dust and apply a base coat of white or black acrylic paint if your eggs are very shiny or brightly colored.
Designing Your Dragon Styles
Before you start gluing on wings at random, think about the personality of each dragon. A simple sketch on scrap paper can help you decide where to place horns, what size the wings should be, and how fierce or friendly the face will look.
- Friendly hatchlings: Rounded features, big cartoon eyes, pastel colors, and soft curves.
- Guardian dragons: Sharper horns, metallic or dark colors, and bold patterns like stripes or chevrons.
- Elemental dragons: Color schemes that match fire, water, earth, or air, with matching decorations like glitter “embers” or shell “scales.”
Step-by-Step: Basic Dragon Body
Once your design is roughly planned, you can begin turning a plain egg into a believable dragon body. The process is simple enough for beginners but flexible enough for crafters who love adding tiny details.
- Paint the base color.
Cover the entire egg with your chosen main color using a soft brush or foam brush. A second coat usually gives a smoother finish, especially on glossy plastic. - Add belly and back accents.
Paint a lighter oval on one side to act as the dragon’s belly, then add a darker stripe along the back where spikes will go. - Create subtle scales.
Dab a sponge or crumpled foil into slightly darker paint and gently press it onto the egg for a mottled, scaled effect. - Let everything dry completely.
Drying time is essential before you move on to gluing or drawing details; rushing at this stage can cause paint to peel.
Making Wings, Horns, and Spikes
The silhouette of a dragon is defined by its wings and horns. Lightweight materials keep your figures balanced and safe for play while still allowing you to create dramatic shapes.
- Draw wing shapes on craft foam or cardstock: bat-like with “fingers” work well for classic dragons.
- Cut out small horn shapes (triangles or curved cones) and a line of back spikes sized to fit the egg.
- If using cardstock, color or paint both sides before gluing so the pieces look finished from every angle.
Attach these features once the egg’s paint has dried. Use small dots of glue rather than thick blobs so that wings and horns sit flat and dry quickly.
Bringing the Face to Life
Kids often focus on the dragon’s face first, so this is where you can let personality shine. Decide whether your dragons will look cute, mischievous, or intimidating.
- Use paint pens or fine markers to add large, round pupils for a friendly look or narrow, slitted pupils for a more fearsome stare.
- Draw small nostrils and a curved mouth; a slight upward curve makes the dragon look friendly, while a straighter line or tiny teeth can suggest fierceness.
- Try adhesive googly eyes for a more playful, animated appearance, especially for younger crafters.
Adding Texture and Shine
Once the main features are in place, you can highlight certain areas to make the dragons feel more magical. Texture can be subtle or over-the-top, depending on your taste.
- Glue small rhinestones or sequins along the back to form shimmering scales.
- Brush a thin coat of metallic or iridescent paint along wing edges and horns for a magical glow.
- For a lava or ice effect, dab on clear glue and sprinkle with glitter in warm reds and oranges or cool blues and silvers.
Themed Dragon Ideas
Once you have made one basic dragon, it becomes tempting to create an entire clan. Choosing themes for each dragon makes this process even more fun and opens up storytelling possibilities.
| Theme | Color Palette | Special Details |
|---|---|---|
| Fire Dragon | Reds, oranges, golds | Flame-shaped wings, glitter “embers” on the belly |
| Forest Dragon | Greens, browns, copper | Leaf-shaped wings, tiny faux moss or twine ring around the base |
| Ice Dragon | Whites, pale blues, silver | Sharp crystal-like spikes, iridescent glitter on the back |
| Galaxy Dragon | Dark blues, purples, black | Speckled “star” dots, metallic silver horns |
Creating a Dragon Nest Display
Part of the charm of these dragon eggs is arranging them into a scene. A simple nest or miniature lair turns individual crafts into a complete centerpiece for a mantel, bookshelf, or holiday table.
- Fill a shallow basket or tray with shredded paper, faux moss, or raffia, then tuck the dragons into the materials so they look like they are just hatching.
- Add small gems, coins, or shiny beads to suggest the treasure your dragons are guarding.
- Label each dragon with a tiny name tag or banner to give them a distinct identity and encourage storytelling.
Kid-Friendly Variations
Not every household wants hot glue guns or permanent paints on the table. Fortunately, this project adapts easily for younger crafters and short attention spans.
- Use washable markers instead of paint so kids can decorate and re-decorate their dragons.
- Provide foam stickers or paper shapes with double-sided tape instead of loose embellishments and strong glues.
- Simplify the design to a painted egg with just eyes and a few foam spikes for quick success.
Safety and Durability Tips
Dragons are tough, but plastic eggs can pop open or lose parts if they are handled roughly. A few precautions help your creations survive longer in the hands of curious young dragon tamers.
- Seal both the egg seam and any large decoration joints with a clear-drying glue or varnish to prevent parts from peeling off.
- Choose non-toxic paints and glues, especially if younger children are involved in the crafting session.
- Store finished dragons in a shallow box with tissue or paper between layers to avoid rubbing off paint during the off-season.
Using Dragons for Play and Learning
These dragon eggs are more than simple decorations. They can become tools for imaginative play, storytelling, and even light educational activities when used creatively.
- Encourage children to invent backstories about where each dragon came from, what powers it has, and what kind of world it lives in.
- Use color-coded dragons to practice sorting, counting, or pattern recognition with younger kids.
- Incorporate the dragons into bedtime stories or classroom lessons about myths, legends, and folklore.
Frequently Asked Questions
Can I open the eggs after decorating them?
It is possible to leave the eggs unglued along the seam so that they can still open, but heavy wings or horns may shift out of place if the egg is handled roughly. If you want to hide treats or tiny notes inside, consider keeping decorations lightweight and using a thin strip of removable tape along the seam instead of permanent glue.
What if I only have bright, shiny plastic eggs?
Bright, glossy eggs can still become excellent dragons, but they benefit from a primer or base coat. A quick coat of white, black, or gray acrylic paint helps new colors stick, prevents streaking, and leaves you with a smoother final finish.
How long do these dragon eggs last?
With careful storage and a protective clear coat, plastic-egg dragons can last for several seasons. Because the eggs are lightweight and resistant to breakage, most wear and tear will come from decorations being knocked loose or paint getting scuffed, both of which are easy to touch up.
Can this project work in a classroom or group setting?
Yes, it works well for groups if you prepare in advance. Pre-paint the eggs in a base color, pre-cut foam wings and horns, and set out markers and stickers so each child can focus on individualizing their dragon without waiting for paint to dry between steps.
What if I am not good at drawing faces?
If drawing detailed faces feels intimidating, use simple shapes. Two dots for eyes and a curved line for the mouth can still create a charming expression, especially if combined with bold colors or fun wing designs. Stick-on eyes or printed face stickers also work well for anyone who prefers not to draw at all.
Final Thoughts
Transforming plastic Easter eggs into dragon hatchlings turns a pile of leftover holiday supplies into a magical, story-filled project. Each egg becomes a unique creature with its own colors, features, and personality, inviting both kids and adults to explore creativity, play, and a touch of fantasy long after the candy is gone.