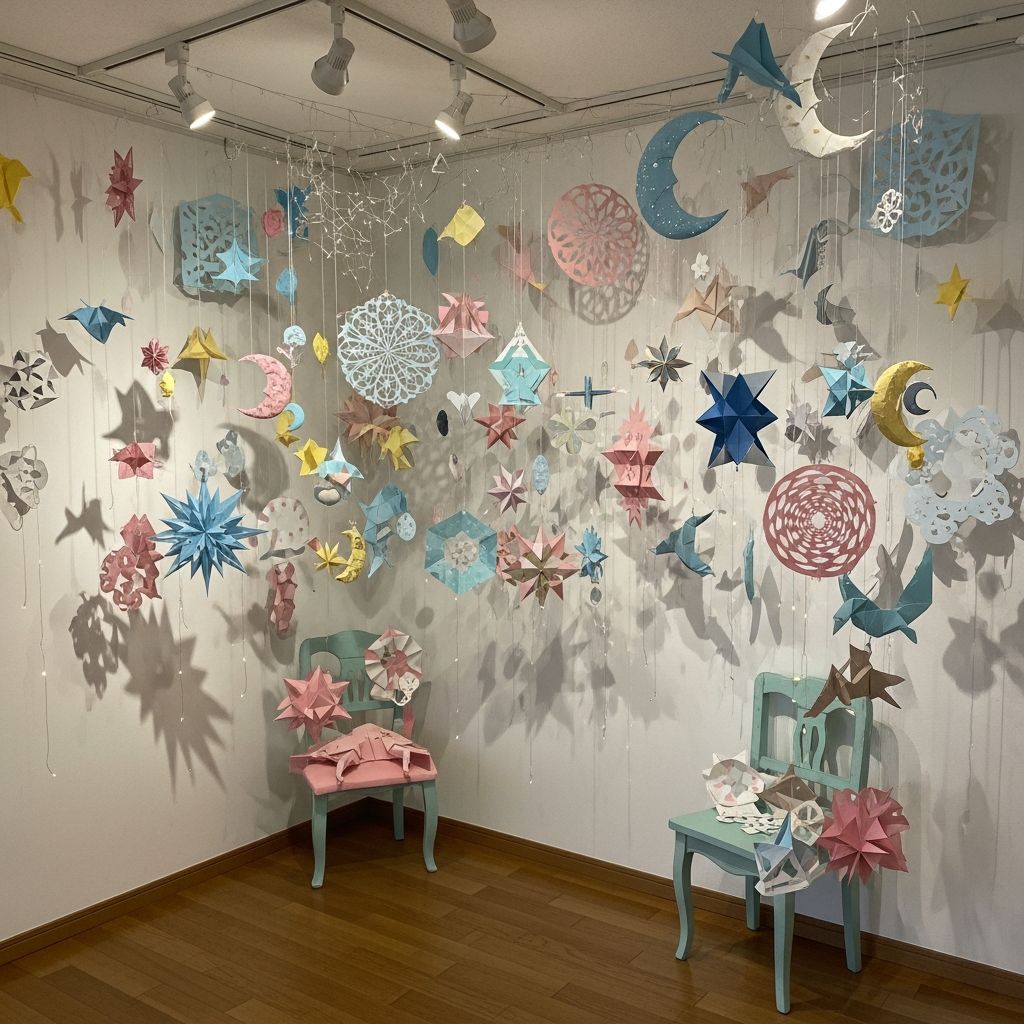
Decorating a room does not have to mean buying expensive art, repainting walls, or investing in custom furniture. With nothing more than paper, string, and a bit of creativity, you can turn a plain room into a colorful, personal, and cozy retreat. This guide walks through practical ideas, simple projects, and styling tips to help you design a look you love on a small budget.
Why Paper and String Are Perfect for Room Decor
Paper and string are surprisingly powerful decorating tools. They are inexpensive, easy to find, and easy to customize to your style, whether you love bright colors, neutral tones, or minimalist lines. Because they are lightweight and non-permanent, they are especially ideal for renters, dorm rooms, kids’ rooms, and anyone who likes to switch things up often.
- Low cost: Use printer paper, scrapbook paper, gift wrap, or even old magazines and paper bags.
- Easy to customize: Cut, fold, paint, or stamp paper for endless shapes, patterns, and textures.
- Renter-friendly: Hang decor with removable adhesive, washi tape, or lightweight hooks.
- Kid-friendly: Many projects are safe and simple enough to do with children, with supervision.
Planning Your Paper-and-String Makeover
Before cutting or hanging anything, take a few minutes to plan. A simple plan will help your decor look intentional and pulled together, not random or cluttered.
Choose a Color Story and Mood
Start with how you want the room to feel: calm, playful, romantic, or modern. Then pick two or three main colors and one accent color. Keeping to a small color palette makes even very simple materials look stylish and unified.
- Calm and airy: Soft blues, whites, pale gray, and light wood tones.
- Playful and bright: Bold primaries, neon accents, and graphic patterns.
- Earthy and warm: Kraft paper, terracotta, mustard, olive green, and twine.
- Romantic and dreamy: Blush, cream, gold, and delicate translucent papers.
Pick Your Feature Area
Decide where your paper and string decor will have the most impact. This prevents the room from feeling visually crowded and helps you focus your efforts.
- Above the bed or crib
- Behind a desk or reading chair
- Over a sofa or entryway console
- Along a hallway or staircase wall
Basic Materials Checklist
You do not need everything on this list, but having a small “decor box” makes tinkering with the room easy.
- Assorted paper (cardstock, scrapbook paper, kraft paper, colored paper, tissue paper)
- String, twine, yarn, baker’s twine, or thin ribbon
- Scissors and, if possible, a hole punch
- Transparent tape, washi tape, or removable wall adhesive
- Optional: markers, paint, stickers, paper clips, mini clothespins
Project Ideas: From Simple to Statement
Below are several project ideas using paper and string. Mix and match them to suit your room size, wall space, and personal taste. Each idea can be scaled up or down depending on how much time you have.
1. Paper Shape Garland
Garlands are one of the easiest ways to fill blank wall space or dress up a shelf, window, or headboard. You can adapt the shapes to match the season or your theme.
- Shapes to try: Circles, hearts, stars, leaves, clouds, triangles, or simple geometric forms.
- How to make: Cut shapes from paper, punch or poke a small hole if needed, and thread them onto string or tape them along a strand.
- Where to hang: Across a window, over a mirror, above the bed, or along shelves.
2. Vertical Paper Mobiles
Vertical strands of paper hanging from the ceiling or a wall hook add movement and softness to a room. They work especially well in corners that feel empty or next to a reading chair.
- Cut matching or varied shapes (such as circles fading from dark to light) and attach them along a string at regular intervals.
- Tie the top of each strand to a small hoop, stick, embroidery hoop, or simply tape it to the ceiling.
- Use lightweight paper so the strands move gently with air currents but do not tug on the tape or hooks.
3. DIY Paper Banner with Words
Add a phrase or word that sets the tone of the room—”READ,” “PLAY,” a child’s name, or a favorite short motto. Keep the wording brief so it stays legible and clean.
- Cut small rectangles, flags, or pennant shapes from sturdy paper.
- Write or stencil one letter on each piece.
- Fold a small flap at the top and tape the flap over a string so the letters hang evenly.
- Hang above a bed, door, or desk for an instant focal point.
4. Floating Photo and Memory Line
Photos, postcards, kids’ drawings, and ticket stubs can all become decor when they are displayed cleverly instead of hidden in drawers.
- Stretch a length of string across a wall using removable hooks or washi tape at each end.
- Clip photos and mementos to the string using mini clothespins or paper clips.
- Layer in small paper cutouts, handwritten notes, or quotes to add texture and color.
5. Layered Paper Wall Collage on String
For a more artistic feel, create a wall collage that combines string, paper, and overlapping shapes. This works well when you want a large impact but have a small budget.
- Run several vertical strings from the top of the wall down to halfway or two-thirds of the wall height.
- Attach paper shapes, small envelopes, paper flowers, or tiny folded forms along the strings, staggering the heights.
- Over time, tuck in new memories or drawings to keep the collage evolving.
Decor Style Ideas for Different Rooms
Paper and string are flexible enough to fit every room in the home. Below is a quick overview of how you might adapt these ideas to specific spaces.
| Room | Suggested Decor | Best Paper Types |
|---|---|---|
| Nursery or kids’ room | Cloud or star garlands, name banners, gentle mobiles | Soft colors, cardstock, tissue paper for lightness |
| Teen bedroom | Photo lines, bold word banners, geometric garlands | Bright patterned paper, magazine pages, metallic accents |
| Living room | Neutral-toned garlands, layered wall hanging, seasonal pieces | Kraft paper, textured papers, subtle prints |
| Home office | Motivational word banner, calendar or memo line, small mobile | Minimalist solid colors, notecards, grid or dot paper |
| Entryway | Welcome banner, key message board, mini garland around a mirror | Durable cardstock, laminated pieces if handled often |
Step-by-Step Example: Simple Circle Garland
To make the ideas more concrete, here is one detailed project you can adapt in many ways. Circles are classic, easy to cut, and work with almost any style.
Materials
- Colored or patterned paper
- Round object for tracing (cup, lid, stencil) or a circle punch
- Scissors
- String, twine, or thin yarn
- Tape or glue
Instructions
- Trace and cut circles. Trace several circles on your chosen paper and cut them out neatly. Aim for at least 20–30 for a long garland.
- Arrange your pattern. Lay the circles out on a table in the order you want them to appear—alternating colors, creating gradients, or mixing patterns randomly.
- Attach to string. Roll out a length of string slightly longer than you think you need. Tape or glue the top of each circle to the string, leaving a small gap between each one.
- Secure the ends. Tie small loops at each end of the string to make hanging easier.
- Hang and adjust. Use tape or hooks to hang the garland. Step back and adjust spacing or angle until it feels balanced.
Making It Safe and Renter-Friendly
Even simple materials deserve a few safety and practicality checks, especially around children, pets, or rented walls.
Protecting Walls and Paint
- Use removable adhesive hooks or strips wherever possible.
- Test a small piece of tape on an inconspicuous area before using it widely.
- Avoid very heavy clusters of paper that might pull paint off when removed.
Child and Pet Safety Tips
- Keep long cords and hanging strands out of reach of babies and small children.
- Avoid placing delicate paper decor where pets can chew or pull it down.
- Use blunt scissors and supervise kids during any cutting or hanging.
Upcycling and Eco-Friendly Ideas
Decorating with paper and string is a great opportunity to reuse materials you already have. Upcycling not only saves money but also keeps the look unique.
- Turn old magazines, maps, and book pages into garlands and collages.
- Use brown paper bags for a warm, rustic feel that pairs beautifully with simple cotton string.
- Save gift wrap, greeting cards, and paper packaging with interesting patterns for future projects.
Finishing Touches: Styling Like a Pro
A few simple styling guidelines can help your handmade decor look cohesive and intentional rather than busy.
- Repeat elements: Use the same shape or color in multiple places to tie areas together.
- Vary scale: Combine small delicate pieces with one or two larger focal elements.
- Leave breathing room: Do not cover every inch of wall; empty space helps your creations stand out.
- Change with the seasons: Swap in new colors or motifs for holidays, birthdays, or a fresh mood.
Frequently Asked Questions
How can I make paper decor look grown-up, not childish?
Choose a limited color palette, avoid overly busy patterns, and lean toward geometric shapes or simple silhouettes. Using neutrals such as white, taupe, gray, or black with one accent color keeps the overall effect modern and sophisticated.
Will paper and string decor last a long time?
Durability depends on where you place it and what kind of paper you use. Heavier cardstock and scrapbook paper will hold up longer than thin printer paper or tissue. Keeping decor away from direct sunlight and moisture will also help prevent fading and warping.
Can I use these ideas in a rental without damaging the walls?
Yes. Focus on lightweight pieces and rely on removable hooks, poster putty, or gentle tape designed for walls. Avoid nails and very heavy installations, and always remove adhesives slowly when you are ready to take the decor down.
What if I am not “crafty” or artistic?
Start with the simplest projects: straight garlands of basic shapes, photo lines, or banners with short words. You do not need advanced drawing skills—tracing household items like lids, boxes, and rulers is often enough to create clean, pleasing designs.
How do I keep the decor from looking cluttered?
Limit yourself to one main focal wall or area and choose a small family of shapes and colors. If the room starts to feel busy, remove one element at a time until it feels calm and intentional again.
Bring Your Walls to Life
With just paper and string, you can build a room that reflects your personality, celebrates your memories, and feels warm and welcoming. Because these materials are inexpensive and easy to change, you have full permission to experiment: try a new color, shift a garland, or swap out photos whenever you like. A home that evolves with you, one small project at a time, often feels more special than any store-bought decor.