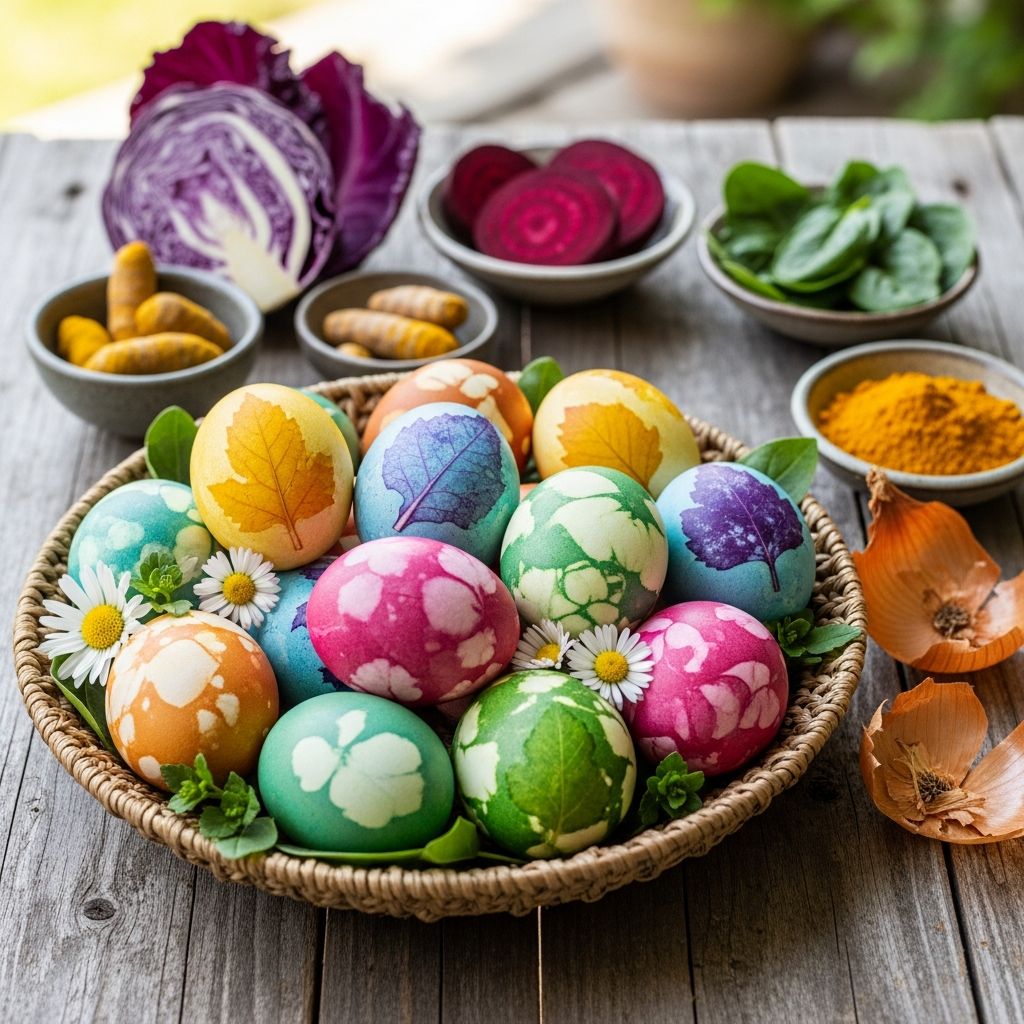
Transform ordinary eggs into colorful masterpieces using ingredients from your kitchen and garden. This approach avoids synthetic dyes, offering a healthier, sustainable alternative for Easter celebrations that families can enjoy together.
Why Choose Natural Dyes for Easter Eggs
Natural dyeing taps into time-honored traditions, producing subtle, earthy tones impossible with commercial kits. It encourages creativity, reduces waste by repurposing scraps, and minimizes exposure to artificial chemicals. Parents appreciate the safety for young children, while the process fosters mindfulness about nature’s palette.
- Safety first: All materials are food-grade or plant-based, non-toxic even if ingested accidentally.
- Eco-benefits: Biodegradable dyes prevent environmental pollution from synthetic runoff.
- Unique results: Each batch yields one-of-a-kind shades influenced by ingredient freshness and soak time.
Historical practices from various cultures highlight natural dyes’ enduring appeal, from onion skins in Europe to turmeric in Asia. Today, this craft aligns with modern sustainability goals.
Gathering Your Supplies
Stock up on basics before starting. You’ll need hard-boiled eggs (heritage breeds add natural base colors), white vinegar for color-setting, pots for simmering, strainers, and natural materials. For patterns, collect small leaves, flowers, pantyhose scraps, rubber bands, or twine.
| Essential Tools | Natural Dye Sources | Optional Add-Ons |
|---|---|---|
| Stainless steel pots Wooden spoons Strainers or cheesecloth | Onion skins Beets Turmeric powder | Pantyhose for wrapping Leaves/flowers Baking soda for pH shifts |
| Glass jars for soaking Tongs for handling | Red cabbage Coffee grounds Hibiscus flowers | Vegetable oil for shine Pinch bowls |
Prepare 6-12 eggs per color batch. Use room-temperature hard-boiled eggs to prevent cracking; cool them fully first.
Mastering Basic Dye Baths
Creating dye starts with extracting pigments through simmering. Chop or peel ingredients generously—more material means deeper hues. Add 2-3 tablespoons vinegar per quart of water to help colors bind to the eggshell’s porous surface.
Step-by-Step Dye Preparation
- Fill pot with dye material (e.g., skins from 10 onions).
- Cover with water, bring to simmer (not boil) for 30-60 minutes until richly colored.
- Strain solids, stir in vinegar, cool slightly.
- Add eggs, simmer gently 15-30 minutes, then soak overnight for intensity.
Experiment with ratios: Weak brews yield pastels; concentrated ones produce jewels. Always strain to avoid gritty textures.
Color Palette from Nature
Nature offers a spectrum from soft pastels to bold gems. Results vary by water pH, material age, and duration—embrace the unpredictability.
| Ingredient | Color Outcome | Tips for Best Results |
|---|---|---|
| Yellow onion skins | Golden orange to rusty brown | Simmer 45-60 min; soak overnight |
| Beets or beet powder | Vivid pink to magenta | Chop fresh beets; add extra vinegar |
| Turmeric powder | Bright yellow to marigold | Use 2-3 tbsp per quart; stir well |
| Red cabbage | Blue to purple | Shred finely; adjust with baking soda |
| Coffee or black tea | Taupe to deep beige | Brew strong; multiple dips darken |
| Hibiscus flowers | Lavender to teal | Dried works best; gentle simmer |
For shifts, add vinegar for acidity (pinks/blues) or baking soda for alkalinity (greens/purples). Test small batches first.
Creating Stunning Patterns and Designs
Elevate plain dyes with resist techniques. Leaves and flowers block dye, revealing white motifs against tinted shells.
Leaf and Flower Imprinting
- Dampen egg slightly; press flat leaves (parsley, ferns, baby’s breath) or petals onto surface.
- Stretch pantyhose tightly over egg, securing with twist tie or string—ensure no gaps.
- Submerge in warm dye bath, simmer 20-30 minutes, cool overnight.
- Unwrap carefully post-soak; rinse gently.
Pro tip: Use a colander over steaming pots for vapor-set prints without full submersion, preserving delicate botanicals.
Tie-Dye and Speckle Effects
- Wrap eggs with rubber bands or fabric strips before dyeing for banded patterns.
- For speckles, simmer in beet dye, then brush-rinse selectively for mottled looks.
- Layer dips: Start pale, re-dip darker for ombre effects.
Practice on extra eggs; tighter wraps yield crisper designs.
Advanced Techniques for Vibrant Results
Refine your craft with these pro methods. Heritage eggs (Araucana for blue, Marans for chocolate) provide stunning bases.
- pH Play: Red cabbage shifts dramatically—vinegar turns pink, soda green. Monitor changes in separate jars.
- Extended Soaks: Refrigerate in dye 24-48 hours for jewel tones without heat.
- Multi-Stage Dyeing: Dye once, dry, unwrap partially, redye for hybrid patterns.
- Shimmery Finish: Buff with vegetable oil post-drying for natural gloss.
Ventilate workspaces when using powders like turmeric to avoid inhalation. Supervise kids closely around hot pots.
Safety Guidelines for Family Crafting
Prioritize well-being during this hands-on activity. Natural doesn’t mean risk-free—hot liquids scald, powders irritate.
- Work in ventilated areas; wear masks for fine powders.
- Keep pets and toddlers away from dye stations.
- Use tongs for hot eggs; cool dyes before child handling.
- Discard used baths down drains—they’re harmless but may stain.
For blown-out eggs (long-lasting decor), pierce top/bottom, blow contents, rinse thoroughly before dyeing.
Troubleshooting Common Issues
| Problem | Cause | Solution |
|---|---|---|
| Faint colors | Insufficient material or short soak | Increase ingredients; soak longer |
| Cracked shells | Cold eggs in hot dye | Bring all to room temp first |
| Muddy hues | Over-mixed dyes or old materials | Use fresh batches; strain well |
| Slippery patterns | Loose wrapping | Tie tighter; use thin stockings |
Patience yields perfection—imperfections add charm.
Frequently Asked Questions
Can I eat the eggs after natural dyeing?
Yes, if refrigerated promptly and consumed within days. Rinse well; discard if cracks appear.
How long do dyed eggs last?
Hard-boiled: Up to a week in fridge. Blown-out shells: Indefinitely as decor.
What if I don’t have pantyhose?
Substitute cheesecloth, coffee filters, or flour paste for resists—results vary.
Are these dyes vegan?
Yes, using plant/spice sources; skip any animal-derived mordants.
Can I reuse dye baths?
Limited—add fresh vinegar and material for second batches, expect lighter shades.
Holiday Tips and Variations
Host a dye party: Set stations by color. Pair with egg hunts using these beauties. For non-Easter twists, adapt for solstice or harvest crafts. Store extras in displays; their organic fade tells a story.
Engage senses—smell simmering beets, feel textures, watch colors bloom. This craft builds memories beyond the holiday.
References
- Dye Easter Eggs With Natural Dyes — Botanical Colors. 2023-01-15. https://botanicalcolors.com/dye-easter-eggs-with-natural-dyes/
- Naturally Dyed + Patterned Easter Eggs — Kathryn Davey. 2022-04-10. https://kathryndavey.com/how-to-make-naturally-dyed-patterned-eggs/
- Dye Easter Eggs in Nature’s Hues — Fine Gardening. 2021-03-25. https://www.finegardening.com/article/dye-easter-eggs-in-natures-hues
- Naturally Dyed Eggs for Easter – a tutorial — Petal Plum. 2023-04-05. https://petalplum.com.au/blog/naturally-dyed-eggs-for-easter-a-tutorial
- Coloring Eggs Naturally — The Ranch Table. 2024-03-20. https://theranchtable.com/blogs/field-notes/natural-easter-egg-dyes