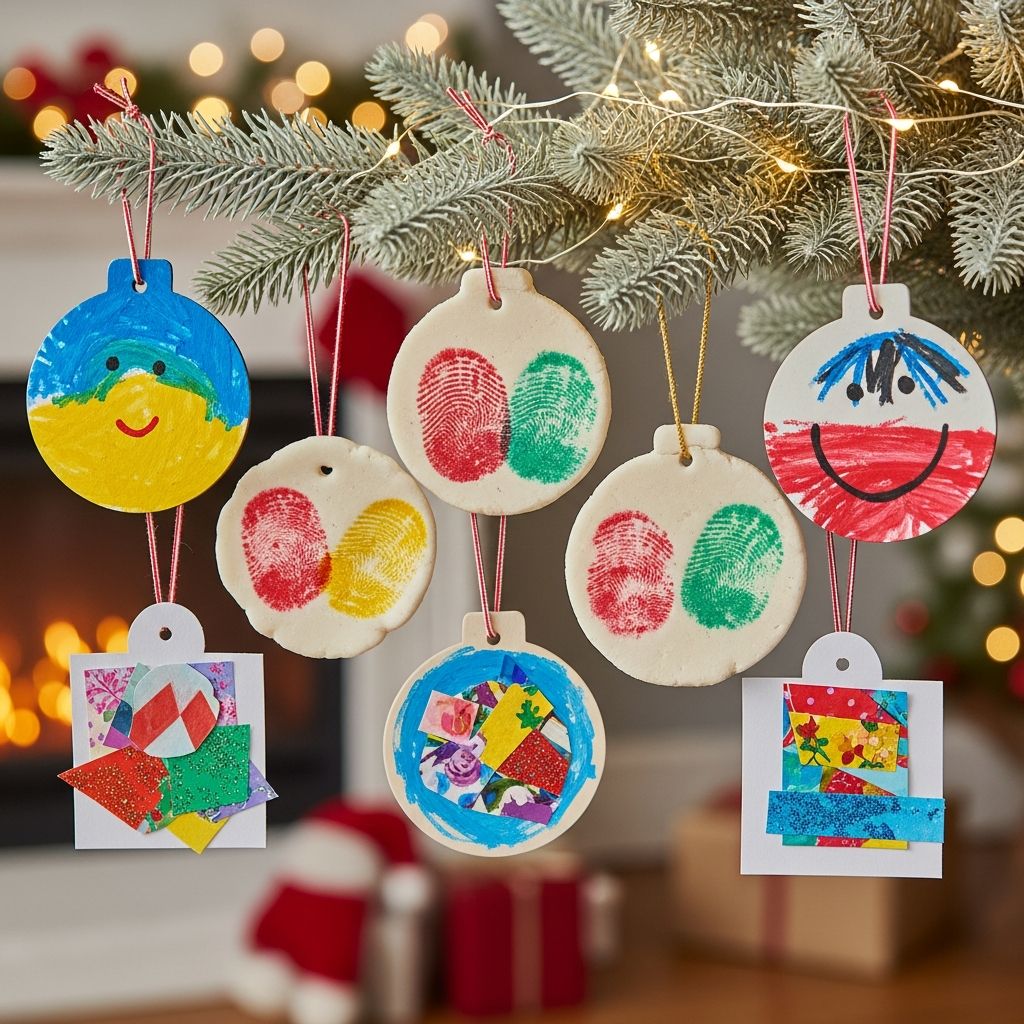
Every refrigerator gallery tells a story: a lopsided snowman, a rainbow that ignores the lines, a bold scribble drawn with serious concentration. Holiday ornaments made from children’s art are a way to move those fleeting masterpieces from paper to something your family will unpack and smile at year after year.
This guide walks you through how to transform everyday kid-made art into durable, meaningful ornaments, with practical tips on materials, project ideas for all ages, and ways to display and store your keepsakes.
Why Turn Kids’ Art into Ornaments?
Transforming your child’s art into ornaments does more than decorate a tree; it preserves memories in a format your family can revisit every holiday season. Instead of throwing away piles of paper or leaving drawings in a box, you can highlight the most meaningful pieces as part of your yearly traditions.
Ornaments also give kids a sense of pride and ownership over the holiday environment. When they see their work displayed alongside cherished decorations, they feel that their creativity matters.
- Ornaments condense bulky artwork into small, manageable keepsakes.
- They create an easy way to mark each year of your child’s growth.
- They make heartfelt, low-cost gifts for grandparents, teachers, and friends.
Planning Your Ornament-Making Session
Before you start cutting and gluing, take a moment to set yourself up for success. Planning ahead ensures that the crafting time feels fun instead of frantic for both you and your child.
Choose the Right Time and Space
- Pick a block of time when no one is rushed, such as a weekend morning.
- Cover your table with kraft paper, an old tablecloth, or garbage bags for easy cleanup.
- Keep paper towels and wipes handy for paint and glue mishaps.
Gather Basic Supplies
You do not need specialty craft equipment to create meaningful ornaments. Many materials can be pulled from your recycling bin and existing art stash.
- Children’s drawings, paintings, doodles, or school projects.
- Cardstock or thin cardboard (from cereal boxes or packaging).
- Scissors, child-safe scissors, and a hole punch.
- Glue sticks, white glue, or double-sided tape.
- String, yarn, ribbon, or twine for hanging.
- Optional: clear packing tape, contact paper, or laminating pouches for durability.
Choosing Which Artwork to Use
Not every piece of art needs to become an ornament. Focus on those that capture a feeling, a milestone, or a phase of your child’s development. This is less about perfection and more about emotional connection.
- Look for recurring themes your child loves to draw, like rockets, animals, or princesses.
- Include early scribbles for younger children to show how their style evolves over time.
- Consider seasonal pieces—snowflakes, trees, stars—but do not limit yourself to holiday imagery.
Involving your child in the selection can be surprisingly meaningful. Ask questions like, “Which picture makes you happiest?” or “Which one do you want to show Grandma on the tree?”
Simple Ornament Styles for All Ages
The best ornaments use straightforward techniques so kids can do most of the work themselves. Below are several styles that adapt easily to different ages, skill levels, and art materials.
1. Framed Mini-Masterpieces
Turn sections of drawings and paintings into tiny framed pieces that hang on the tree.
- Cut cardstock or thin cardboard into small shapes such as circles, squares, or hearts.
- Cut out a favorite portion of your child’s artwork slightly smaller than the backing shape.
- Glue the art onto the backing and trim any excess.
- Optional: Add a second backing shape behind it to create a border or “frame.”
- Punch a hole at the top and add ribbon or twine for hanging.
This style works well for abstract art, watercolors, and finger paintings, especially when the color and texture are the main attraction.
2. Collaged Keepsake Shapes
Collage ornaments let you combine multiple pieces of art into one new design. They are perfect when you have small scraps or partially torn drawings.
- Trace large shapes (stars, trees, mittens, circles) onto lightweight cardboard.
- Cut or tear pieces of your child’s artwork into smaller chunks.
- Glue the pieces onto the cardboard shape, slightly overlapping to cover all edges.
- Trim around the shape again for a clean outline.
- Optional: Seal the front with clear tape or contact paper for durability.
3. Laminated Doodle Discs
If you have access to a laminator or self-sealing laminating sheets, you can create polished, long-lasting ornaments from even the most delicate doodles.
- Cut drawings or paintings into small circles or rectangles.
- Write the child’s name and year on the back or along the bottom.
- Place the cut piece into a laminating pouch, leaving space around the edges.
- Laminate and then cut around the design, leaving a thin clear border.
- Punch a hole in the laminated edge and add a ribbon loop.
The clear surface also lets kids add stickers or metallic markers on top for extra sparkle.
Project Ideas by Age Group
Different ages bring different motor skills, attention spans, and artistic styles. Tailoring your ornament projects to your child’s stage makes the process smoother and more enjoyable.
| Age Range | Best Materials | Suggested Ornament Style | Adult Involvement |
|---|---|---|---|
| Toddlers (1–3) | Finger paint, chunky crayons, stickers | Simple collaged shapes, sealed scribble discs | High (cutting, gluing, hanging) |
| Preschool (3–5) | Washable markers, tempera paint, foam shapes | Framed mini-masterpieces, layered paper ornaments | Moderate (help with tracing and cutting) |
| Early Elementary (6–8) | Colored pencils, watercolor, stamps | Laminated doodle discs, illustrated story ornaments | Low to moderate (guidance and safety checks) |
| Tweens (9–12) | Fine-tip pens, mixed media, collage materials | Layered mixed-media ornaments, mini comic panels | Low (mainly setup and cleanup) |
Adding Personal Details and Dates
What transforms a pretty piece of art into a true keepsake is the context you add around it. Years from now, you will want to know who created each piece and when.
- Write the child’s name and age on the back with a permanent pen.
- Add the year or even the exact date if the artwork marks a special occasion.
- Use a short phrase such as “First year of preschool” or “Our first holiday in the new house.”
If you worry about your handwriting fading, consider adding a small printed label sticker or writing on a piece of tape stuck to the back.
Creative Ways to Display Kids’ Art Ornaments
While a traditional tree is the most obvious place to hang ornaments, there are many other ways to showcase your child’s creativity during the holidays.
- Dedicated kids’ tree: Set up a small tabletop tree in a child’s room or playroom just for their creations.
- Window garland: String ornaments onto ribbon and hang them across a window or doorway.
- Mantle or shelf display: Prop flat ornaments against books or picture frames along a shelf.
- Gift toppers: Use an ornament in place of a bow on wrapped presents for family members.
Displaying ornaments beyond the tree builds anticipation as kids recognize their own work decorating many parts of the home.
Making Ornaments Last for Years
Paper-based ornaments are more fragile than store-bought glass or plastic ones, but a few simple steps can keep them in good shape for many seasons. Think of them as scrapbooking elements made to hang, and protect them accordingly.
- Laminate or cover the front and back with clear contact paper to resist moisture and fingerprints.
- Store ornaments in a sturdy box, layering tissue paper or paper towels between them.
- Keep them away from direct sunlight when not on display to minimize fading.
- Use acid-free pens and glues when possible for longer-lasting colors.
Even if some pieces show wear over time, the signs of age can add charm, reminding you of how long those tiny hands have been creating.
Involving the Whole Family
Ornament-making can easily become a yearly tradition that everyone looks forward to. Each family member, regardless of artistic confidence, can contribute something to the collection.
- Let older siblings help younger ones with tracing shapes or tying ribbons.
- Invite grandparents to contribute a simple drawing or handwritten message to include as part of the ornament set.
- Plan a family “reveal night” where everyone hangs this year’s new ornaments together and tells the story behind each one.
This shared activity strengthens family bonds and builds a sense of continuity from one holiday season to the next.
Tips for Stress-Free Crafting with Kids
Holiday crafting can be joyful, but it can also feel overwhelming if expectations are too high. A few mindset shifts help keep the focus on connection rather than perfection.
- Embrace mess and imperfection; a smudged fingerprint often becomes the most loved detail.
- Offer simple choices instead of open-ended demands: “Do you want a star or a circle?” instead of “What do you want to make?”
- Prepare materials in advance—precut shapes, sorted scraps—so kids can dive right into creating.
- Take breaks when interest fades; you can always finish a project later.
When the priority is having fun together, the final ornaments usually turn out charming, even if they are not symmetrical or polished.
Frequently Asked Questions
How many ornaments should we make each year?
There is no right number, but many families like to create one ornament per child per year. That makes it easy to look back over time without feeling buried in clutter. If your child is particularly enthusiastic, you can still encourage more crafting while choosing only a few favorites to keep long term.
What if my child’s art is mostly scribbles?
Early scribbles capture an important stage in development and can look beautiful when cut into shapes or used in collages. Focus on color and motion rather than recognizable images. Labeling the back with your child’s age and a short note can help those pieces feel just as special as more detailed drawings later on.
Can we use digital art for ornaments?
Yes. If your child loves drawing on a tablet or computer, print favorite pieces on cardstock, then cut and mount them just as you would with traditional paper art. You can also resize digital images easily to fit specific ornament shapes.
How do I prevent ornaments from warping or curling?
Mounting thin paper onto sturdier cardboard helps keep it flat. Applying adhesive evenly across the back and pressing the piece under a heavy book while it dries can also reduce curling. For long-term stability, consider laminating finished ornaments.
What if my child does not like their older artwork later?
As kids grow, they may be critical of their earlier work. Use this as an opportunity to talk about progress and how skills improve with practice. You can invite them to make a new ornament that reflects who they are now, while still keeping at least a few older pieces as part of the family story.
Final Thoughts on Turning Art into Tradition
Holiday seasons move quickly, and children grow and change with surprising speed. By transforming their everyday art into ornaments, you capture snapshots of who they were each year, in their own lines and colors. The tree or garland becomes less a generic decoration and more a living scrapbook of your family’s creative life.
With simple materials, a little planning, and a willingness to embrace imperfection, you can build a collection of ornaments that will make future holiday unpacking as joyful as the day they were made.