A dessert bar turns ordinary parties into unforgettable celebrations. Instead of serving just one cake, you offer a playful spread of bite-sized treats that guests can mix and match all night long.
This guide walks through every step of planning an impressive dessert bar: choosing a theme, building a balanced menu, organizing prep, styling the table, and handling storage and service. Use it for birthdays, weddings, baby showers, graduations, holidays, or any event where sweets are the star.
Why Dessert Bars Are So Popular
Dessert bars work because they combine flavor, fun, and flexibility. They also photograph beautifully and can double as decor for your event.
- Variety for every guest: Guests can sample different flavors and textures instead of committing to a single slice of cake.
- Built-in entertainment: A well-styled dessert bar acts as a visual centerpiece and conversation starter.
- Scalable for any budget: You can DIY everything, mix homemade and store-bought, or hire a bakery or caterer.
Step 1: Clarify Your Party Details
Before planning specific desserts, anchor your decisions with a few key details about your event. These basics will shape your menu, table size, and quantities.
- Guest count: Estimate how many people will attend and add 10–15% for last-minute additions.
- Event type: Formal weddings and casual backyard parties call for different presentation styles.
- Time of day: Afternoon events may suit lighter bites; late-night receptions can feature richer sweets.
- Location: Outdoor heat, limited refrigeration, or travel time will affect what you can safely serve.
Step 2: Choose a Clear Dessert Bar Theme
A theme gives your dessert bar focus and makes planning easier. It doesn’t need to be elaborate; even simple cues help unify the look and flavors.
Theme ideas to consider
- Color palette: Pastels for baby showers, jewel tones for evening events, or a two-color scheme that matches your party decor.
- Flavor focus: “All chocolate,” “citrus and berries,” “coffee shop treats,” or “caramel & toffee.”
- Seasonal theme: Cozy fall (spice, caramel, apple), summer fruits (peach, berry, lemon), winter sparkle (peppermint, rich chocolate).
- Occasion-specific: Bridal elegance, children’s storybook, retro diner, movie night, or tropical luau.
Once you pick a theme, use it to guide dessert choices, display pieces, and small decorative details like labels or napkins.
Step 3: Build a Balanced Dessert Menu
Great dessert bars don’t rely on just one type of treat. Aim for variety in flavor, texture, and temperature so guests can create their own tasting experience.
Key flavor and texture categories
- Flavor: Include chocolate, vanilla, fruit, and at least one “surprise” flavor (like salted caramel, espresso, or pistachio).
- Texture: Balance creamy (mousse, cheesecake), crunchy (brittle, cookies), and fluffy (cupcakes, sponge cake).
- Sweetness level: Mix very sweet treats with lighter, less sugary options like fresh fruit skewers or yogurt parfaits.
Sample dessert categories and examples
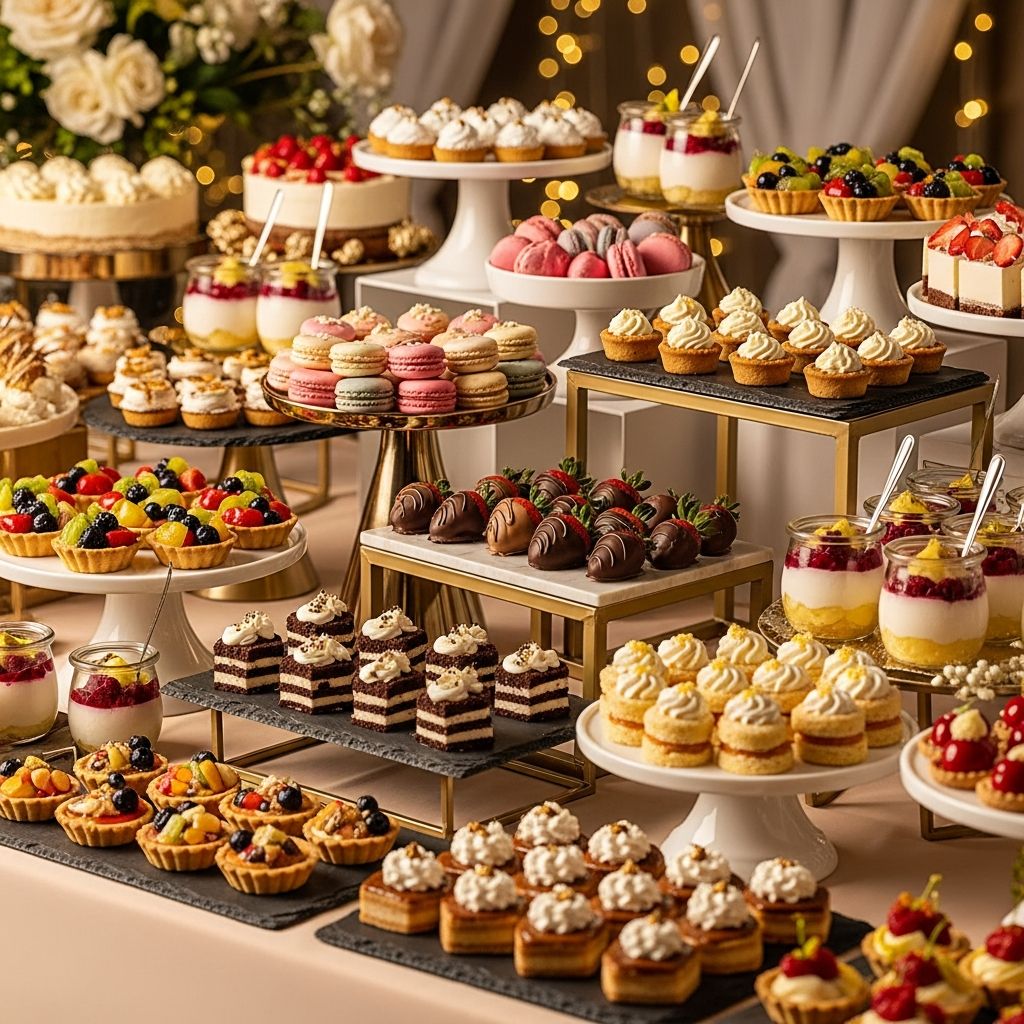
- Mini cakes & cupcakes: Standard crowd-pleasers in several flavors; mini sizes encourage sampling.
- Cookies & bars: Brownies, blondies, shortbread, or cookie sandwiches that transport well.
- Individual desserts: Panna cotta cups, mini cheesecakes, mousse jars, or trifles in clear containers.
- Handheld treats: Cake pops, donut holes, macarons, chocolate-dipped pretzels, and truffles.
- Fresh elements: Fruit skewers, chocolate-dipped strawberries, or citrus segments to reset the palate.
How Much Dessert to Serve
Guests rarely stop at one serving when the table is full of options. Plan generous but realistic quantities to avoid both shortages and mountains of leftovers.
| Event Style | Recommended Servings per Guest | Notes |
|---|---|---|
| Light reception or add-on to full meal | 2–3 small pieces | Guests may feel full from main meal, so keep portions modest. |
| Dessert-focused party | 4–6 small pieces | Guests expect to graze and sample many options. |
| Dessert bar replacing traditional cake | 3–5 small pieces | Include at least one more substantial item like mini cakes. |
As a starting point, assume each guest will eat three mini items and adjust up or down based on your crowd. For children’s events, expect slightly more per child—kids love to go back for seconds.
Step 4: Plan for Dietary Needs
Thoughtful dessert bars make room for guests with dietary restrictions. A few inclusive options can ensure everyone feels welcome and able to participate.
- Common considerations: Nut-free, gluten-free, dairy-free, and vegan desserts are the most requested.
- Clear labeling: Use tent cards or tags indicating which items fit each category.
- Separate placement: Keep allergen-friendly items on their own tray or stand to avoid cross-contact.
Step 5: Organize Your Prep Timeline
A dessert bar involves several different recipes, so organization is key. Instead of making each dessert from start to finish on separate days, break tasks into components.
Suggested prep breakdown
- 1–2 weeks ahead (if freezing): Bake sturdy cookies and bars, cool completely, and freeze tightly wrapped.
- 3–4 days ahead: Prepare fillings, frostings, and doughs. Store in airtight containers in the refrigerator.
- 2 days ahead: Bake cakes and cupcakes. Wrap and refrigerate or freeze, then frost closer to the event.
- 1 day ahead: Assemble layered desserts in jars or cups and finish most decorating.
- Event day: Add final garnishes, set up the table, and place anything that cannot sit out for long at the last minute.
Storage, Transport, and Food Safety
Practical logistics often matter as much as recipes. Think about where everything will live before, during, and after travel to your venue.
- Containers: Use sturdy, labeled boxes and airtight plastic containers for transport and storage.
- Temperature: Keep cream-based fillings and dairy desserts refrigerated as long as possible.
- Display time: In warm environments, limit perishable items on the table and rotate refills from a chilled backup stash.
Step 6: Design the Table Layout
A visually striking dessert bar relies on height, balance, and easy access. Think of your table like a small stage where each treat has a role.
Core layout principles
- Vary heights: Use cake stands, boxes under tablecloths, or tiered trays to create high, medium, and low levels.
- Focal point: Place the most dramatic dessert—such as a cake or tower—in the center or slightly off-center.
- Symmetry and flow: Mirror similar items on both sides or create a gentle curve that guides guests along the table.
- Accessibility: Leave space for tongs, scoops, and plates so guests can serve themselves comfortably.
Step 7: Style With Purposeful Decor
Decor is what transforms a simple table of snacks into a curated dessert bar. Aim to enhance your theme without crowding the desserts themselves.
- Table covering: Start with a clean tablecloth in a solid color that complements your palette.
- Backdrop: A banner, fabric panel, balloon garland, or simple greenery can frame your display.
- Serving pieces: Mix glass, ceramic, and metal stands, but repeat some elements for cohesion.
- Labels and signage: Use small cards to name desserts, note allergens, or add fun descriptions.
DIY vs. Store-Bought Desserts
There is no rule that says everything must be baked from scratch. Many hosts choose a hybrid strategy that saves time while still feeling personal.
- Homemade highlights: Select one or two signature items to make yourself, such as your favorite cookies or a special family recipe.
- Smart shortcuts: Supplement with bakery cupcakes, supermarket brownies dressed up with toppings, or pre-made macarons.
- Consistent presentation: Re-plate store-bought desserts on matching trays so everything feels cohesive.
Ideas for Different Types of Events
Tailor your dessert bar to the occasion by changing flavors, colors, and styling details. Below are simple starting concepts you can customize.
Children’s birthday party ideas
- Brightly colored mini cupcakes with sprinkles and birthday-themed toppers.
- Cut-out sugar cookies shaped to match the party theme.
- Fruit cups or skewers for a fresher choice alongside candy and chocolate.
Wedding or engagement celebration ideas
- Soft, neutral color palette with metallic accents on stands and serving utensils.
- Elegant mini cheesecakes, macarons, and truffles displayed on tiered trays.
- One statement cake surrounded by smaller coordinating desserts.
Casual backyard or holiday gathering ideas
- Rustic platters with brownies, fruit crisps in jars, and bar cookies.
- Seasonal touches like spiced apple desserts in fall or berry-heavy treats in summer.
- Self-serve toppings bar: whipped cream, crushed nuts (if appropriate), caramel, and chocolate sauce.
Enhancing Guest Experience at the Dessert Bar
Small hospitality touches make your dessert bar feel intentional and welcoming. They also prevent bottlenecks and confusion when many guests approach the table at once.
- Clear traffic flow: Position the table so guests can move along one side in a single direction.
- Stacked plates and napkins: Place them at the starting point of the table so guests can serve themselves in order.
- Serving utensils: Provide tongs, spoons, and scoops for each dish to keep things clean and efficient.
- Take-home boxes: Consider small treat bags or boxes so guests can bring a few sweets home at the end of the night.
Simple Checklist for Your Dessert Bar
Use this quick checklist as you plan and set up to make sure nothing important is missed.
- Theme and color palette selected.
- Guest count estimated and servings per person calculated.
- Dessert list finalized with variety in flavor, texture, and dietary options.
- Prep schedule created, including freezing and refrigeration plans.
- Containers, stands, and serving utensils gathered and tested on the table.
- Decor elements chosen: tablecloth, backdrop, signs, and labels.
- Food safety addressed: perishable items timed and stored properly.
Frequently Asked Questions About Dessert Bars
How far in advance can I make desserts for a dessert bar?
It depends on the type of dessert. Many cookies and bar desserts can be baked and frozen up to a couple of weeks ahead, while delicate items like whipped cream–topped treats are best made the day before or the day of your event. Focus on baking and freezing sturdy items early, then save final decorating and assembly for closer to the celebration.
How do I keep the dessert table from looking messy?
Start with a simple color palette and repeat key materials, such as using mostly white plates with a few accent pieces. Group similar items together, refill trays periodically rather than overloading them at the start, and provide clear serving utensils so guests don’t have to touch food directly.
What if I don’t own fancy stands or display pieces?
You can create height using everyday items. Place sturdy boxes or overturned bowls under your tablecloth to raise some platters, stack plates of different sizes, or borrow stands from friends. Uniform napkins, labels, and a clean tablecloth go a long way toward making even basic dishes look pulled together.
How can I control dessert costs for a large group?
Choose recipes with affordable ingredients, such as brownies, cookies, and snack-mix style treats, and keep premium items (like macarons or specialty chocolates) as small accent pieces. Buying ingredients in bulk, prioritizing a few eye-catching items, and using smaller portions for rich desserts can all stretch your budget without sacrificing impact.
Do I still need a traditional cake if I have a dessert bar?
Not necessarily. A dessert bar can easily replace a full-size cake, especially if you include one larger centerpiece dessert or a small cutting cake for ceremonial moments. Decide based on your traditions, budget, and how strongly you feel about the look of a classic cake.
Final Thoughts
A memorable dessert bar is less about perfection and more about thoughtful choices that suit your guests and your event. With a clear theme, a balanced menu, and a little planning, you can assemble a display that looks impressive, tastes incredible, and makes your celebration feel truly special.