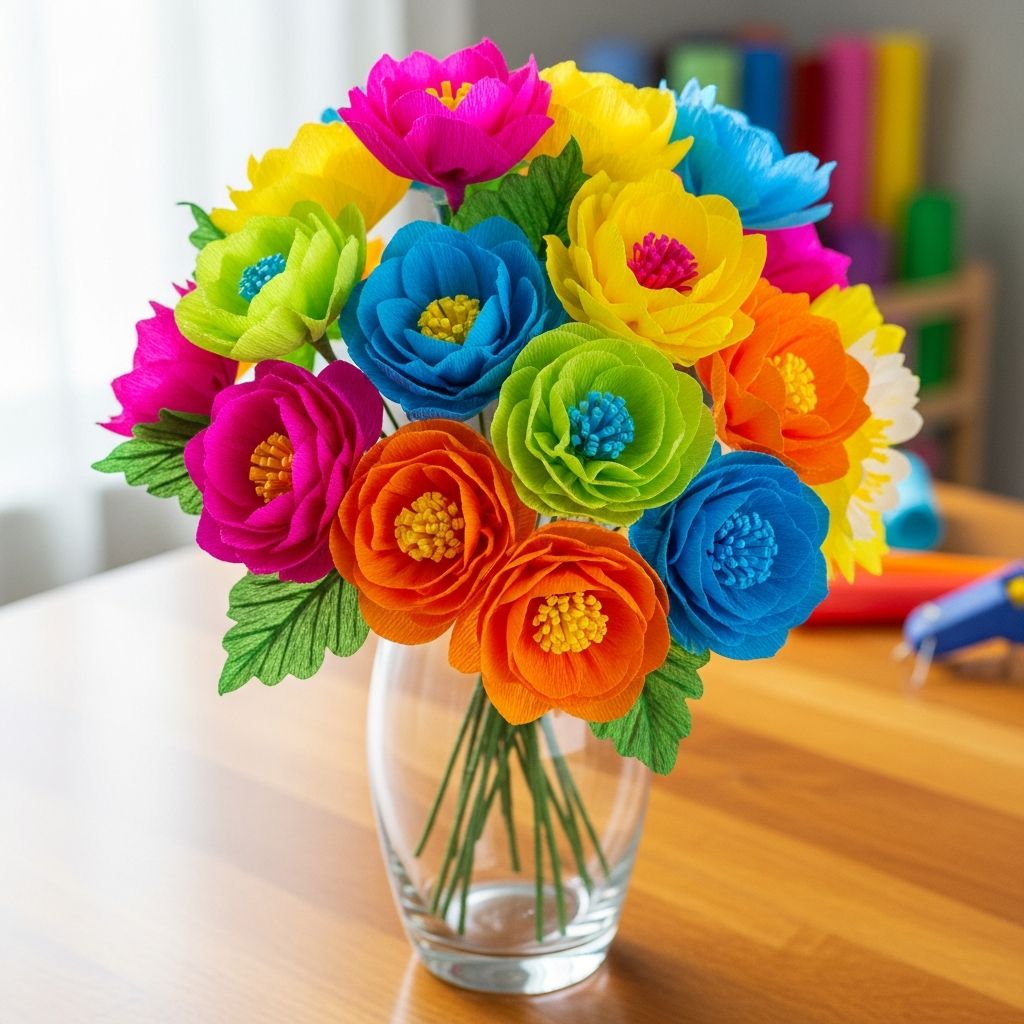
If a vase on your table feels a little dull but fresh flowers are out of the budget, a bouquet of tissue paper blooms is the cheerful solution. With a few folds, a bit of fluffing, and some playful color choices, you can build a long-lasting arrangement that looks surprisingly lush and happy.
Why Tissue Paper Flowers Are Worth Trying
Tissue flowers are light, inexpensive, and forgiving, which makes them perfect for crafters of all ages. They can be made in batches for party decor, used as a kid-friendly rainy-day project, or styled as a centerpiece that never needs water.
Unlike real blooms, these flowers will not wilt, and they can be packed away and reused for future celebrations. Because the materials are so affordable, experimentation with color, size, and petal shapes becomes part of the fun rather than a risk.
Supplies You Will Need
Gather everything before you begin so you can focus on folding and arranging instead of hunting for scissors mid-project. The basic list is short, but a few optional extras help polish the final bouquet.
- Tissue paper sheets in several colors (solid or patterned)
- Thin wire, pipe cleaners, or floral wire for stems
- Scissors or small craft shears
- A vase, jar, tin, or small basket for the arrangement base
- Optional: ribbon, washi tape, scrap paper or tissue to stuff the vase, and small pebbles or marbles for weight
Most of these items are common in gift-wrapping bins or basic craft kits, so it is often possible to start without a special shopping trip. If making this with kids, choose dull-tipped scissors and thicker tissue to reduce accidental tearing.
Choosing Colors and Flower Styles
Color is what makes tissue paper arrangements feel joyful instead of flat. Before cutting anything, decide on a simple color story so your bouquet looks intentional once everything is in the vase.
- Monochrome elegance: Several shades of a single color (like pale pink, rose, and magenta) for a soft, coordinated look.
- Bright party mix: Bold primary or rainbow hues for birthday tables, graduations, or kids’ rooms.
- Seasonal palette: Pastels for spring, warm reds and oranges for fall, or icy blues and silvers for winter celebrations.
- Center-highlight style: One color for the center layers and a different color around the outside, echoing the look of real blooms.
It helps to plan at least two or three different flower sizes or petal shapes so the arrangement has visual variety. Think of how real bouquets mix big, showy blossoms with smaller supporting flowers and filler greens.
Basic Flower, Step by Step
The core flower design relies on an accordion fold, a tie in the middle, and careful fluffing. Once you master this base version, small adjustments in size and trimming create a whole garden of new shapes.
Step 1: Cut and Stack the Paper
Lay several sheets of tissue paper on a flat surface and align the edges as neatly as possible. For a medium flower, use four to six sheets stacked together; for a fuller bloom or larger size, add more layers.
- Cut the stack into a rectangle, for example about 20 cm by 30 cm for a mid-sized bloom.
- Keep the edges squared off; uneven edges will become petal variations but too much difference can make folding difficult.
Step 2: Create the Accordion Fold
Turn the stacked rectangle so a shorter side faces you. Fold up a strip along that edge, about 2 to 3 cm wide, smoothing the crease with your fingers.
- Flip the stack over and fold another strip the same width in the opposite direction.
- Continue flipping and folding until the entire rectangle becomes a long, narrow accordion.
The folds do not have to be perfectly measured, but try to stay consistent so the flower opens evenly. If the paper rips slightly while folding, keep going; small tears tend to vanish once the flower is fluffed.
Step 3: Secure the Center
Fold the accordion in half to find the midpoint. Gently pinch that middle section and wrap it with wire or a pipe cleaner, twisting tightly enough to hold but not so hard that the paper is crushed or sliced.
- Leave a long tail of wire or pipe cleaner to act as the flower stem.
- If you plan to attach the flower directly to a wall or gift box, use a small piece of wire only and trim off any extra length.
Step 4: Shape the Petal Ends
With the accordion still folded, use scissors to trim both ends of the strip into a petal shape. Pointed, rounded, or scalloped tips each create a different personality for the final bloom.
- Rounded ends feel soft and peony-like.
- Pointed ends suggest dahlias or chrysanthemums.
- Flat or slightly wavy ends give a more graphic, stylized look.
Step 5: Separate and Fluff the Layers
Gently spread one side of the accordion into a fan shape, then use your fingers to lift the top sheet of tissue toward the center. Work slowly so the paper does not snag or tear.
- Pull each layer up and toward the middle, one at a time, until that half of the flower looks full.
- Repeat with the other side, alternating layers so the bloom becomes round instead of flat.
When all layers have been separated, lightly tweak and pinch any uneven petals. Spin the stem and adjust until the flower looks balanced from every angle.
From Single Bloom to Finished Bouquet
Once a few flowers are complete, the fun moves to arranging them into a display. The goal is to mix heights, colors, and sizes to create a natural, overflowing effect even though every element is made of paper.
Preparing the Vase or Container
Any vessel that can hold the stems upright will work, from a fancy ceramic vase to a recycled jar wrapped in ribbon. Because tissue flowers are so light, it often helps to add a bit of weight to the bottom.
- Place pebbles, marbles, or dried beans in the base for stability.
- Stuff the container with crumpled scrap paper or extra tissue; this gives stems something to grip.
- Cover visible filler with a neat layer of tissue or a tied ribbon around the outside.
Arranging the Stems
Begin with the tallest flowers in the center or toward the back if the arrangement will stand against a wall. Add medium and smaller blooms around them, slightly bending the wire stems to angle flowers outward.
- Rotate the vase every few additions so the bouquet looks appealing from multiple sides.
- Leave small gaps between some flowers; crowded blooms can look flat instead of full.
- Tuck in a few partly opened flowers as if some blossoms are still unfolding.
Petal Shape and Size Ideas
Changing a few details in the cutting stage transforms the mood of the whole bouquet. Instead of repeating one identical flower, mix and match several designs to mimic the variety found in real gardens.
| Style | Petal Tip Shape | Suggested Sheet Count | Best Use |
|---|---|---|---|
| Soft blossom | Rounded | 4–6 layers | Romantic centerpieces, pastel palettes |
| Spiky bloom | Pointed | 6–8 layers | Bold party decor, bright colors |
| Ruffled pom | Deep scallops | 8+ layers | Hanging decor, photo backdrops |
| Mini bud | Flat or lightly curved | 3–4 layers | Filler flowers, gift toppers |
Use one or two dominant styles for cohesion, then sprinkle in a few accent blossoms for interest. This approach keeps the arrangement from looking chaotic while still feeling playful.
Kid-Friendly Tips and Classroom Uses
Tissue flower arrangements are especially successful in groups, making them ideal for classrooms, clubs, and family gatherings. When working with children, simplify steps and prepare some cutting in advance to keep frustration low.
- Pre-cut stacks of rectangles so kids only handle folding and fluffing.
- Use pipe cleaners instead of thin wire; they are easier for small hands to twist and safer overall.
- Assign color themes by table so each group builds a mini bouquet in a distinct palette.
- Let children sign a tag and tie it to the vase if the bouquet will be gifted to someone special.
This project also doubles as a quick lesson in color mixing, pattern, and texture. Students can compare how different petal shapes change the character of the flowers they create.
Decorating With Your Paper Bouquet
Once your vase is full of bright blooms, there are many ways to work it into your space or event. Because the flowers are light, they can be moved easily from a shelf to a party table and back again.
- Place a single arrangement on a dining table as a centerpiece, matching tissue colors to your dishes or linens.
- Create several small bouquets in jars for a party and send one home with each guest as a favor.
- Coordinate a paper flower vase with a fabric banner or balloons to build a cohesive party theme.
- Use the bouquet as a photo prop for seasonal family pictures or school events.
Because the flowers store flat when gently compressed, you can also pack them away between uses. Keep them in a clean, dry box so dust and moisture do not flatten or stain the petals.
Common Problems and Easy Fixes
Even with careful hands, small snags or wobbly stems sometimes appear. Most of these issues are quick to correct with a bit of trimming, reinforcing, or clever hiding in the arrangement.
- Problem: Petals keep tearing while fluffing.
Fix: Add an extra sheet or two to future flowers and lift layers more slowly, supporting the paper from underneath with your fingertips. - Problem: Flowers droop or twist in the vase.
Fix: Wrap a second pipe cleaner around the existing stem to thicken it, or shorten the stem so the bloom sits closer to the rim of the container. - Problem: The bouquet looks flat from one side.
Fix: Bend a few stems slightly forward or backward and add one or two new flowers in the sparse spots. - Problem: Colors feel mismatched.
Fix: Introduce a neutral anchor color, such as white or cream blooms, and spread them evenly through the arrangement.
Frequently Asked Questions
How long do tissue paper flowers last?
Paper flowers can last for years if kept away from moisture, direct sunlight, and heavy dust. Over time, colors may fade slightly, but that soft aging often gives them a more natural appearance rather than ruining the arrangement.
Can these flowers be reused for different events?
Yes, one of the biggest advantages of a tissue arrangement is that it can be reshaped and restyled. You can pull out a few flowers, slip them into a different vase, or combine them with fresh greenery to create a new look without starting from scratch.
What if I do not have floral wire?
Pipe cleaners, twist ties, or even tightly rolled strips of paper can act as stems. For wall displays or hanging decor, a small loop of string around the center is often enough support without any rigid stem at all.
Is it possible to add leaves?
To create leaves, cut green tissue into smaller rectangles, fold them loosely, and pinch them around the base of a flower before twisting the stem. You can also tape or twist separate leaf shapes along the stem to mimic real foliage.
How do I make giant statement flowers?
Use larger tissue sheets, increase the number of layers, and widen each accordion fold. Thicker wire or even wooden dowels wrapped in floral tape help support the extra weight so the oversized blooms stand upright in a floor vase or as photo backdrop decor.
Final Touches to Make Your Arrangement Shine
Once your bouquet feels full and well balanced, spend a moment on small finishing details. Straighten stems, trim any stray bits of wire, and check that the rim of your vase is clean and free of visible tape or stuffing.
A short ribbon tied around the vessel, a handwritten tag, or a few paper leaves tucked among the flowers can transform a simple craft into a display-worthy piece. With these thoughtful touches, your tissue paper flower arrangement moves beyond a quick project and becomes a cheerful, reusable decoration ready to brighten any corner of your home.