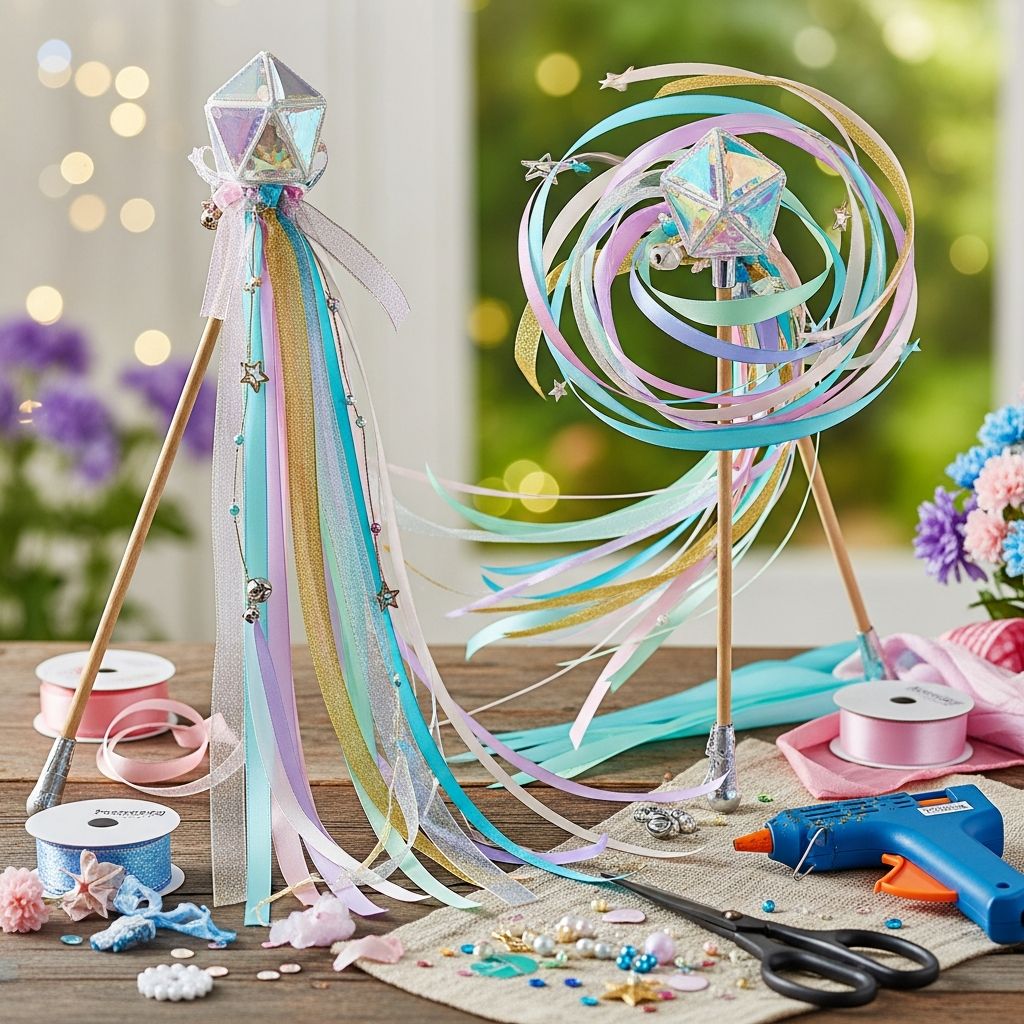
Ribbon wands are simple to make, endlessly customizable, and irresistible to kids and adults alike. With just a few basic supplies, you can create swirling, colorful wands that add magic to dance parties, playtime, birthdays, and even wedding send-offs.
This guide walks through everything from choosing materials to decorating the handles, plus creative variations, safety tips, and FAQs. Whether you want one special wand or a whole basket of party favors, you will find an approach that fits your time, budget, and style.
Why Ribbon Wands Are the Perfect DIY Project
Ribbon wands strike a rare balance: they look impressive, but the process is easy enough for beginners and children with a bit of supervision. You can adjust the colors, textures, and length to match any theme—princess parties, school spirit days, weddings, or seasonal celebrations.
- They require only a few inexpensive, easy-to-find supplies.
- They work as toys, decorations, and favors all at once.
- They encourage movement, creativity, and imaginative play.
Planning Your Ribbon Wands
Before cutting a single ribbon, take a minute to plan how you want the finished wands to look and who will be using them. This helps you choose safer materials, appropriate lengths, and a color palette that fits the occasion.
Questions to Ask Before You Start
- Who are the wands for (toddlers, older kids, adults, mixed ages)?
- Where will they be used (indoors, outdoors, small room, large field)?
- Are they meant for long-term play, one-time events, or keepsakes?
- Do you need them to match a specific theme or color scheme?
Common Use Cases
- Birthday parties and sleepovers.
- Dance or gymnastics routines.
- Wedding exits or ceremony send-offs.
- Classroom movement breaks and music time.
- Dress-up corners and pretend play.
Core Materials and Alternatives
There is no single “correct” supply list for ribbon wands, but most versions use a sturdy stick for the handle and soft, flowing strands for the tails. You can keep it basic or add bells, beads, or paint for extra flair.
| Component | Best Options | Budget / Kid-Friendly Alternatives |
|---|---|---|
| Handle | Wooden dowels, smooth sticks, bamboo skewers with tips trimmed. | Paper straws, recycled cardboard tubes, thick craft sticks. |
| Ribbon/Tails | Grosgrain, satin, or organza ribbon. | Fabric strips, bias tape, yarn, crepe paper streamers. |
| Attachment | Hot glue, tiny screw eyes with loops, thin wire rings. | Strong craft glue, washi tape, tightly tied knots. |
| Embellishments | Jingle bells, beads, charms. | Paper cutouts, foam stickers, simple bows. |
| Finish | Acrylic paint, clear sealant, wood stain. | Washable markers, crayons, colored tape. |
Choosing the Right Ribbon
Ribbon choice has a huge impact on how your wand looks and moves. Stiffer ribbon creates bold, graphic lines in the air, while lighter ribbon floats and flutters more softly. Mixing textures creates visual interest even with a limited color palette.
- Grosgrain ribbon: Durable, textured, and less likely to tangle.
- Satin ribbon: Shiny and elegant, ideal for parties and weddings.
- Organza or sheer ribbon: Light and floaty, lovely layered over opaque colors.
- Fabric strips: Great for using up scraps and giving a boho or rustic feel.
For young children, consider shorter lengths (around mid-arm to shoulder height) and slightly wider ribbon to reduce tangling and make the movement more visible.
Simple Step-by-Step: Classic Ribbon Wand
This basic method creates a straightforward wand with ribbons anchored at one end of a handle. It is sturdy, fast to assemble, and easy to modify.
Supplies for a Basic Wand
- 1 wooden dowel or sturdy handle (about 25–30 cm long).
- 3–6 lengths of ribbon, each around 60–90 cm long.
- Scissors and measuring tape or ruler.
- Hot glue gun or strong craft glue.
- Optional: paint, markers, tape, or stickers for decorating the handle.
Step 1: Prepare and Smooth the Handles
Cut your handles to the desired length, if needed, and smooth any rough edges with sandpaper or by carefully trimming splinters. If children will be using the wands, pay special attention to the ends so there are no sharp points.
At this stage you can paint or decorate the handles. Allow them to dry fully before attaching any ribbon, especially if you used paint or glue-on decorations.
Step 2: Cut and Arrange the Ribbons
Measure and cut your ribbon lengths. A good starting place is to aim for ribbons that are roughly twice the distance from the user’s hand to the floor, then trim as needed. You can cut all one length for a clean, uniform look, or vary them slightly for a more organic, layered feel.
- Use 2–3 colors for a simple design.
- Add a metallic or glitter ribbon for a highlight strand.
- Trim ends on a diagonal or into a V shape to reduce fraying.
Step 3: Attach the Ribbons to the Handle
There are several ways to attach the ribbons, depending on what tools you have and how durable you want the wand to be. The easiest approach with minimal tools is to glue the ribbon directly to the handle and then wrap over the joint.
- Gather the ribbons so one end of each lines up in a neat bundle.
- Place a generous dot or line of glue near one end of the handle.
- Press the ribbon bundle into the glue and hold until secure.
Once the glue has set, wrap the base of the ribbons and a small section of the handle with a strip of ribbon or decorative tape. Secure the end with another small dab of glue to hide the attachment point and strengthen the connection.
Step 4: Final Touches and Testing
Give each wand a gentle shake and spin to ensure nothing is loose. If you see any ribbon slipping or edges peeling away, add a small reinforcement of glue or tape. Trim any overly long strands if they feel awkward, heavy, or likely to drag on the ground.
At this point, you can personalize each wand further with names, initials, small stickers, or color-coded handles if they are going to specific kids or roles at an event.
Variation: Swivel-Style Wands for Extra Movement
For older kids or more dramatic performances, consider a swivel-style wand where the ribbon is attached to a small loop or ring that can turn independently from the handle. This helps the ribbon spin freely and reduces tangling during fast movements.
How Swivel-Style Wands Differ
- The ribbon bundle is attached to a small ring or loop at the top of the handle.
- The loop rotates as the wand moves, allowing long ribbons to spin smoothly.
- This style is especially fun for dance routines, parades, and outdoor play.
Adapting the Basic Method
Instead of gluing ribbons directly to the handle, tie or knot them onto a small metal or plastic ring. Secure the ring to the end of the handle using a screw-in eye, wrapped wire loop, or a tightly taped connection. Add a decorative band around the top of the handle to cover any hardware and protect little hands.
Decorative Ideas and Themed Sets
Once you have the basic construction down, the truly fun part is designing unique looks. You can create individual hero wands or full sets that coordinate perfectly with your event or play theme.
Color Palette Inspiration
- Princess or fairy: Pastel pinks, purples, and blues with a touch of silver.
- Nature or woodland: Greens, browns, and soft neutrals, paired with twine or lace.
- School spirit: Two or three school colors with bold stripes.
- Seasonal: Orange and gold for autumn, icy blues and white for winter, bright florals for spring.
Embellishment Options
- Wrap handles with patterned washi tape for quick, clean designs.
- Add small bells near the base of the ribbons for a gentle jingle.
- Tie on tiny charms or beads to mark special roles (like birthday child or ring bearer).
- Paint patterns—stripes, polka dots, or ombré effects—on wooden handles.
Safety Tips for Kids and Group Events
Ribbon wands are generally safe, but they still involve sticks, long strands, and, sometimes, small parts. A few simple guidelines go a long way toward preventing tangles, bumps, or other mishaps, especially in crowded or high-energy settings.
- Keep wand lengths and ribbons shorter for toddlers to prevent tripping.
- Avoid very thin dowels or sharp points; round off or cover ends if needed.
- Skip small detachable beads or charms for children who still mouth objects.
- Set clear “no whacking” rules and demonstrate gentle swirling motions.
For large groups, consider designating a wide open area as the “wand zone” so children are not swinging ribbons near food tables, candles, or fragile decorations.
Fun Ways to Use Ribbon Wands
Once your wands are ready, there are countless ways to put them to use beyond simple spinning and waving. They can support learning, coordination, and creativity as well as provide beautiful visual effects in photos and performances.
Games and Activities for Kids
- Color-call dancing: Play music and call out a color; only kids holding that color ribbon can move until you switch.
- Follow-the-leader swirls: One child leads with specific motions (circles, zigzags, figure eights) while others copy.
- Storytelling props: Use wands as “magic” tools in improvised stories and pretend adventures.
- Obstacle streams: Hang ribbons over a low line and let kids run through, brushing them with their wands.
Incorporating Wands into Events
- Place wands in jars or baskets by the entrance as take-home favors.
- Use coordinated sets for wedding exits instead of confetti or rice for an easy-to-clean option.
- Add them to photo booths for colorful motion in pictures.
- Include them in classroom music times to highlight beat, rhythm, and tempo.
Quick Troubleshooting Guide
Even simple crafts sometimes need fine-tuning. If your wands are not quite behaving how you imagined, small adjustments in ribbon length, attachment method, or handle design usually fix the problem.
| Issue | Likely Cause | Simple Fix |
|---|---|---|
| Ribbons tangle easily. | Too many strands or very long lengths. | Reduce ribbon count or trim to a shorter length; use slightly stiffer ribbon. |
| Ribbons fall off the handle. | Insufficient glue or loose wrapping. | Add more glue, then wrap the base with tape or another ribbon band. |
| Wand feels heavy for kids. | Thick handle, dense ribbons, or metal hardware. | Switch to lighter handles and fewer ribbons; skip large beads or charms. |
| Colors look dull or muddy. | Too many competing shades. | Limit to 2–3 main colors and add a single accent (like metallic or white). |
| Edges fray quickly. | Unsealed ribbon ends. | Cut with sharp scissors and seal edges using clear nail polish or fabric sealant. |
Storage and Care Tips
With just a little care, ribbon wands can last through many play sessions and special occasions. Good storage helps keep ribbons from creasing, tangling, or collecting dust between uses.
- Stand wands upright in a jar or vase so ribbons hang freely.
- Avoid packing them tightly in boxes where ribbons can wrinkle and knot.
- Spot-clean ribbons gently with a damp cloth if they pick up dirt.
- Replace individual ribbons if they become badly frayed or torn instead of discarding the whole wand.
Frequently Asked Questions
How long should the ribbon be for young children?
For toddlers and preschoolers, aim for ribbon lengths that reach roughly from their hand to just above the ground when they hold the wand at their side. This usually means ribbons around 45–60 cm long, depending on height, which gives enough motion without tripping hazards.
Can I make ribbon wands without hot glue?
Yes. You can tie ribbons tightly around the handle and secure them with strong knots or use sturdy, fast-drying craft glue. Wrapping the attachment area with decorative tape adds both strength and a polished look, even without a glue gun.
What is the easiest handle for a large group craft?
For classrooms or parties, paper straws or thick craft sticks are convenient because they come pre-cut, are lightweight, and are safe for supervised group use. Children can decorate them with markers and stickers before ribbons are attached.
How can I make ribbon wands feel more special for a wedding?
Choose a limited, elegant color palette that matches the event, such as two main colors and a metallic accent. Add details like small bells, monogrammed tags, or coordinating paint on the handles, and display the finished wands in pretty containers near the ceremony or exit.
Are ribbon wands reusable after an event?
Absolutely. After a party or wedding, ribbon wands can move straight into kids’ dress-up bins, be used for photo shoots, or be saved as keepsakes. If some ribbons wear out, they are easy to replace, which extends the life of the wand.
Bringing It All Together
Ribbon wands turn simple materials into something that invites movement, imagination, and celebration. With a bit of planning, thoughtful color choices, and the right attachment method, you can craft wands that delight children, elevate special events, and add a sense of magic to everyday moments.
Once you have created your first set, experiment with new shapes, textures, and embellishments. Over time, your ribbon wands can become a favorite go-to project whenever you need a quick, creative way to bring more color and joy into your space.