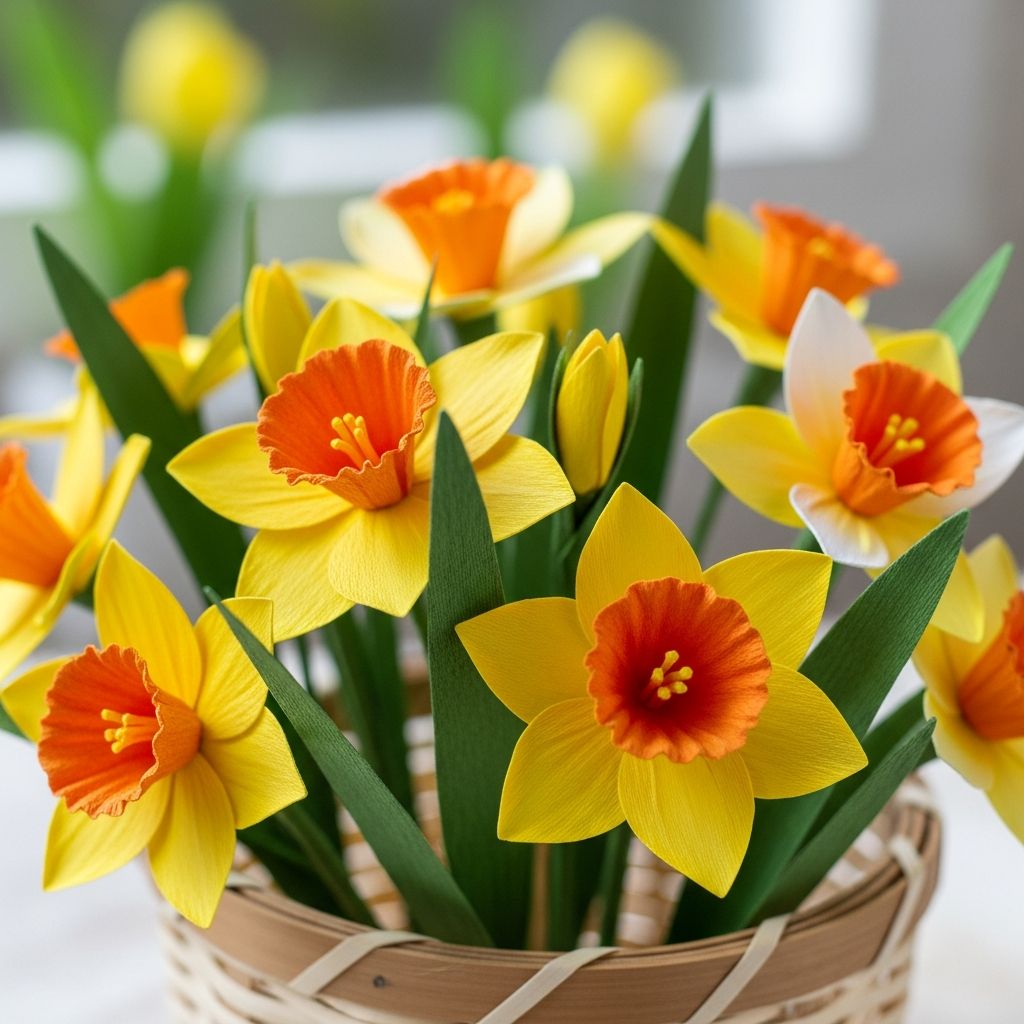
Paper daffodils are a cheerful way to welcome spring, brighten a rainy afternoon, or decorate a classroom or dining table. This guide walks you through an original, step-by-step project for making daffodils from paper using basic supplies, with tips to adapt the craft for young children, older kids, and adults.
Daffodils are among the first flowers to appear in spring and are widely recognized as symbols of new beginnings and hope, which is one reason they are used in many seasonal celebrations and campaigns. Turning that symbolism into a hands-on project helps children connect seasonal changes with creative play.
Why Make Paper Daffodils?
Before jumping into the instructions, it helps to understand what makes this craft especially useful for families and educators.
- Seasonal connection: Daffodils are classic spring flowers, often associated with the end of winter and the return of color outdoors.
- Minimal mess: This project uses mostly dry supplies (paper, scissors, glue stick), making cleanup quick and simple.
- Skill building: Children practice fine motor skills, hand–eye coordination, and spatial reasoning through folding and cutting.
- Flexible difficulty: Steps can be simplified for preschoolers or expanded into a more realistic, detailed flower for older crafters.
- Reusable decor: Finished flowers last all season and can be reused each year, unlike fresh flowers.
Supplies and Substitutions
You do not need special tools or expensive materials. Most items are common in homes or classrooms.
| Item | Purpose | Suggested Alternatives |
|---|---|---|
| Yellow paper (light and dark) | Petals and trumpet-style center | Any light-colored paper (white, cream) colored with crayons or paint |
| Green paper or pipe cleaners | Stems and leaves | Drinking straws, wooden skewers wrapped in green tape, or rolled green paper |
| Scissors | Cutting petals, centers, and leaves | Child-safe scissors for younger kids |
| Glue stick | Light, quick-drying adhesive for paper | White school glue (applied sparingly) |
| Pencil | Lightly sketching petal shapes | Pen or thin marker (used gently) |
| Ruler (optional) | Measuring squares and circles | Pre-cut squares or tracing around lids |
Planning Your Paper Daffodil Project
A few minutes of planning helps the craft run smoothly, especially with kids.
- Decide how many flowers you want: a single stem, a small bouquet, or a full centerpiece.
- Pre-cut paper squares if working with young children so they can focus on folding and gluing.
- Protect the table with scrap paper or a washable tablecloth, especially when using liquid glue.
- Demonstrate each step once slowly, then let children copy at their own pace.
Step-by-Step: Creating the Petals
The daffodil petals in this project are made from a folded square of paper, which naturally forms a six-petal star when opened.
1. Cut Your Petal Square
For each daffodil, you will need one square of paper for the petals.
- Cut a square about the width of your palm (around 4 inches / 10 cm is a good starting size).
- For a mixed bouquet, cut several squares in slightly different sizes.
2. Fold the Base Shape
This series of folds creates equal petals with minimal measuring.
- Fold the square diagonally to form a triangle, carefully matching the corners.
- Press the fold firmly with your finger to create a sharp crease.
- Fold the triangle in half again, aligning the corners.
- Fold one more time to make a smaller, narrow triangle. Each fold helps keep the petals even.
3. Shape the Petals
Now you transform the folded triangle into a petal cluster.
- Hold the triangle so the sharp point faces downward and the open edges point up.
- Draw a soft, rounded curve across the top from one side to the other, like the top of a heart or a cloud.
- Carefully cut along the line through all the layers.
- At the very bottom tip, snip a small hole (no larger than a pea). This is where the center and stem will pass through.
- Gently unfold the paper to reveal a flower shape with multiple petals.
If the petals look uneven, simply trim the edges a bit until you are happy with the shape. Imperfections make each flower unique.
Making the Daffodil’s Trumpet Center
The raised, cup-like center is one of the most recognizable features of a daffodil.
4. Cut the Center Strip
- Cut a rectangle from darker yellow or orange paper.
- A good starting size is about half the width of your petal square and a little shorter in height (for example, 2.5 inches / 6 cm wide and 1.5 inches / 4 cm tall).
- For a ruffled edge, cut small, shallow triangles or waves along one long side of the rectangle.
5. Form the Cone
- Roll the rectangle into a tube so the short ends overlap slightly.
- Use a glue stick to secure the overlap, creating a ring.
- Pinch one end of the ring gently so it narrows into more of a cone shape; the narrow end will sit against the petals.
- If the cone looks too tall, trim a little from the bottom edge.
6. Add Texture (Optional)
For older kids or adults looking for a more realistic effect:
- Lightly color the ruffled edge with orange or darker yellow pencil or pastel.
- Pinch and fold the edge in tiny zig-zags to imitate the natural frill of a daffodil trumpet.
Attaching the Stem and Assembling the Flower
Once the petals and center are ready, the flower comes together quickly.
7. Prepare the Stem
- Use a green pipe cleaner, a strip of rolled green paper, or a green straw for the stem.
- If using a pipe cleaner, bend about 1 cm of one end into a small hook or flat spiral. This helps hold the flower in place.
8. Assemble the Flower
- Place the petal piece flat on the table, with the colored side facing up.
- Apply a small ring of glue around the central hole on the petals.
- Press the narrow end of the cone through the hole from the front, so the wider, ruffled part sits above the petals.
- From the back, press gently around the cone base to help it stick to the petals.
- Push the hooked end of the stem through the same central hole from the back, into the cone.
- Twist or press the hook gently against the inside of the cone so the flower is held in place.
- Add a dot of glue where the cone and stem meet inside, if needed.
Set the flower aside for a few minutes to let the glue dry fully.
Adding Leaves and Arranging Your Bouquet
Leaves and thoughtful arrangement turn a single flower into a finished decoration.
9. Cut and Attach Leaves
- Cut long, narrow leaf shapes from green paper, slightly curved like a ribbon.
- Each stem looks balanced with one or two leaves attached near the lower half.
- Glue the leaves directly onto the stem, or wrap the base of the leaves with a small strip of tape.
10. Display Ideas
- Paper bouquet: Arrange several stems in a small jar, cup, or paper-wrapped tin.
- Gift topper: Tie one or two daffodils onto a present with ribbon or twine.
- Wreath or garland: Tape or glue flowers onto a cardboard ring or string them on yarn.
- Table place cards: Attach a small tag with a guest’s name to each stem.
Adapting the Craft for Different Ages
Fine motor skills develop gradually, so it helps to adjust the steps according to age and ability.
For Preschoolers
- Pre-cut squares, rectangles, and leaves.
- Offer a choice of two or three colors instead of a full box.
- Allow them to help with folding by guiding their hands.
- Use thicker stems (like paper straws) that are easier to grasp.
For Elementary-Age Kids
- Let them measure squares using a ruler to practice basic measurement.
- Encourage experimentation with petal shapes and sizes.
- Invite them to design a simple bouquet layout or centerpiece.
For Teens and Adults
- Add shading with colored pencils or pastels to mimic natural color variations.
- Use stiffer paper for petals and crepe paper for the trumpet for a more realistic texture.
- Combine daffodils with other paper flowers (such as tulips or crocuses) in a mixed spring arrangement.
Safety Tips and Classroom Use
With a few precautions, this craft is suitable for group activities in classrooms, libraries, or community centers.
- Provide child-safe scissors for younger children and review safe cutting habits.
- Store scissors and other sharp tools out of reach when not in use.
- Supervise glue use to prevent accidental ingestion and keep glue away from eyes.
- Collect small paper scraps immediately to keep floors clear and reduce slipping hazards.
Frequently Asked Questions (FAQs)
Q: What kind of paper works best for paper daffodils?
A: Standard colored printer paper or lightweight construction paper works very well. Cardstock is possible but can be harder for small hands to fold; tissue paper is beautiful but more delicate and better for older kids or adults.
Q: How long does one flower take to make?
A: Once you are familiar with the steps, one daffodil can be made in about 10–15 minutes. With young children or in a group setting, allow extra time for folding and gluing.
Q: Can I prepare parts in advance for a large group?
A: Yes. Pre-cut the squares, rectangles, and leaf shapes, and even pre-fold the petal triangles if needed. This helps keep the session focused on decoration and assembly, which is often more enjoyable in large groups.
Q: How can I make the flowers more realistic?
A: Use several shades of yellow and white, add light shading with colored pencils, gently curl petals around a pencil, and vary the sizes of the centers and petals so each flower looks a little different.
Q: How should I store paper daffodils so they last?
A: Keep them away from direct sunlight and moisture. Place them upright in a jar or lay them flat in a box with tissue paper between layers. Properly stored paper crafts can last for multiple seasons.
References
- Daffodils and the Great Britain Campaign — Marie Curie. 2022-02-15. https://www.mariecurie.org.uk/get-involved/marie-curie-daffodil-appeal/about-daffodils
- Narcissus (Daffodil) Horticultural Information — Royal Horticultural Society. 2021-11-10. https://www.rhs.org.uk/plants/narcissus
- Developing Fine Motor Skills — Centers for Disease Control and Prevention (CDC). 2022-09-19. https://www.cdc.gov/ncbddd/childdevelopment/positiveparenting/preschoolers.html
- Scissor Safety Tips — Nationwide Children’s Hospital. 2018-06-01. https://www.nationwidechildrens.org/family-resources-education/700childrens/2018/06/scissor-safety-for-kids