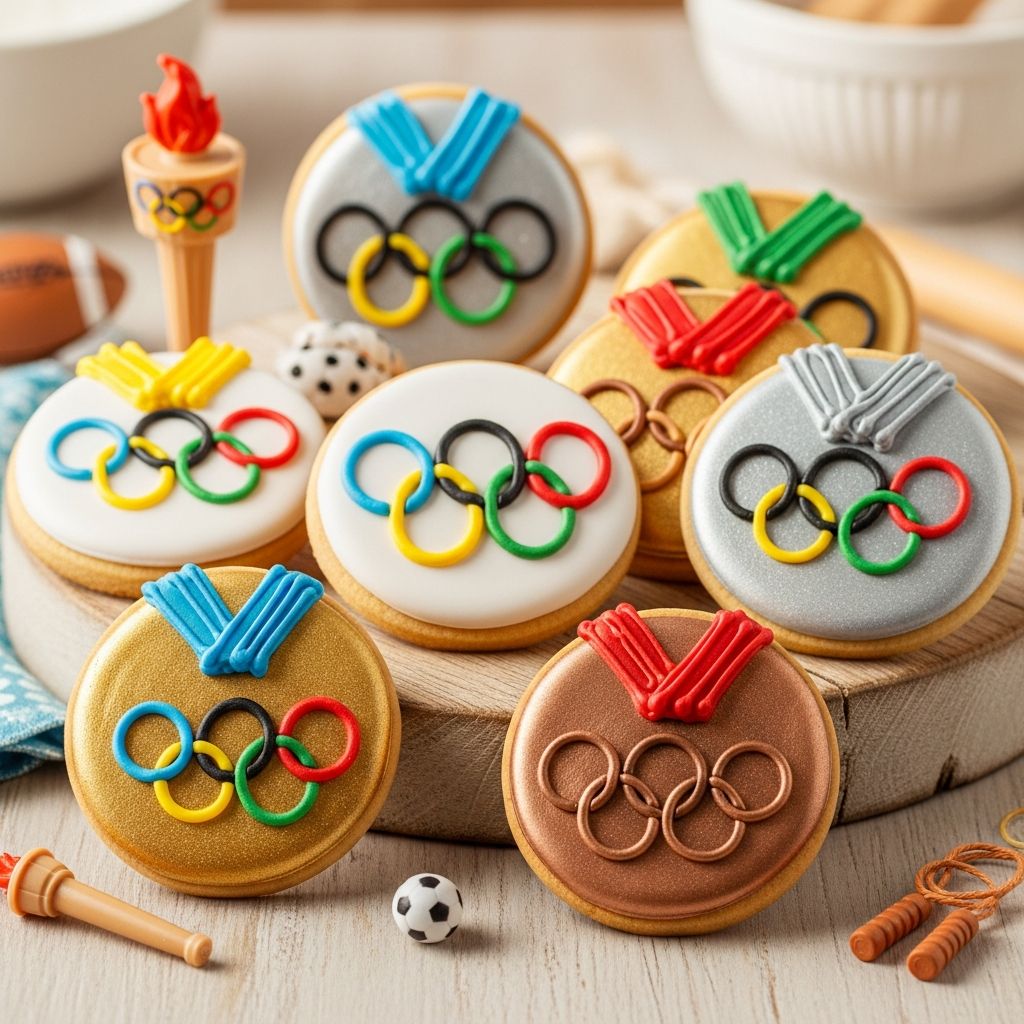
Hosting your own mini games at home is even more exciting when there are medals at the finish line—especially when those medals are edible. Olympic medal cookies are an easy, kid-friendly baking project that doubles as decor, dessert, and party favor all in one.
Why Olympic Medal Cookies Are Perfect for Celebrations
Olympic medal cookies fit right in at viewing parties, school events, birthday celebrations, and rainy-day craft sessions. They offer a simple, hands-on activity that lets kids feel involved in the excitement of the games while practicing basic kitchen and craft skills.
Because they can be made with either homemade or store-bought cookies, this project adapts to your time, budget, and comfort level in the kitchen. You can keep things very simple for younger children or add more detailed designs for older kids and adults.
- Great for mixed-age groups, from preschoolers to teens.
- Customizable for any country, team color, or sport.
- Can be prepared ahead and stored until your event.
Choosing the Best Base Cookie
The secret to neat, medal-shaped treats is starting with cookies that are sturdy, fairly flat, and round. Soft, cake-like cookies tend to crumble or bend when you add a ribbon, so aim for something that keeps its shape when held by the edge.
You can bake your favorite recipe or simplify the process by using a reliable store-bought option. Either way, let the cookies cool completely before you begin decorating or cutting any openings for ribbon.
Good Cookie Options
- Plain sugar cookies: Smooth surface and neutral flavor that pairs well with frosting and sprinkles.
- Shortbread cookies: Sturdy, buttery, and less sweet, which balances sugary decorations.
- Vanilla sandwich cookies: Separate them, use one side as the “medal,” and keep the filling for another snack or dessert.
- Gingerbread rounds: Perfect for winter games or holidays with a warm spice flavor.
| Cookie Type | Pros | Things to Consider |
|---|---|---|
| Sugar cookies | Flat surface, easy to cut, mild flavor that kids love. | Can be fragile if rolled too thin or baked too soft. |
| Shortbread | Rich flavor and firm texture that holds a ribbon well. | Crumbles if overbaked; handle gently when making holes. |
| Sandwich cookies | No baking required, widely available, budget friendly. | Smaller surface for designs; center may crack if pushed too hard. |
| Gingerbread | Festive flavor and color, great for winter events. | Darker color can make metallic details less visible. |
Essential Supplies and Ingredients
Before starting, gather everything you need so kids can focus on decorating rather than waiting for missing pieces. Set up a “medal station” with small bowls, paper plates, and paper towels to help contain sprinkles and drips.
Core Ingredients
- Round cookies (homemade or store-bought).
- Royal icing, cookie icing, or thick powdered sugar glaze.
- Edible metallic decorations, such as gold, silver, or bronze luster dust or metallic sprinkles.
- Food coloring in primary colors for rings, flags, or team accents.
Medal and Ribbon Supplies
- Ribbon in red, blue, or any team color, cut into necklace-length pieces.
- Drinking straw, skewer, or small round piping tip for punching holes.
- Piping bags or squeeze bottles for neat icing lines.
- Parchment paper or wire racks for drying decorated cookies.
- Scissors for trimming ribbon (adults only).
Step-by-Step: Turning Cookies into Medals
This basic method works no matter which cookie you start with. If you’re working with younger children, consider doing the ribbon openings ahead of time so they can focus on decorating.
1. Prepare the Cookies
- Arrange cooled cookies in a single layer on a tray or parchment-lined table.
- Inspect for cracks or crumbs and set any fragile pieces aside as snacks rather than medals.
- Decide where the “top” of each medal will be so all the holes end up in roughly the same place.
2. Create the Ribbon Opening
You can either punch a small hole near the edge or embed the ribbon between two cookies using icing as glue. The best method depends on how sturdy your cookies are and how much time you have.
- Hole method: Use a drinking straw or skewer to gently twist a small hole near the top edge of the cookie. Wiggle slightly rather than pressing straight down to reduce cracking.
- Sandwich method: Spread a layer of icing on one cookie, lay a folded ribbon end on top, then press a second cookie gently over it. Let it dry completely before lifting.
3. Add the Medal Finish
- Outline the cookie with icing and flood the center for a smooth base, or keep the surface textured for a more rustic medal.
- While the icing is still soft, dust with edible metallic powder or sprinkle with colored sugar in gold, silver, or bronze tones.
- Tap the cookie gently to shake off excess decorations and place it back on the drying surface.
4. Decorate with Olympic-Inspired Details
Once the base layer sets, you can pipe small designs, numbers, or letters onto the medal. Keep details large and simple so they stay legible and don’t overwhelm the cookie.
- Pipe the year of the games in the center of the medal.
- Add tiny stars or stripes to represent team colors.
- Use different shapes or borders to distinguish gold, silver, and bronze sets.
5. Thread the Ribbon
- For holed cookies, slide the ribbon through the opening and tie the ends together in a knot or bow.
- For sandwiched cookies, gently tug on the ribbon once the icing is dry to ensure it is secure.
- Hang the finished medals on a rack or lay them flat until you’re ready to present them.
Creative Variations for Different Ages and Events
Once you master the basic method, you can adapt it for different sports, age groups, and themes. Use color, pattern, and labels to make every set of cookies feel unique.
No-Bake Shortcut Version
When time is short or baking is not an option, a no-bake approach keeps the fun without turning on the oven. Focus on assembly and decoration rather than mixing dough and waiting for cookies to cool.
- Use sturdy packaged cookies, such as plain shortbread rounds or sandwich cookies.
- Apply ready-made cookie icing or candy melts instead of homemade frosting.
- Let kids decorate using only squeeze bottles, sprinkles, and edible markers.
Healthy-ish Medal Ideas
If you prefer a slightly lighter treat, you can borrow the medal concept without relying solely on sugar cookies. The key is to keep the round shape and include some sort of ribbon or “strap.”
- Top round whole-grain crackers with nut butter and banana slices, then add a ribbon just for looks.
- Use rice cakes with yogurt spread and fruit arranged in circle patterns.
- Create “breakfast medals” with pancakes or mini waffles decorated with fruit and a small paper ribbon taped to a toothpick.
Themed Sets for Viewing Parties
Match your cookie medals to favorite athletes, sports, or nations. This makes your treat table feel more like an official opening ceremony spread.
- Color-code medals by sport: blue edges for swimming, green for track, red for gymnastics.
- Write event names or simple symbols in the center, such as a ball, hoop, or racquet.
- Create country-inspired sets with ribbon colors that echo different flags.
Kid-Friendly Kitchen Tips and Safety
Decorating cookie medals is an ideal first kitchen project for children when the environment is set up thoughtfully. Offer age-appropriate tasks to make everyone feel included.
Tasks for Different Age Groups
| Age Range | Suggested Tasks |
|---|---|
| Toddlers (with close supervision) | Sprinkling decorations, placing ribbons into already-made holes, choosing colors. |
| Early elementary | Squeezing icing from bottles, dusting metallic powder, helping thread ribbons. |
| Older kids and tweens | Outlining cookies, writing numbers or letters, carefully pressing straw holes in softer cookies. |
| Teens | Mixing icing, baking cookies, managing oven tasks with adult oversight. |
Safety Reminders
- Adults should handle hot pans, sharp scissors, and any cutting tools used to shape or pierce cookies.
- Explain that metallic-looking decorations must be labeled as edible before they go on food.
- Watch for loose ribbon threads, which can become choking hazards for very young children.
Storing, Transporting, and Displaying Your Cookie Medals
Planning to take your cookie medals to a classroom party or a friend’s house? Proper storage and packaging keep them looking shiny and impressive instead of smudged or broken.
How to Store Medal Cookies
- Let icing and decorations dry completely before stacking or wrapping.
- Place cookies in a single layer between sheets of parchment inside an airtight container.
- Keep them at cool room temperature away from direct sunlight, which can fade colors or soften icing.
Transport and Display Ideas
- Lay cookies flat in a shallow box for travel, then hang them on a DIY “medal stand” made from a clothes rack, tension rod, or cardboard display.
- Create individual “winner bags” with one gold, one silver, and one bronze medal stacked together in a clear food-safe bag.
- Arrange them on a cake stand or tiered tray, letting ribbons spill over the edge for a festive look.
Fun Games and Party Ideas Using Medal Cookies
These treats are more than dessert; they can become part of the entertainment. Plan a series of simple activities and hand out cookie medals as prizes so everyone leaves with a tasty reward.
Simple Backyard Events
- Obstacle course with hula hoops, cones, and jump ropes for timed runs.
- Ball toss or beanbag games with different “difficulty zones” worth extra points.
- Relay races where each teammate must complete a silly task such as hopping, skipping, or balancing a ball.
Non-Competitive Medal Uses
If you prefer to keep the focus on fun rather than winning and losing, use medals in more cooperative ways. This can be especially helpful with young kids or mixed-age groups.
- Give medals for creative categories such as “best team spirit,” “funniest cheer,” or “most colorful outfit.”
- Let everyone decorate their own cookie and then trade with a friend instead of competing.
- Host a “parade of nations” where each child carries a flag and receives a medal just for participating.
Frequently Asked Questions About Olympic Medal Cookies
Can I make medal cookies in advance?
Yes. If stored in an airtight container at room temperature, most decorated sugar or shortbread cookies stay fresh for several days. For best results, wait until the icing is fully dry before stacking or packaging.
What if my cookies crack when I make the ribbon hole?
Try making the hole while the cookies are still slightly warm but set, or switch to the sandwich method that hides the ribbon ends between two cookies. You can also move the hole a bit farther from the edge to give the cookie more support.
Do I need special edible metallic paints?
Not necessarily. While edible luster dusts and metallic gels create a very realistic medal shine, you can also use colored sugar, sprinkles, or tinted icing in gold, silver, and bronze shades for a similar effect.
How can I adapt this for food allergies?
Choose cookies that match your dietary needs, such as gluten-free or dairy-free options, and double-check that all decorations are safe for your guests. Consider using color-coded ribbons or labels to indicate which cookies meet specific restrictions.
Are these appropriate for classroom parties?
Yes, as long as the school allows homemade treats or you rely on packaged cookies with clear ingredient labels. Assemble medals at home, then bring them in boxes or individually wrapped bags for easy distribution and minimal mess.
Bring Home the Gold with Your Own Cookie Medals
With a handful of cookies, some icing, and lengths of ribbon, your family can create a tray of glittering medal cookies that look almost too impressive to eat. They offer a playful way to celebrate favorite athletes, encourage friendly games, and turn any viewing night into a memorable event.
Whether you go all out with detailed designs or keep things simple with a dusting of color, the real victory is the time spent together mixing, decorating, and cheering around the table.