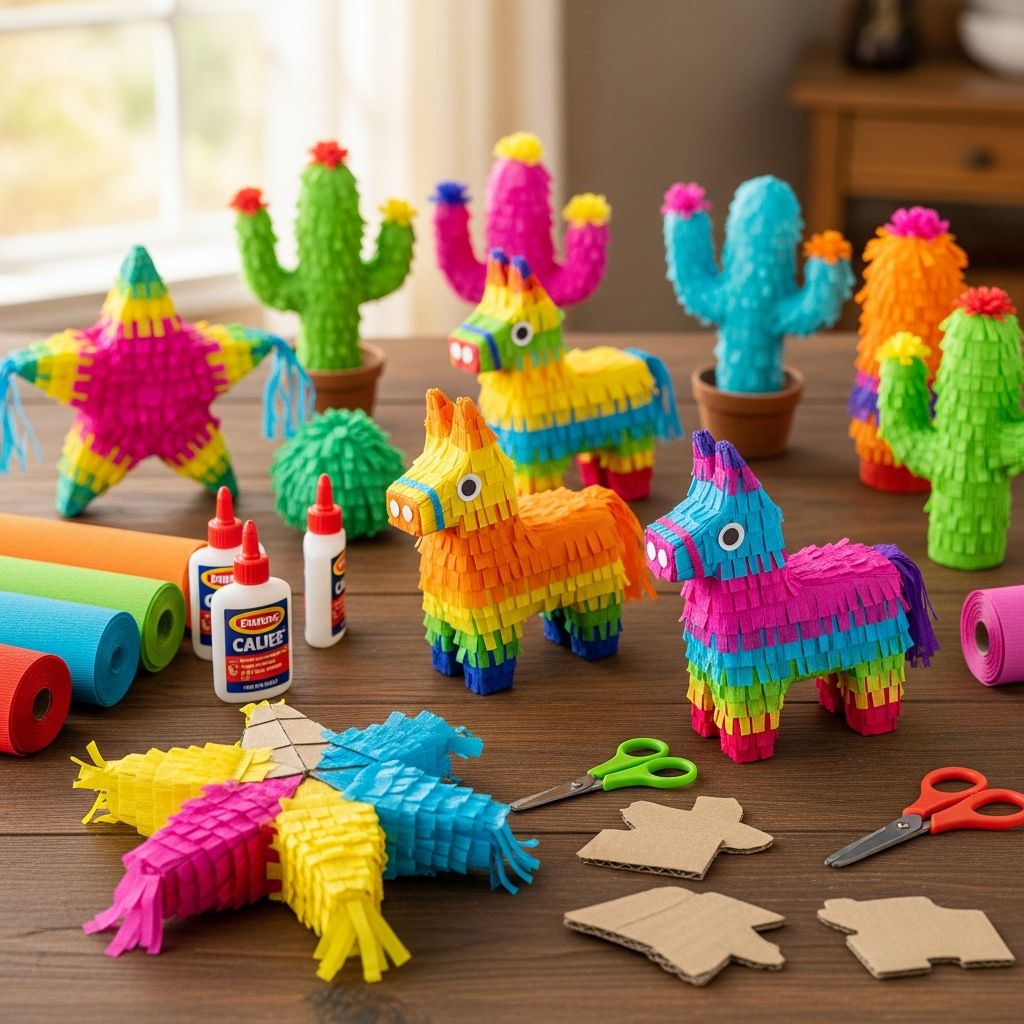
Mini piñatas are a playful way to bring bright color, tradition, and a little bit of surprise into any Cinco de Mayo celebration. Instead of buying generic party favors, you can turn cardboard and tissue paper into tiny treasures that double as décor and treats.
This guide walks through the entire process, from choosing shapes and planning your design to building the structure, decorating with fringe, filling with goodies, and presenting your creations at a fiesta. Everything here is written to be flexible, so you can adapt it to your time, budget, and crafting comfort level.
Why Mini Piñatas Are Perfect for Cinco de Mayo
Traditional piñatas are often large, heavy, and meant to be smashed to pieces. Mini versions keep the festive look but are easier to make, easier to display, and ideal for handing out as party favors. They also allow every guest to have their own small surprise instead of waiting in line for a single big piñata.
Mini piñatas are especially great for family parties because they can be filled with small toys, stickers, or non-candy treats, making them adaptable to guests of different ages and dietary needs.
Planning Your Mini Piñata Design
Before cutting a single piece of cardboard, spend a few minutes planning your design. This avoids frustration later and helps you decide how many piñatas to make and how much time you will need.
- Decide how many guests will receive a mini piñata.
- Choose one or two simple shapes that you can repeat easily.
- Coordinate the color scheme with the rest of your Cinco de Mayo decorations.
- Decide whether your piñatas will hang, sit on a table, or be attached to place settings.
Shape Ideas That Work Well
Simple, bold shapes are the easiest to cut and decorate, and they look great once covered in fringe. Avoid tiny, detailed designs that will be hidden under layers of tissue.
- Classic donkey or burro silhouette.
- Stars or suns for a bright, celebratory look.
- Hearts, circles, or squares for beginners.
- Cacti or chili peppers for extra fiesta flair.
| Shape | Skill Level | Best For | Notes |
|---|---|---|---|
| Circle or oval | Beginner | First-time crafters, kids helping with cutting | Fast to trace using bowls or lids as templates. |
| Star | Beginner–intermediate | Centerpieces and hanging decor | Looks dramatic once fringed, even in simple colors. |
| Donkey / burro | Intermediate | Traditional Cinco de Mayo themes | Works best if you keep the silhouette chunky, not detailed. |
| Cactus | Intermediate | Modern fiesta or southwestern themes | Arms can be reinforced with extra tape to avoid bending. |
Materials and Tools You Will Need
One of the biggest advantages of mini piñatas is that they use inexpensive, easy-to-find materials. Many of them can be repurposed from your recycling bin or leftover party supplies.
- Thin cardboard (cereal boxes, shipping boxes, or cardstock).
- Tissue paper in several bright colors.
- Masking tape or clear tape.
- Craft glue or a glue stick.
- Scissors and a craft knife (for adults).
- String, ribbon, or twine for hanging.
- Pencil and simple shape templates (bowls, cookie cutters, etc.).
- Candy, confetti, or small toys for filling.
Optional Extras
These extras are not required, but they add polish or make the project easier when you are making a large batch of piñatas.
- Metal hole punch for clean hanging holes.
- Pre-made confetti to tuck inside.
- Self-adhesive gems, stickers, or glitter glue for extra detail.
- Printed tags with guest names or short messages.
Step 1: Create the Cardboard Base
Every mini piñata begins with a simple box-like structure, which is made from two identical cardboard shapes connected by a strip that creates depth. This internal shell gives the piñata strength and forms the hollow space for fillings.
- Draw or trace your chosen shape twice on cardboard.
- Cut out both shapes carefully, making sure they are as similar as possible.
- Cut long strips of cardboard about 2.5–4 cm (1–1.5 inches) wide for the sides.
Once you have your pieces, gently bend the side strips so they curve around the outline of your shape. This makes taping much easier and helps reduce creases or cracks in the cardboard.
Step 2: Assemble the Mini Box
Now you will turn your flat pieces into a hollow, 3-D form. Work slowly and add tape in small sections so the shape stays even.
- Place one cardboard shape flat on the table; this is your base.
- Align the edge of a side strip with the outline of the base and tape it in place a few centimeters at a time.
- Continue adding more strips until you almost reach the full perimeter, leaving a small opening to fill the piñata later.
- Attach the second cardboard shape on top, taping around the edges to join it to the side strips.
If you want your piñata to hang, add a loop of ribbon or string before sealing everything. A simple method is to tape the ends of a loop inside the top area of the shape so the knot is hidden.
Step 3: Prepare Tissue Paper Fringe
The signature look of a piñata comes from rows of overlapping fringe. Cutting the fringe takes a bit of time, but you can prepare a stack of strips and then decorate several piñatas at once.
- Cut long strips of tissue paper approximately 4–5 cm (1.5–2 inches) wide.
- Stack several layers together and fold them lengthwise to speed up cutting.
- Along one long edge of the stack, snip small cuts toward the center without cutting all the way through, creating a fringe.
For a clean look, keep the uncut band along the top of the strip at least 1 cm wide. This uncut area will be glued to the cardboard while the fringed edge hangs free to create texture.
Step 4: Cover the Piñata with Fringe
Decorating is the most rewarding part of the process. The key is to start from the bottom and work upward so each new row hides the glued edge of the one below it.
- Apply a thin line of glue near the bottom edge of one side of the piñata.
- Press a fringe strip into the glue, keeping the uncut band on the cardboard and the fringe dangling below.
- Continue gluing strips in horizontal rows, overlapping slightly as you move upward.
- Repeat on the other side and finally around the edges.
Use one color per side for a bold look, or alternate colors every row for a rainbow effect. When you finish, gently trim any excessively long fringe so the shape still reads clearly.
Step 5: Fill and Close Your Mini Piñata
Once the structure is decorated, it is time to hide the goodies. Because mini piñatas are small, a little filling goes a long way. Choose items that are light, compact, and safe if dropped.
- Wrapped candies or chocolates.
- Mini erasers, stickers, or temporary tattoos.
- Confetti (paper, not metallic, if children will open them).
- Small notes with jokes or positive messages.
To close the opening, you can tape it shut from the outside and then cover the taped area with an extra patch of fringe. Another option is to design a small flap or tab that tucks in and can be gently pulled open later, which keeps the piñata reusable as a keepsake.
Safety and Kid-Friendly Tips
Even though mini piñatas are small, they should be designed with safety in mind, especially if young children will be handling them. Avoid sharp edges, heavy objects, and anything that might tear through the cardboard unexpectedly.
- Supervise children when scissors or craft knives are being used.
- Skip very hard candies for toddlers and opt for stickers or small toys instead.
- Keep glitter, sequins, and tiny beads out of piñatas intended for very young guests.
Turning Mini Piñatas into Party Stars
Once your piñatas are built, there are many creative ways to use them at a Cinco de Mayo fiesta. They can stand alone as decorations, become part of games, or be personalized for each guest.
- Place one mini piñata at each setting as a combined place card and favor.
- Hang a cluster at different heights as a colorful backdrop for photos.
- Arrange a row down the middle of the table instead of traditional centerpieces.
- Hide them around the house or yard for a piñata scavenger hunt.
Easy Color Combinations for a Fiesta Look
If you are unsure which colors to pick, think of classic Mexican folk art and textiles: bright, saturated hues layered next to each other. A few strong shades are enough to create a festive feeling without overwhelming the rest of your decor.
- Red, yellow, and turquoise.
- Pink, orange, and lime green.
- Blue and purple with pops of white for contrast.
- Monochrome green for cactus shapes or golden yellow for suns and stars.
Mini Piñatas as Gifts and Favors
Because they are personal and handmade, mini piñatas make memorable gifts long after the candy is gone. They can mark a milestone birthday, a themed baby shower, or a school celebration about Mexican culture.
- Add name tags and use them in place of traditional goody bags.
- Create a customized design that reflects the guest of honor’s favorite colors or hobbies.
- Include a small note inside thanking guests for celebrating with you.
Batch-Making Mini Piñatas for Larger Parties
For a large Cinco de Mayo gathering, making one piñata per guest can sound overwhelming. A simple, assembly-line approach helps you finish a big batch without feeling rushed.
- Cut all cardboard shapes at once and stack them by design.
- Prepare a large pile of pre-cut fringe strips in your chosen colors.
- Complete all bases, then move to decorating, then filling and sealing.
- Invite friends or older kids to help with safe, repetitive steps like gluing fringe.
Frequently Asked Questions (FAQs)
How long does it take to make one mini piñata?
For a first attempt, expect to spend about 30–45 minutes on a single piñata, including cutting, assembling, and decorating. As you gain experience, you can complete them more quickly, especially if you work on several at the same time.
Can children help with this project?
Yes, children can participate in age-appropriate steps such as choosing colors, cutting fringe with safety scissors, and gluing tissue strips. An adult should handle sharper tools like craft knives and supervise any activity involving small objects that may pose a choking hazard.
What can I use if I do not have cardboard?
If cardboard is unavailable, heavy cardstock or several layers of glued paper can serve as substitutes for small, lightweight piñatas. The structure will be more delicate, so keep the fillings very light and avoid hanging them by a long string.
Do mini piñatas need to be broken open?
They do not have to be broken like traditional piñatas. Many people prefer to design a flap or pull-tab so the contents can be released without destroying the craft, allowing guests to keep the decorated shell as a souvenir.
How far in advance can I make them?
Mini piñatas can be prepared several weeks before your Cinco de Mayo event as long as they are stored in a dry place away from direct sunlight. Wait until closer to the party to add any heat-sensitive fillings such as chocolate, especially in warm climates.
Making Cinco de Mayo Extra Special
Mini piñatas offer more than just candy; they are an opportunity to share time with family and friends while crafting, and to acknowledge the cultural traditions associated with Cinco de Mayo in a hands-on way. By choosing bright colors, playful shapes, and thoughtful fillings, you create tiny pieces of art that make the celebration feel lively and personal.
Whether you make a single centerpiece or a whole collection of favors, this simple project brings joy to the party twice—once while you build them and again when your guests discover what is hidden inside.