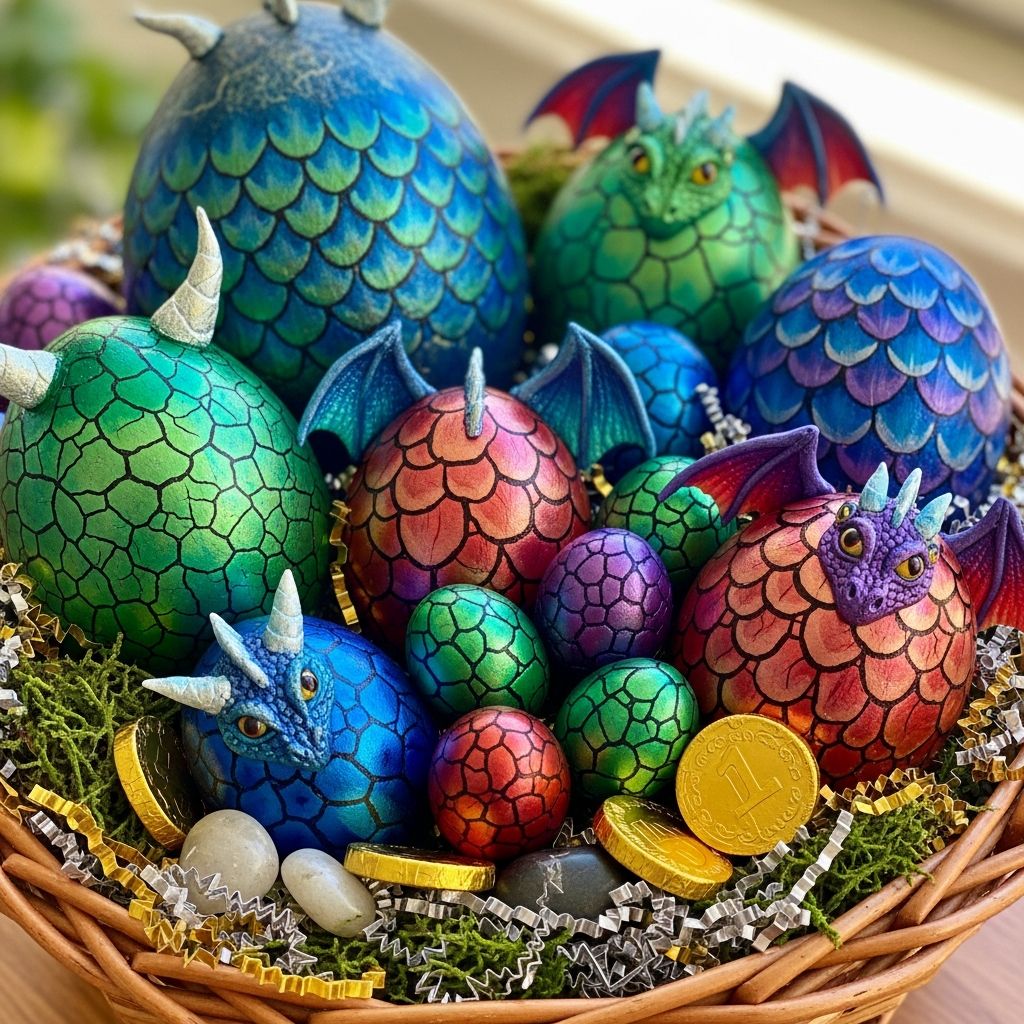
Easter eggs do not have to be pastel and predictable; they can also be mysterious, glittering treasures from a dragon’s hidden lair. Transform a simple egg-decorating afternoon into an immersive fantasy craft session filled with storytelling, texture, and shimmering color. This guide walks through how to design dragon eggs from start to finish, with a focus on creativity, kid-friendly steps, and a magical mood your family will remember.
Why Dragon Eggs Belong in Your Easter Basket
Dragon eggs bring a sense of adventure to a holiday that often leans on the same dye kits year after year. Instead of just coloring eggs, children imagine they are guardians of rare, powerful creatures waiting to hatch. The result is not only eye-catching decor but also a shared story that makes the finished project feel special and personal.
This project also stretches beyond simple dipping and drying, introducing kids to layering paint, building texture, and combining materials for dramatic effects. Adults can lean into more complex techniques while still keeping a simplified version for younger crafters.
Essential Materials and Smart Substitutions
The beauty of dragon egg crafting is that it works with whatever you already have in your art box. Start by choosing whether you want temporary, edible eggs or long-lasting display pieces. From there, you can adapt your materials to suit your budget, time, and family’s ages.
Core materials
- Eggs (hard-boiled for temporary decor or plastic/wooden foam eggs for keepsakes)
- Acrylic craft paints in metallic, jewel, and dark tones
- Paintbrushes in several sizes (including at least one small detail brush)
- Paper towels, scrap paper, or cardboard to protect your workspace
- Disposable cups or palettes for mixing colors
Texture and sparkle add-ons
- School glue or decoupage medium
- Fine glitter or mica powder
- Small flat-backed gems, rhinestones, or sequins
- Craft foam or air-dry clay for raised scales
- Netting, lace, or mesh as stencils for scaly patterns
Helpful tools
- Toothpicks or bamboo skewers for holding and detailing eggs
- Egg carton or foam block for drying
- Soft pencil for sketching patterns
- Optional clear sealer or varnish for durability on non-edible eggs
Planning Your Dragon Egg Designs
Before you open the paint, decide what kind of dragons your eggs belong to. Are they wise forest dragons, icy mountain guardians, or fiery cave dwellers? The answer will guide your color palette, textures, and finishing details. Planning this in advance turns the project from random decorating into intentional design.
Consider naming each dragon and giving it a short backstory. Children can sketch their dragon on paper and then decide which colors and patterns on the egg hint at that creature’s powers or personality.
Color ideas by dragon type
| Dragon Type | Suggested Colors | Texture Ideas |
|---|---|---|
| Fire Dragon | Deep reds, black, copper, gold | Crackled paint, heavy metallic highlights |
| Ice Dragon | White, silver, light blue, teal | Smooth finish with glitter, frosty gradients |
| Forest Dragon | Emerald, moss green, brown, bronze | Leaf-like imprints, earthy speckles |
| Storm Dragon | Dark blue, charcoal, violet, silver | Swirling marbling, lightning-like streaks |
| Gem Dragon | Magenta, turquoise, amethyst, gold | Embedded gems, high-shine metallic scales |
Preparing the Eggs for Crafting
Proper preparation prevents paint from sliding off or cracking too soon. Hard-boiled eggs should be cooled and dried completely before decorating. Wipe them lightly with a damp cloth to remove any residue, then pat dry so the surface is clean and ready for color.
Non-edible eggs such as plastic, wooden, or foam options benefit from a quick base coat of plain white or black acrylic paint. This base acts like a primer and helps subsequent layers of color appear richer and more even.
Base Coats: Laying the Foundation
A thoughtful base coat gives your dragon egg depth and richness, even before scales or gems appear. Choose one dominant color for each egg and cover the entire surface, using a skewer or toothpick pushed into the base to hold the egg while you paint. Allow enough drying time before moving to the next step.
For a more dramatic look, consider using dark bases like black, deep navy, or midnight green. When metallic paint or lighter colors are dry-brushed over the top, the result resembles worn, ancient scales rather than smooth, flat color.
Creating Scales with Simple Techniques
Scales are the heart of the dragon egg effect. You can build them in quick, easy ways for young children or more detailed methods for older kids and adults. The goal is to create repeated shapes that slightly overlap or sit close together, hinting at layered armor.
Painted scale patterns
- Use a small round brush to paint rows of half-circle shapes around the egg, starting at the bottom and working up.
- Overlap each new row slightly on the previous one so the shapes look like shingles on a roof.
- Alternate colors within the same family (for example, alternating teal and dark green) to create subtle variety.
Textured scale tricks
- Press netting or mesh lightly into a nearly dry layer of paint to lift some color and reveal a pattern that mimics scales.
- For non-edible eggs, dab small droplets of glue across the surface; when dry, they create raised bumps that look like rough, worn scales once painted over.
- Roll the egg over crumpled foil to create gentle dents on foam eggs, adding a weathered, battle-scarred look.
Adding Dimension with Layered Color
Flat color can look cartoonish, but layering brings dragon eggs to life. Once your base coat and scale shapes are dry, use dry-brushing and shading to imitate depth and light. A tiny amount of paint goes a long way; it should feel more like dusting color than fully covering an area.
Dry-brushing involves dipping the brush in paint, wiping most of it off on a paper towel, and then lightly passing it over raised surfaces. This highlights scales, edges, and textures, making them appear three-dimensional without a lot of effort.
Layering ideas
- Highlight edges with metallic paints such as gold, copper, or silver to suggest light reflecting off scales.
- Shade crevices with a darker tone of your base color to deepen the illusion of overlapping layers.
- Blend small patches of a contrasting color to show areas of magical energy or glowing heat beneath the shell.
Special Effects: Cracks, Runes, and Glow
Once the main color and texture are complete, it is time for dramatic details. Cracks, glowing fissures, and strange symbols transform a pretty egg into a mysterious artifact that looks like it could hatch at any moment. This is especially fun for older kids who enjoy fantasy stories or role-playing games.
Sketch lightly with a pencil first if you are nervous about painting freehand. Mistakes can usually be blended back into the background with a bit of base color.
Cracked shell illusion
- Use a fine brush and dark paint to draw irregular, branching lines across the egg, meeting at jagged angles.
- Outline one side of each crack with a thin highlight color to suggest depth.
- Add a tiny touch of bright color (such as gold or neon blue) inside a few cracks to hint that something magical glows within.
Magical runes and symbols
- Invent your own alphabet or use simple shapes like triangles, spirals, and arrows to create mysterious markings.
- Paint runes in a single high-contrast color and dot the ends of lines to give them a mystical, purposeful appearance.
- Consider placing symbols in a ring around the top or bottom of the egg, as if they were part of an ancient spell.
Gemstone Accents and Shimmer
Gems and sparkle raise your dragon eggs from interesting to breathtaking. Strategic placement makes them feel like part of the egg’s anatomy rather than random decoration. Think of them as natural crystal formations, magical seals, or protective nodes growing from the shell.
For younger children, offer a limited selection of colors and show examples of clustered versus evenly spaced gems. Older crafters can experiment with gradients of color that fade into painted highlights around each stone.
Ways to use gems and glitter
- Create a “spine” of gems running from the top to the bottom of the egg, resembling a row of armor plates.
- Cluster stones near cracks or runes, as if channeling or containing the dragon’s power inside.
- Brush a thin layer of glue over certain areas and dust with fine glitter, concentrating it around high points to emphasize the shape of the scales.
Kid-Friendly Variations and Safety Tips
Dragon egg crafts can be tailored for any age. Toddlers and preschoolers may focus on bold color and simple dabbing, while older children handle detailed scales, symbols, and glue-on embellishments. Supervision matters most when sharp tools, hot water, or small gems are involved.
Discuss in advance which eggs will be purely decorative and which might be peeled and eaten later. For edible eggs, keep decorations on the shell’s surface only, avoid toxic materials, and always remove embellishments before serving.
Safety and simplicity checklist
- Reserve very small gems and beads for older children to avoid choking hazards.
- Use nontoxic, washable paints for young kids, and protect clothing with smocks or old T-shirts.
- Set up a drying area that children cannot easily bump, reducing the risk of spills or broken eggs.
Turning Dragon Eggs into a Family Story
The craft becomes even more memorable when it is woven into a story. As each person finishes their egg, encourage them to introduce the dragon that lives inside. They can share its name, powers, favorite habitat, and how it might help protect the family’s imaginary kingdom.
Combine finished eggs into a “dragon nest” centerpiece surrounded by greenery, moss, or tissue paper flames. Add small handwritten tags describing each dragon’s traits so visitors can read about your mythical menagerie.
Displaying, Hiding, and Gifting Your Creations
Once finished, dragon eggs deserve a prominent place in your spring decor. They can nestle into Easter baskets, perch on candleholders, or sit on small stands fashioned from bottle caps or folded cardstock. Non-edible eggs can be tucked into a box for reuse year after year, slowly growing your magical collection.
For egg hunts, hide dragon eggs in slightly more challenging spots and include a short clue or riddle wherever one is found. The finder can adopt that dragon for the day, using its imaginary powers to “unlock” small privileges like choosing a game or story that evening.
Care and Storage for Long-Lasting Dragon Eggs
If you work with plastic, wooden, or foam bases, a little care will help your dragon eggs stay beautiful over time. Once the paint is completely dry, a light coat of clear varnish or spray sealer (used outdoors or in a well-ventilated area) adds protection from chipping. Let the sealer dry fully before handling.
Store your eggs wrapped in tissue paper or soft fabric inside a sturdy box. Label each layer so next year’s unboxing feels like opening a chest of treasures rather than sorting through random craft leftovers.
Frequently Asked Questions
Can I make dragon eggs without paint?
Yes. You can wrap eggs in colored tissue, foil, or patterned tape to create dragon-like textures. Press the materials firmly around the shell, then seal with a thin layer of glue or decoupage medium on non-edible eggs.
Are dragon egg crafts suitable for toddlers?
With supervision and simplified steps, toddlers can enjoy this project. Focus on letting them dab large patches of color with sponges or wide brushes while an adult handles gems, small pieces, and detailed line work.
How long will decorated eggs last?
Hard-boiled eggs decorated for display should be used or discarded within a safe timeframe recommended for refrigerated cooked eggs. For long-term decor, choose plastic or wooden eggs and protect them with a clear finish so they can return each year without fading.
Can I mix traditional dye kits with these techniques?
Absolutely. You can start with dyed eggs to establish a vibrant base, then layer on painted scales, cracks, and gems after the shells are fully dry. Combining dye and paint offers more depth with less effort.
What if I do not have special craft supplies?
Creative improvisation often leads to the most interesting dragon eggs. Try crayon resist designs, simple marker patterns, or sponge painting with whatever colors you have. The storytelling you build around each egg matters more than any single material.