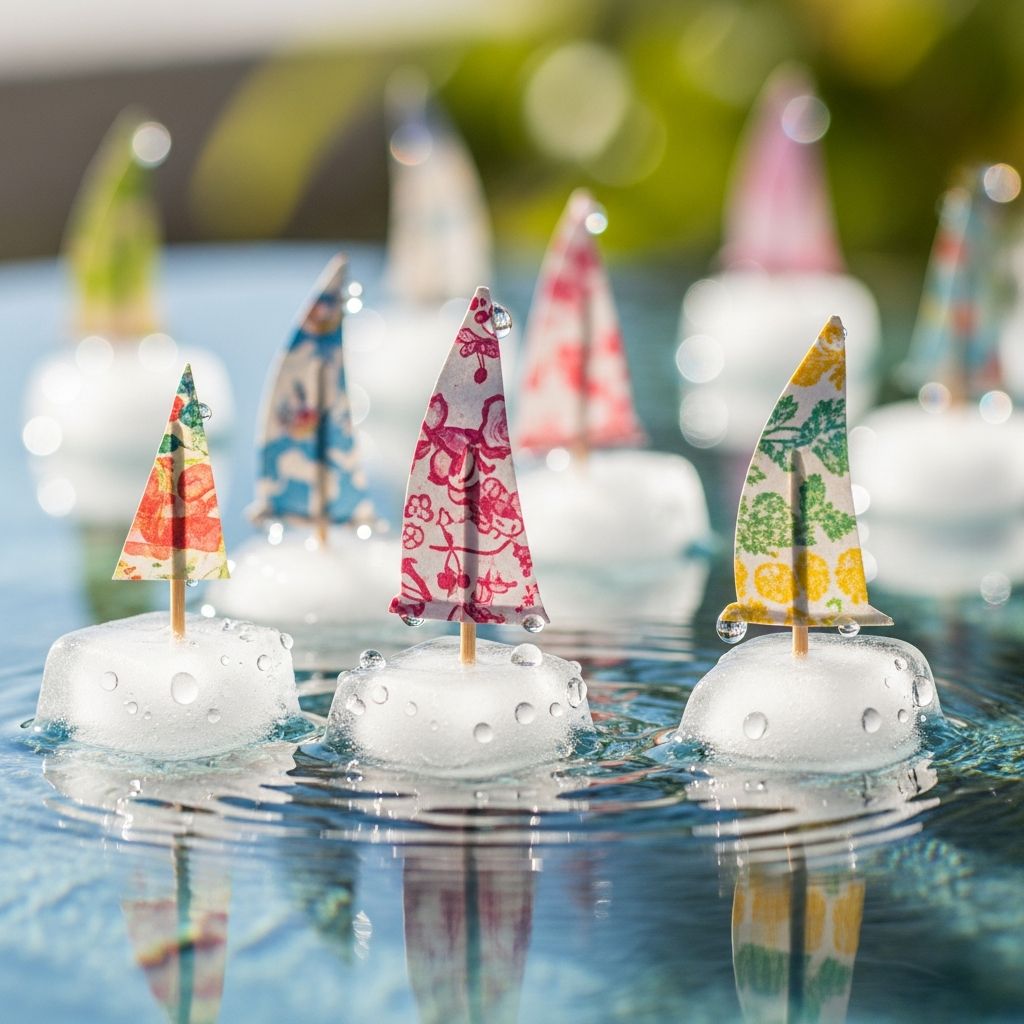
When temperatures climb and kids get restless, a simple water-and-ice activity can reset the mood fast. Ice cube sailboats are a kid-friendly craft and outdoor play idea rolled into one: children build the boats, freeze them, decorate sails, and then send them gliding across water for cool, hands-on fun.
This guide walks you through how to make ice cube boats using everyday supplies, plus ideas for learning, safety, and playful variations so you can keep revisiting the activity all summer.
Why Ice Cube Boats Make the Perfect Summer Craft
Ice cube sailboats are more than just cute; they are a smart choice for families because they are:
- Low-prep: Most materials are already in your kitchen or craft bin.
- Budget-friendly: Water, paper, and a few simple items are all you need.
- Quick to set up: Active crafting time is short; the freezer does most of the work.
- Easy to clean: The main ingredient is ice, which melts away instead of making sticky messes.
- Flexible: Suitable for toddlers with supervision and still interesting for older kids if you add challenges.
Unstructured water play supports sensory development, creativity, and self-directed exploration in early childhood, which many child development experts highlight as foundational to learning.
Basic Supply Checklist
You can adapt this activity to what you have on hand, but the core idea is simple: a block of ice with a mast and a sail. Here is a flexible list to get you started.
| Category | Suggested Items | Notes |
|---|---|---|
| Ice base | Plastic cups, silicone molds, ice cube trays, muffin tins | Choose a size that fits your container or water table. |
| Mast | Bendable straws, wooden skewers (blunt ends), craft sticks | Straws are soft and kid-friendly; trim to fit. |
| Sails | Construction paper, cardstock, foam sheets, recycled cardboard | Thick paper or foam holds up better when wet. |
| Fasteners | Clear tape, washi tape, glue dots, hole punch | Hole punches make neat mast holes in sails. |
| Water & color | Plain water, food coloring, liquid watercolors | Optional color makes boats easier to see and more fun. |
| Play space | Large bowl, baking dish, water table, plastic bin | Choose an outdoor-friendly spot if possible. |
Step-by-Step: How to Build Ice Cube Sailboats
Use these steps as a basic template and modify them to match your supplies and your child’s age.
1. Prepare the Ice Molds
Start by choosing what shape you want for your boats. Smaller cups or ice cube trays make boats that melt quickly; larger molds float longer and move more slowly.
- Rinse out your cups or trays.
- Place them on a small tray or plate so they are easy to carry to and from the freezer.
- Invite kids to help decide: one big boat or a fleet of tiny boats?
2. Add Water and Color (Optional)
Fill each cavity or cup with clean tap water, leaving a small gap at the top so the expanding ice does not overflow. If you want colorful boats:
- Stir a drop or two of food coloring into each compartment.
- Experiment with mixing primary colors to create new shades.
- Talk about what happens when colors blend — an easy intro to basic science concepts.
Using food coloring in small amounts is generally recognized as safe in food contexts, but it can stain skin or clothing, so consider smocks or aprons to minimize laundry.
3. Add the Mast
The mast keeps the sail upright and gives kids something to hold when lowering the boat into water.
- Cut each straw or stick so it is slightly taller than the cup or mold.
- Place the mast in the center of the water in each cup or cube.
- If it tips over, support it with a small piece of tape across the top of the cup, or cover the tray with foil and poke the mast through so it stays vertical.
Positioning the mast near the center helps the boat float more evenly, which is a simple, child-friendly way to explore balance and stability.
4. Freeze the Boats
- Carefully move the tray or cups to the freezer.
- Freeze for several hours or overnight until completely solid.
- For impatient kids, set a timer together and check progress—it turns waiting into part of the activity.
Freezing time varies based on volume and freezer temperature, but most home freezers require several hours to fully freeze small containers of water.
5. Design and Decorate the Sails
While the ice freezes, shift the focus to art. Cut simple sail shapes and let children decorate freely.
- Cut triangles, rectangles, or fun shapes like hearts or lightning bolts.
- Offer crayons, washable markers, stickers, or stamps.
- For sturdier sails, trace shapes onto cardstock or thin craft foam.
- Use a hole punch to make two holes in each sail so it can slide onto the mast, top and bottom.
Drawing and cutting help build fine motor skills and creativity, aligning with recommendations from early childhood educators to provide rich, open-ended art experiences.
6. Release the Ice from the Molds
Once the water has frozen solid, it is time to unmold the boats.
- Let the cups sit at room temperature for a minute or two, or run a little warm water over the outside of the cup.
- Gently tug or wiggle the mast to loosen the ice boat.
- Place released boats on a plate or tray to carry outside quickly so they don’t melt too much indoors.
Briefly running warm water on the outside of the container helps the ice expand and slip out more easily without cracking.
7. Attach the Sails
- Slide the mast through the two pre-punched holes in each sail.
- Adjust the height so the sail sits around the middle of the mast.
- If needed, secure the bottom of the sail with a small piece of tape to keep it from sliding.
Now your fleet is ready to sail.
Play Ideas: Turn Your Backyard into a Mini Harbor
Once the boats are built, the real magic begins. Set out a container of water and invite kids to test, race, and experiment.
Simple Ways to Play
- Gentle races: Place two or more boats at one end of a tub and blow through straws to see which reaches the other side first.
- Wind and waves: Use a handheld fan, paper plate, or folded cardboard to create wind that pushes the sails.
- Obstacle course: Float small objects (like clean bottle caps or foam blocks) as “islands” to sail around.
- Rescue mission: Drop a few small plastic figures in the water and try to nudge them to safety with the boats.
- Melting watch: Observe how the boats change shape as they melt and talk about where the ice is going.
STEM Learning Moments
Ice boats are a playful entry point into basic science, technology, engineering, and math concepts:
- States of matter: Notice the transition from liquid water to solid ice and back to liquid again as it melts.
- Buoyancy: Compare what floats and what sinks—ice floats on water because it is less dense.
- Forces and motion: Explore how blowing, pushing, or using “wind” changes the speed and direction of the boats.
- Prediction and testing: Ask kids to guess which boat will melt first or move fastest and then observe what happens.
Safety & Cleanup Tips for Grown-Ups
Like any water play, a few simple precautions keep everyone safe and relaxed.
- Always supervise water play closely. Drowning can occur quickly and in surprisingly small amounts of water, so constant, attentive adult supervision is essential.
- Use shallow containers. Bowls, bins, or trays with just a few centimeters of water are usually enough for this activity.
- Adapt for age: For toddlers, keep boats large enough not to be a choking risk and avoid sharp masts or small decorations.
- Protect surfaces: Set up outdoors or place towels under indoor play to catch drips.
- Quick cleanup: When play is done, pour water into a sink or garden bed and compost or recycle paper and cardboard where possible.
Fun Variations to Try All Summer Long
Once you have tried the basic version, mix things up to keep kids interested and engaged.
1. Rainbow Regatta
- Freeze separate batches of red, blue, and yellow boats.
- Match the sail color to the hull color for a coordinated fleet, or let kids deliberately mismatch colors.
- Invite children to group boats by color or create patterns, adding a bit of early math practice.
2. Nature Explorer Boats
- Collect leaves, small petals, or tiny twigs from the yard.
- Drop these natural treasures into the cups before freezing.
- As the ice melts in the water table, kids can scoop out the items and examine them up close.
3. Glow-in-the-Dark Harbor (Evening Play)
- Use a large clear container outside at dusk.
- Float ice boats alongside glow sticks placed in the water for a nighttime regatta.
- Stick to sealed glow products and supervise carefully; discard if they crack.
4. Mini Ice Boat Science Lab
Turn your play space into a simple experiment station:
- Test how boats move in cold vs. slightly warm water.
- Add a pinch of salt to one section of water and leave the other plain; compare how quickly the ice melts.
- Record results on a simple chart with pictures or tally marks.
5. Themed Storytelling Boats
- Choose a theme: pirates, explorers, arctic animals, or favorite storybook characters.
- Decorate sails to match the theme—skull-and-crossbones, treasure maps, or animal faces.
- Invite kids to narrate a story as they sail their boats, building language skills along with imagination.
Frequently Asked Questions (FAQs)
What age group is best for ice cube sailboats?
Preschoolers and early elementary kids usually get the most from building and sailing the boats. Toddlers can enjoy watching, splashing, and helping with simple parts like decorating sails, but they require very close, hands-on supervision around any water and small pieces.
How can I keep the activity low-mess indoors?
Use a deep plastic storage bin with just a small amount of water and place it on a large towel or waterproof mat. Offer only a few boats at a time, and keep a hand towel nearby for quick wipe-ups. You can also place the bin in the bathtub to contain splashes.
My boats keep tipping over. What should I change?
Try lowering the center of gravity by shortening the mast and using a smaller sail. Make sure the mast is centered in the ice rather than near the edge, and use wider molds so the base of the boat is more stable. Kids can help troubleshoot, turning this into a playful engineering challenge.
Can we reuse the sails and masts?
Yes. Let everything dry thoroughly after play, flatten any crumpled sails, and store them in a labeled envelope with the masts. Next time you make boats, you only need to freeze fresh ice blocks and slide the saved sails back on.
Is it okay to use food coloring in the ice?
Using a small amount of food coloring in ice for play is common. It may lightly stain skin and some fabrics, so consider aprons and choose play clothes. If you prefer to avoid color in the water, add color only to the paper sails instead.
How long do the boats last before melting?
In hot weather and shallow water, small ice boats may last around 10–20 minutes, while larger blocks of ice can float longer. You can keep a second batch in the freezer to swap in when the first fleet melts, extending playtime without extra prep.
References
- Developmentally Appropriate Practice in Early Childhood Programs Serving Children from Birth Through Age 8 — National Association for the Education of Young Children (NAEYC). 2021-04-01. https://www.naeyc.org/resources/position-statements/dap
- Characteristics of Play and Their Importance in Early Education — American Academy of Pediatrics, M. Yogman et al. 2018-09-01. https://publications.aap.org/pediatrics/article/142/3/e20182058/38619/The-Power-of-Play-A-Pediatric-Role-in-Enhancing
- Food Color Additives: What You Need to Know — U.S. Food & Drug Administration (FDA). 2023-03-20. https://www.fda.gov/food/food-additives-petitions/color-additives-question-and-answer
- Water: A Closer Look at the Most Common Substance on Earth — U.S. Geological Survey (USGS). 2019-01-01. https://www.usgs.gov/special-topics/water-science-school/science/water-density
- Water Safety for Children — Centers for Disease Control and Prevention (CDC). 2024-05-15. https://www.cdc.gov/drowning/facts/index.html