Hot chocolate spoons are a fun, hands-on way to turn simple ingredients into a rich, cozy treat that doubles as a charming homemade gift. Instead of powdered mixes, these spoons use real melted chocolate that you stir into hot milk to create a luscious cup of cocoa.
This guide walks through everything from choosing the right chocolate to decorating, gifting, and storing your spoons, plus variations for different diets and flavors. It is written to be easy enough for beginners, but detailed enough that experienced crafters and bakers will still pick up a few new ideas.
Why Hot Chocolate Spoons Are Worth Making
Hot chocolate spoons are more than just a cute idea; they are practical, versatile, and surprisingly economical. They combine a small craft project with a delicious payoff, making them ideal for families, classrooms, offices, and holiday gatherings.
- Kid-friendly project: Children can help with stirring, decorating, and packaging.
- Customizable flavors: You can create classic, peppermint, mocha, or even spicy versions.
- Perfect for gifting: Individually wrapped spoons make thoughtful, low-cost presents.
- Great for parties: Arrange different flavors in jars and let guests choose their own.
Essential Ingredients and Tools
Before melting any chocolate, gather a few basic supplies. The exact brands are not critical, but quality does matter, especially for the chocolate.
Core ingredients
- Chocolate: Bars or chips in milk, dark, or white chocolate.
- Optional fat: A small amount of coconut oil or cocoa butter to help with smooth melting.
- Toppings: Mini marshmallows, crushed candy canes, sprinkles, toffee bits, or flavored chips.
Recommended tools
- Heat-safe bowl and saucepan (for a simple double boiler) or a microwave-safe bowl.
- Wooden, bamboo, or sturdy plastic spoons.
- Silicone ice cube tray, mini muffin tray, or parchment-lined baking sheet.
- Small spatula or spoon for filling molds.
- Cellophane bags, twine, and gift tags for packaging.
Choosing the Right Chocolate
The flavor and texture of your finished spoons depend heavily on the chocolate you use. Think of it as the foundation of your drink: if you like the chocolate by itself, you will likely enjoy it melted into milk.
| Type | Taste profile | When to use |
|---|---|---|
| Milk chocolate | Sweet, creamy, mild cocoa flavor | Great for kids and classic, dessert-like hot chocolate |
| Dark chocolate (60–70%) | Richer, more intense cocoa, less sweet | Perfect for adults or anyone who prefers a deeper chocolate flavor |
| White chocolate | Very sweet, buttery, no real cocoa flavor | Best for vanilla-style or colored festive spoons and swirls |
| Chocolate chips | Convenient, slightly firmer set | Ideal when you need consistent results and easy melting |
Step-by-Step: Basic Hot Chocolate Spoons
The steps below outline a simple, reliable method. Adjust quantities depending on how many spoons you would like to make.
1. Prepare your workspace
- Line a baking sheet with parchment paper if you are dipping spoons directly.
- If using a silicone mold, place it on a tray so you can move it easily once filled.
- Arrange spoons, toppings, and tools within easy reach before melting the chocolate.
2. Melt the chocolate gently
Use either a microwave or a makeshift double boiler. Slow, gentle heat keeps the chocolate smooth and prevents scorching.
- Microwave method: Heat the chocolate in short bursts, stirring in between until just melted and glossy.
- Stovetop method: Place a heat-safe bowl over a pan of simmering water, stirring the chocolate until melted.
- If desired, stir in a teaspoon or two of coconut oil or cocoa butter for a silkier finish.
3. Fill molds or coat spoons
There are two main approaches: letting the chocolate set around the spoon in a mold, or coating the spoon directly.
- Mold method: Spoon melted chocolate into each cavity, then insert a spoon upright into the center.
- Direct dipping method: Dip each spoon into the chocolate, turning to coat the bowl of the spoon fully.
- Allow excess chocolate to drip off before setting the spoon on your lined tray or in the mold.
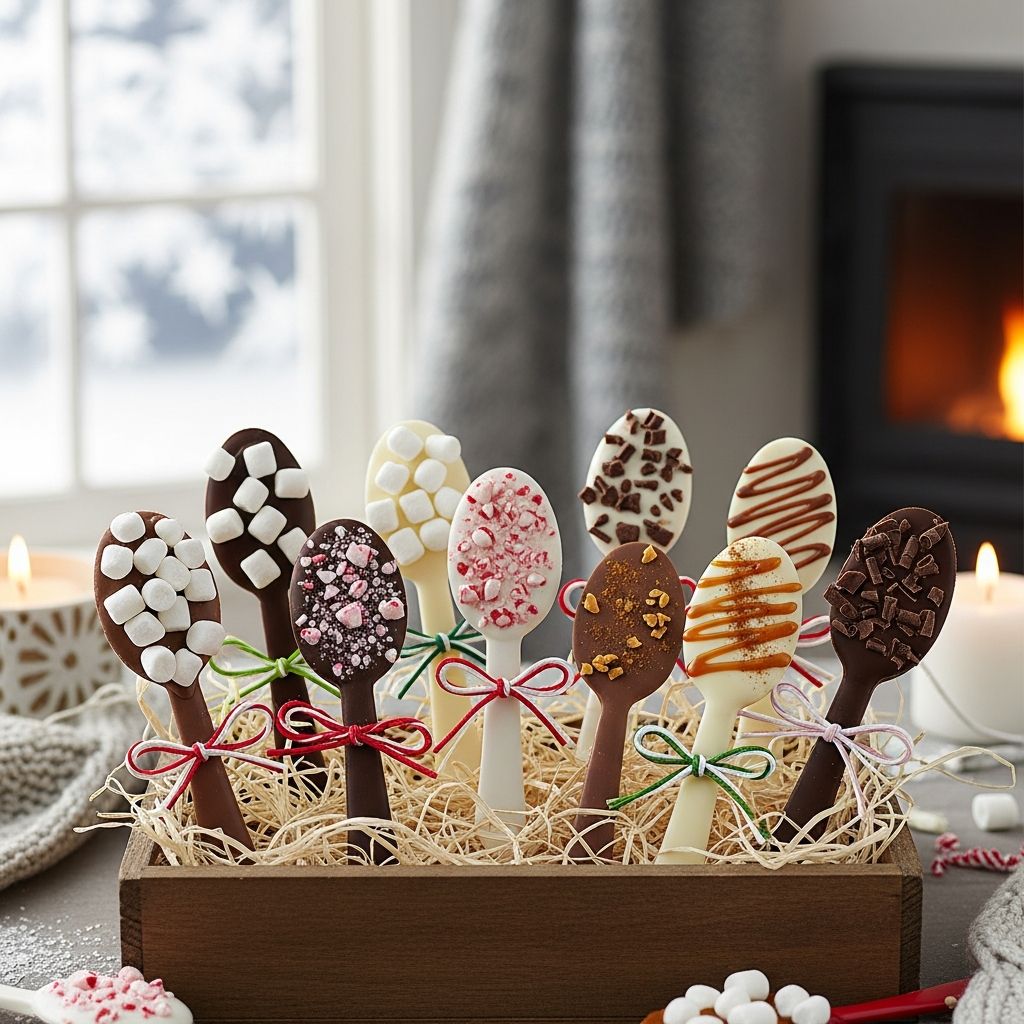
4. Add toppings and decorations
Toppings add texture, flavor, and visual appeal. Sprinkle them on while the chocolate is still soft so they adhere well.
- Press mini marshmallows lightly into the surface.
- Dust with crushed candy canes for a peppermint crunch.
- Add chocolate curls, sprinkles, or a drizzle of contrasting chocolate for a polished look.
5. Let the spoons set completely
Allow the chocolate to firm up at cool room temperature or in the refrigerator. Rushing this step can lead to cracks or smudged decorations.
- Room temperature: Expect several hours for a fully firm set.
- Refrigerator: Usually 30–60 minutes, depending on thickness.
- Once solid, carefully remove spoons from molds or peel them from the parchment.
Flavor Variations to Try
One of the best parts of making hot chocolate spoons is the freedom to experiment with different taste combinations. You can create a whole “flavor bar” by mixing and matching extracts, toppings, and chocolate types.
- Peppermint: Stir a drop or two of peppermint extract into the melted chocolate and garnish with crushed candy canes.
- Mocha: Add a small amount of instant espresso powder for a coffee-chocolate spoon that pairs well with hot milk or brewed coffee.
- Salted caramel: Swirl in soft caramel bits and finish with a pinch of flaky sea salt.
- Spiced chocolate: Sprinkle in cinnamon, nutmeg, or a tiny touch of cayenne for a warming, grown-up twist.
- Cookie crumble: Top with crushed sandwich cookies or shortbread pieces for extra crunch.
Serving: How to Use Hot Chocolate Spoons
Hot chocolate spoons are meant to be stirred into hot liquid until the chocolate fully dissolves. The amount of liquid you use depends on how rich you prefer your drink.
- Heat your milk or milk alternative until steaming but not boiling.
- Place one spoon into a mug and pour the hot liquid over it.
- Stir slowly until the chocolate melts completely and the drink looks smooth and uniform.
| Spoon size | Approximate chocolate amount | Suggested milk per spoon |
|---|---|---|
| Small spoon | 1–2 tablespoons chocolate | 3/4 to 1 cup hot milk |
| Standard spoon in mold | 2–3 tablespoons chocolate | 1 to 1 1/2 cups hot milk |
| Extra-large spoon block | 3–4 tablespoons chocolate | Up to 2 cups hot milk |
Packaging Ideas for Gifts
Thoughtful packaging turns a simple spoon into a gift-worthy treat. A little creativity goes a long way, and you do not need elaborate materials.
- Slip one or two spoons into a clear cellophane bag and tie with twine or ribbon.
- Attach a tag with serving instructions and flavor descriptions.
- Place several individually wrapped spoons in a mug, basket, or small box as a larger gift.
For special occasions, coordinate ribbon and toppings with a color theme, such as red and white for winter holidays or pastel sprinkles for a winter birthday party favor.
Party and Gathering Ideas
Hot chocolate spoons fit easily into a variety of events, from casual family movie nights to festive gatherings. They can simplify hosting because the spoons act as pre-portioned flavor packets.
- Hot cocoa bar: Offer multiple spoon flavors, jars of toppings, and pitchers of hot milk.
- Winter birthday activity: Let guests decorate their own spoons and take them home as favors.
- Office treats: Set out a basket of individually wrapped spoons near the coffee station.
Tips for Storage and Shelf Life
Proper storage keeps your spoons looking neat and tasting fresh. Because they are primarily chocolate, they can last for several weeks if stored correctly.
- Keep them in a cool, dry place away from direct sunlight and heat sources.
- Use airtight containers or sealed bags to prevent moisture and odors from affecting the chocolate.
- If using perishable toppings (like soft caramels that might weep), aim to serve or gift within a week or two.
Dietary and Allergy-Friendly Adjustments
With a few substitutions, you can adapt hot chocolate spoons to suit many dietary needs. Always label ingredients if gifting to someone with allergies or sensitivities.
- Dairy-free: Use dairy-free dark chocolate and pair with almond, oat, or soy milk.
- Vegan: Choose vegan chocolate and gelatin-free marshmallows; avoid dairy-based toppings.
- Nut-free: Check labels on chocolate and toppings to ensure they are made in nut-safe facilities.
- Low-sugar: Use chocolate sweetened with alternative sweeteners and limit candy toppings.
Common Mistakes and How to Avoid Them
Even a simple project can have a few pitfalls. Understanding the most frequent issues helps ensure smooth, glossy, and sturdy spoons every time.
- Grainy texture: Often caused by overheating the chocolate; use gentle heat and stir often.
- Spoons falling over in molds: Prop handles against the mold edges or anchor them with toppings.
- Chocolate not melting fully in milk: Make sure the milk is hot enough and give the spoon more time to dissolve.
- Toppings falling off: Add them while the chocolate is still soft and press lightly so they embed in the surface.
Frequently Asked Questions (FAQs)
How far in advance can hot chocolate spoons be made?
When stored in a cool, dry place in airtight packaging, hot chocolate spoons can typically be made several weeks in advance. For best flavor and texture, many people prefer to use them within two to three weeks, especially if marshmallows or other sensitive toppings are included.
Do I have to temper the chocolate?
Tempering creates a glossy finish and a sharper snap, but it is not strictly necessary for this project. For most home uses and casual gifting, gently melted chocolate that is allowed to set completely will be more than adequate and much simpler to manage.
Can I use these spoons with water instead of milk?
Yes, the spoons will still melt in hot water, but the drink will be thinner and less creamy. If using water, consider making the spoons with richer dark chocolate or adding more chocolate per serving to keep the drink flavorful.
What kind of spoons work best?
Sturdy wooden or bamboo spoons hold up well and have a cozy, rustic look. Reusable metal spoons can also work, especially if you plan to serve the drinks immediately and collect the spoons afterward.
Can kids help make hot chocolate spoons?
Yes, this is a very child-friendly project when an adult handles the hot chocolate and any cutting tools. Children can safely help with stirring cooled chocolate, sprinkling toppings, and decorating or labeling packages.
How many spoons should I give as a gift?
For small tokens, one or two spoons packaged together is usually enough. For a larger gift, consider pairing several spoons with a mug, a jar of extra marshmallows, or a cozy pair of socks for a complete cold-weather bundle.
Bringing It All Together
Hot chocolate spoons offer an inviting blend of creativity, flavor, and comfort. With a few basic ingredients and simple steps, you can create beautiful spoons that brighten winter days, warm cold hands, and add a personal touch to your gifts and gatherings.
Whether you keep the flavors classic or adventurous, the joy of stirring a chocolate-laden spoon into steaming milk is a small ritual that feels special every single time.