Homemade Silly Putty is a simple, inexpensive craft that doubles as a mini science experiment, giving children a playful way to experience what a non-Newtonian fluid is. This guide walks you through the materials, key safety tips, step-by-step instructions, and the science behind why this strange substance can behave like both a liquid and a solid.
What Is Silly Putty?
Silly Putty is a stretchy, bouncy material that can flow slowly like a thick liquid yet snap or shatter when pulled or struck quickly. It can be rolled into a ball, flattened, stretched into long strands, or pressed into molds to capture shapes and textures.
The original toy was developed accidentally during research into synthetic rubber, but its unusual properties quickly turned it into a popular children’s plaything and a classic example for teaching about material science.
Understanding Non-Newtonian Fluids
A non-Newtonian fluid is a substance whose viscosity (thickness or resistance to flow) changes depending on the force applied to it. In contrast, a simple liquid like water flows the same way whether it is stirred slowly or quickly.
Silly Putty acts like a non-Newtonian fluid because it flows slowly under gentle forces but becomes firm and brittle when you apply sudden, strong forces. This makes it ideal for demonstrating how some materials do not follow the usual rules described by Newton’s laws of viscosity.
Learning Goals and Benefits
Making homemade Silly Putty is more than just a craft; it is a hands-on STEM activity that encourages kids to ask questions, make predictions, and test ideas about materials and motion. It builds curiosity about chemistry and physics in a way that feels like play instead of a formal lesson.
The sensory aspect of kneading and stretching putty can also help children develop fine motor skills and offers a satisfying, squishy texture that many kids find calming and engaging.
Materials You Will Need
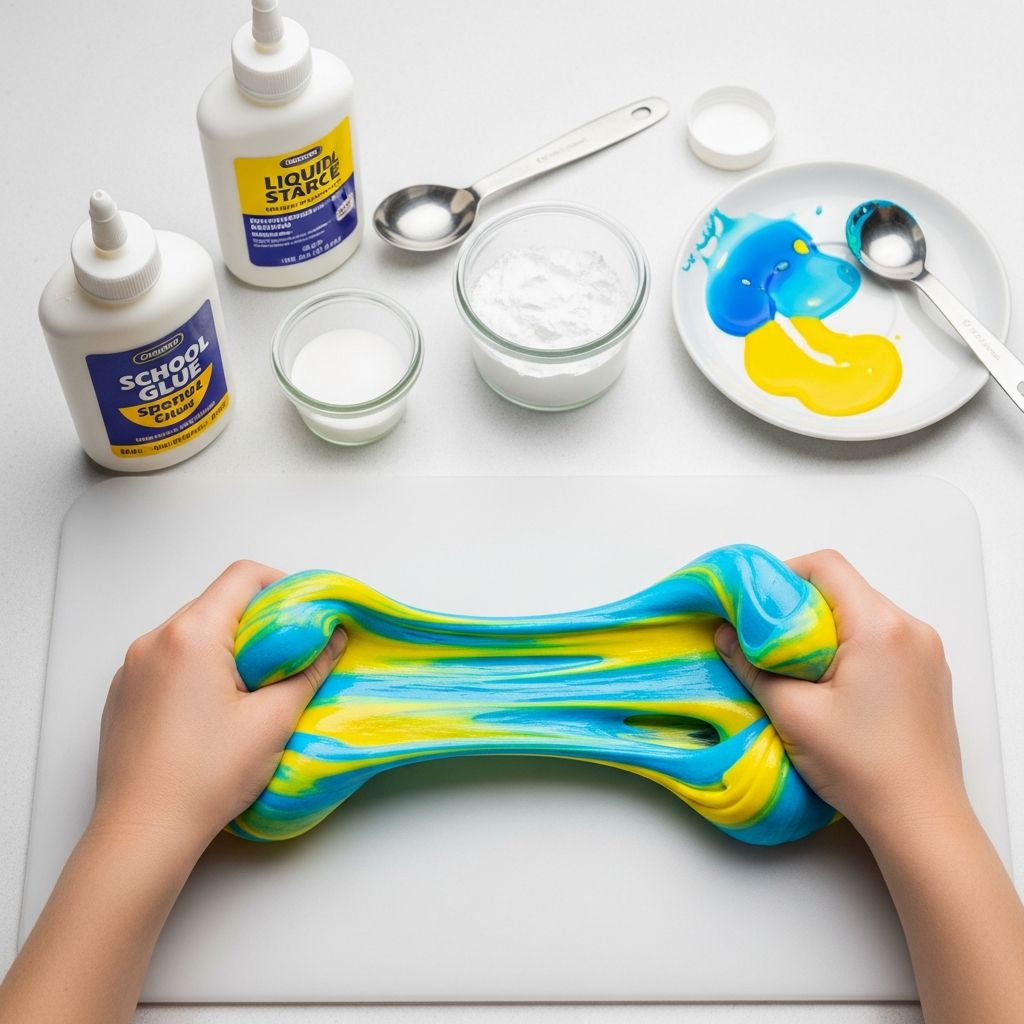
You can make Silly Putty with common household ingredients, though the exact combination may vary depending on the recipe you choose. Before starting, gather everything so children are not left waiting midway through the project.
- Liquid craft glue or school glue (typically white or clear)
- A thickening or activating ingredient (commonly a borate-based solution or similar activator, depending on your chosen method)
- Warm water for mixing and dissolving
- Food coloring or liquid colorant (optional for tinted putty)
- Small bowls or cups for separate mixtures
- Spoon or craft stick for stirring
- Measuring spoons and cups
- Plastic table covering or tray to protect surfaces
- Airtight container or plastic egg for storage
Optional Extras
- Fine glitter for sparkly putty
- Glow-in-the-dark pigment for night-time fun
- Latex or nitrile gloves if you want to avoid getting ingredients on hands
- Aprons or old T-shirts for kids
Safety and Preparation
As with any project involving household chemicals or concentrated solutions, review safety guidelines before you begin. Children should always be supervised, and an adult should be the one to handle measuring and dissolving any stronger ingredients, especially activators.
Cover your work area with newspaper, a plastic tablecloth, or a tray to protect surfaces from spills and food coloring stains. Keep a roll of paper towels, a damp cloth, or wipes nearby for fast cleanup of drips and sticky fingers.
Basic Safety Tips
- Do not allow children to eat Silly Putty or put it in their mouths.
- Keep ingredients and finished putty away from eyes, nose, and open cuts.
- Wash hands with soap and water after handling ingredients and after playing.
- Store all concentrated ingredients out of reach of small children and pets.
- Check packaging warnings on glue and activators before use.
Step-by-Step Instructions for Homemade Silly Putty
The instructions below follow a typical homemade Silly Putty process that separates the glue mixture from the activator mixture and then combines them. This method helps children see how two ordinary liquids can transform into a stretchy, squishy solid-like material.
Step 1: Make the Glue Mixture
Start by pouring a measured amount of liquid glue into a small bowl or cup. You can use white glue for an opaque effect or clear glue if you want a glassy, translucent putty.
Add an equal amount of water to the glue and stir until the two blend into a smooth, uniform liquid. If you are using food coloring or glitter, mix those into the glue-water blend at this stage so the color and sparkle distribute evenly.
Step 2: Prepare the Activator Solution
In a separate container, dissolve the chosen activator in warm water, following the recommended proportions for your recipe. Thorough stirring is important so the active ingredient spreads evenly through the water and no clumps remain.
Keep this solution clearly labeled and make sure children understand that it is not for drinking. The warm water helps the powder or concentrated ingredient dissolve more completely and speeds up the reaction when the two mixtures are combined.
Step 3: Combine the Mixtures
Slowly pour some of the activator solution into the glue mixture while stirring continuously. Almost immediately, the liquid will begin to thicken and form soft clumps of putty as the molecules start linking together.
Continue stirring and adding small amounts of activator until most of the liquid is incorporated into one stretchy mass. It is usually better to add too little activator at first and then increase gradually than to add too much and end up with a crumbly product.
Step 4: Knead the Putty
Once a ball of putty forms, remove it from the bowl and place it in your hands. At first it may feel slimy or sticky, but kneading it gently will help the texture improve as the mixture becomes more uniform.
If the putty remains too sticky after a minute or two of kneading, you can dip your fingers in a little more activator solution and continue to work the putty until it becomes smooth and easy to handle. Stop adding activator when the putty stretches without leaving residue on your hands.
Step 5: Test and Adjust
At this point, kids can experiment with their Silly Putty to see how it behaves. If it tears too easily, it might need a bit more kneading; if it feels rubbery and stiff, you may have used a little too much activator.
Encourage children to describe how the putty acts when they stretch it slowly versus pulling it quickly or rolling it into a ball. These observations tie directly into the concept of non-Newtonian fluids and material behavior.
How Silly Putty Behaves: Simple Experiments
Once your homemade Silly Putty is ready, turn playtime into a series of simple experiments. Ask open-ended questions and let children record their observations in a notebook or on a worksheet.
- Slow stretch test: Pull the putty apart very slowly and notice how it stretches into long strands without breaking.
- Fast pull test: Tug it sharply and observe how it snaps or tears instead of stretching.
- Bounce test: Roll it into a ball and drop it from different heights to see how high it bounces.
- Flow test: Leave a ball of putty on a table for a few minutes and watch it slowly flatten under its own weight.
- Imprint test: Press it onto a coin, small toy, or textured surface and check how well it copies the pattern.
Observation and Discussion Ideas
After each mini experiment, ask children to compare what they expected with what they saw. Did the putty act more like a solid or a liquid in each test? How did changing the force or time affect its behavior?
Linking these observations back to the word “non-Newtonian” helps children understand that some substances do not act like typical fluids and that science often explores materials that challenge everyday assumptions.
Science Behind the Stretch
The key to Silly Putty’s strange behavior lies in its long, chain-like molecules, often called polymers. When the activator is added, it helps form temporary links between these chains, giving the putty its stretchiness and bouncy, rubber-like properties.
When you apply a slow, gentle force, the polymer chains have time to slide past each other, so the putty flows and stretches. Under a sudden force, the chains cannot move quickly enough and instead lock together briefly, causing the putty to snap or break.
Simple Science Vocabulary for Kids
| Word | Kid-Friendly Meaning |
|---|---|
| Polymer | A very long chain made of many smaller, repeated pieces linked together. |
| Viscosity | How thick or runny a liquid is, or how easily it flows. |
| Non-Newtonian fluid | A special fluid that changes how it flows when you push or pull on it in different ways. |
| Activator | An ingredient that helps glue molecules join and turn from a liquid into stretchy putty. |
Using the Activity as a Teaching Tool
Parents and educators can weave this craft into lessons about states of matter, chemistry, or physics. Children can compare Silly Putty with familiar materials like water, honey, clay, and rubber bands to spot similarities and differences in behavior.
You can also introduce basic experimental design by changing one ingredient at a time—such as using more or less activator, switching between white and clear glue, or adding different amounts of water—and having kids record how each change affects stretchiness and bounce.
Storage and Cleanup Tips
To keep homemade Silly Putty usable, store it in an airtight container, plastic bag, or toy egg when not in use. If left out, it will slowly dry and lose its stretch, though a small splash of water and gentle kneading may sometimes revive it.
If putty gets onto fabric, first try gently peeling or scraping off as much as possible. Then treat the area with soap and warm water, or follow fabric care recommendations; avoid very hot water or intense scrubbing on delicate materials.
House Rules for Play
- Only play with Silly Putty at the table or another easy-to-clean area.
- Keep it away from hair, carpets, and upholstered furniture.
- Put it back into the container as soon as you are finished.
- Wash hands after every play session.
Variations and Extensions
Once you master the basic recipe, you can experiment with different looks and textures. Kids often enjoy choosing their own colors or themes to personalize their putty and make the project feel unique every time.
- Glitter putty: Add fine glitter to the glue mixture for a sparkly effect.
- Glow putty: Mix in glow-in-the-dark pigment and charge it under a bright light.
- Marbled putty: Divide the base mixture into portions, color each separately, then twist and fold them together.
- Themed putty: Use colors inspired by seasons, holidays, or favorite characters.
Frequently Asked Questions (FAQs)
1. Is homemade Silly Putty safe for young children?
Homemade Silly Putty is intended for supervised play and should not be used by children who are likely to put it in their mouths. Always follow age recommendations on the ingredient packaging and make sure an adult is present for both the mixing and play stages.
2. Can we make this project without strong chemicals?
Many recipes rely on common household ingredients, but some still act as mild chemicals once concentrated. If you are concerned, choose a recipe that uses the gentlest options available and handle all measuring and dissolving tasks as the adult.
3. Why did our Silly Putty turn out too runny?
A runny result usually means there is not enough activator or the mixture has not been kneaded long enough. Add the activator solution in very small amounts and continue kneading until the putty holds together without puddling.
4. Why is our putty hard and crumbly?
Excess activator can make the putty stiff. If this happens, try working in a few drops of warm water or a bit more glue, kneading thoroughly to restore some flexibility.
5. How long does homemade Silly Putty last?
With proper storage in an airtight container and reasonable care during play, homemade Silly Putty can last for several sessions before its texture begins to change. Discard and make a fresh batch if it becomes discolored, smells odd, or collects too much dust and debris.
6. Can Silly Putty stain surfaces?
Some colorants or glitters may leave temporary marks on certain surfaces or fabrics, especially if left in contact for long periods. Protect tables with coverings and avoid placing colored putty directly on porous materials to minimize staining.
Making Science Playful at Home
A homemade Silly Putty project turns everyday kitchen ingredients into a hands-on introduction to chemistry and physics. Children explore cause and effect as they mix, knead, and test the material, learning how small changes in ingredients and force can create big differences in behavior.
With a bit of preparation and clear safety guidelines, families can enjoy this activity again and again, trying new variations, designing small experiments, and discovering that science can be just as fun and surprising as any toy.