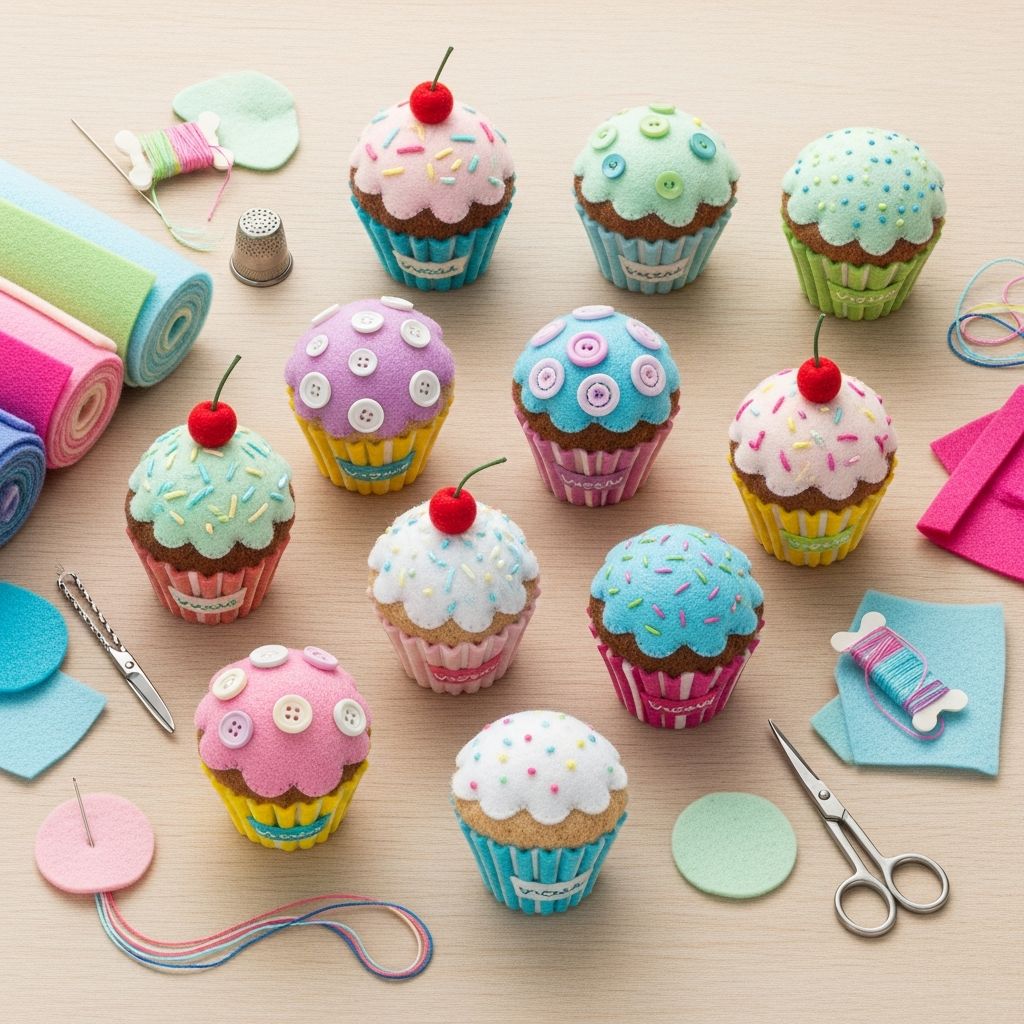
Handmade felt cupcakes are a charming way to turn a pile of colorful fabric into hours of pretend play, storytelling, and quiet time for children. Soft, stackable, and endlessly customizable, they also offer adults a satisfying, low-cost sewing project that can be completed in short, manageable sessions.
Why Felt Cupcakes Make the Perfect Play Project
Felt cupcakes combine the fun of baking with the durability of handmade toys, giving children an open-ended play set that never crumbles or needs cleaning up. They are also compact and lightweight, making them ideal for restaurants, car rides, or any situation where you need calm, portable entertainment.
- They introduce kids to color matching, counting, and simple design choices.
- They encourage imaginative play, storytelling, and role-play around a pretend bakery or tea party.
- They are reusable, washable (with care), and easy to expand with new pieces over time.
Essential Materials and Tools
You do not need a sewing machine or advanced skills to make felt cupcakes; basic hand-stitching, patience, and a few household tools are enough. Most supplies are inexpensive, and once you have them, they can be reused for many future felt projects.
| Item | Purpose | Tips |
|---|---|---|
| Wool blend or craft felt sheets | Cupcake base, frosting, and decorations | Choose sturdy felt that holds its shape and resists pilling. |
| Embroidery floss or strong sewing thread | Hand-stitching and visible decorative seams | Pick colors that either match or contrast your felt for different looks. |
| Hand sewing needles | Joining layers of felt | Use a sharp needle with an eye large enough for embroidery floss. |
| Fabric scissors | Cutting clean, precise shapes | Reserve these scissors for fabric to keep edges neat. |
| Polyester fiberfill | Stuffing the cupcake top | Use small pinches to avoid lumps. |
| Paper and pencil | Designing simple patterns | Experiment on paper before cutting felt. |
| Pins or fabric clips | Holding layers in place while sewing | Helpful for keeping curves aligned. |
| Optional embellishments | Sprinkles, cherries, and extra texture | Use buttons, seed beads, ribbon, or tiny felt shapes. |
Planning Your Cupcake Design
Before picking up scissors, decide how your cupcakes will be used and who will be playing with them. Larger, simplified shapes are best for toddlers, while older children may enjoy smaller cupcakes with more detail and removable toppings they can rearrange.
- Choose a color palette: pastels for a bakery theme, bright primaries for toddlers, or realistic shades like chocolate brown and vanilla cream.
- Decide whether decorations will be sewn down permanently or detachable for mixing and matching.
- Sketch a rough cupcake diagram with three parts: wrapper, cake top, and frosting or toppings.
Creating Easy Paper Patterns
Simple paper patterns help ensure that your cupcake pieces align correctly and remain consistent if you make multiple sets. Basic shapes work best: rectangles for wrappers, circles or domes for tops, and wavy ovals for frosting.
- Draw a rectangle for the cupcake wrapper, slightly wider than tall; this will be wrapped and shaped into a shallow cup.
- Sketch a dome for the cake top, wide enough to sit comfortably inside the wrapper with a small overhang.
- Add optional frosting pieces that can be stacked, such as a scalloped circle or a swirl shape.
- Cut out your paper shapes and test them by stacking them on top of each other before tracing onto felt.
Cutting Felt Pieces with Clean Edges
Felt is forgiving, but clean cutting makes your finished cupcakes look polished and helps seams align smoothly. Work slowly and keep your scissors blades fully inside the felt as you cut curves to avoid jagged edges.
- Trace paper patterns onto the felt lightly with a fabric pen or tailor’s chalk, then cut just inside the lines.
- Rotate the felt, not the scissors, when cutting tight curves or scallops.
- Cut duplicates together by layering two felt sheets for matching fronts and backs.
Basic Hand Stitches for Soft Toys
Several simple stitches are all you need to assemble felt cupcakes that are sturdy enough for daily play. Two commonly used stitches are the whip stitch and the blanket stitch, both of which wrap around the fabric edge and lock layers together.
- Whip stitch: A quick looping stitch that goes over the edge to join two pieces; ideal for hidden or small seams.
- Blanket stitch: A decorative edge stitch with even spacing that looks attractive on visible cupcake rims and frosting edges.
- Running stitch: A simple in-and-out stitch used to attach flat decorations or define lines on the wrapper.
Assembling the Cupcake Base
The base, or wrapper, acts as the foundation of your felt cupcake. A slightly stiff wrapper helps the cupcake stand upright and keeps the stuffed top securely in place during pretend baking sessions.
- Cut a long rectangle for the wrapper and, if desired, a second rectangle from thin cardboard to slip inside for extra firmness.
- Form the felt rectangle into a ring, overlapping the short ends slightly, and whip stitch along the overlap.
- If using a bottom circle, cut a matching felt piece and whip stitch it to the ring to create a shallow cup shape.
Building the Fluffy Cupcake Top
The cupcake top should feel soft and springy, with enough structure to hold any felt decorations you add. Using two matching dome shapes allows you to sandwich the stuffing neatly inside for a smooth, rounded finish.
- Place two identical dome pieces together and start stitching around the edge with a blanket or whip stitch.
- Pause when you have a small opening left and gently add stuffing in small pinches, pressing it into the corners.
- Adjust the stuffing until the top feels evenly full, then close the opening with a few tight stitches and knot securely.
Attaching Top to Wrapper Securely
Once the wrapper and top are complete, they can be permanently joined or left separate for stacking and rearranging. Permanent attachment is safer for very young children, while older kids may enjoy swapping tops and wrappers like mix-and-match desserts.
- For a fixed cupcake, run a row of whip stitches through the lower edge of the top and the inner rim of the wrapper.
- For a removable top, slightly under-stuff the bottom curve so it gently wedges into the wrapper without popping out.
Designing Removable Frosting and Toppings
Removable pieces transform felt cupcakes into a creative kit where kids can design new desserts over and over again. Keep toppings flat and lightweight so they layer nicely and do not tip the cupcake.
- Cut frosting shapes such as scalloped circles, drippy edges, or spiral swirls that can sit on top of the cake dome.
- Make tiny sprinkles from thin strips of felt, then cut into short pieces for confetti-style decorations.
- Create cherries, berries, or candy pieces by stuffing small circles and stitching them into plump beads.
Fun Decoration Ideas for Variety
With a few color changes and small embellishments, each cupcake can look like a completely different flavor or style. This variety keeps the play set interesting and encourages children to describe and name their creations.
- Classic birthday cupcake: White frosting, colorful felt sprinkles, and a tall felt candle with a yellow flame.
- Chocolate deluxe: Dark brown top, light brown wrapper, and a felt chocolate curl made from a rolled strip.
- Fruit-topped cupcake: Pastel frosting with small stuffed strawberries, blueberries, or citrus slices.
- Seasonal specials: Orange and black for Halloween, red and green for winter holidays, or pastel eggs for spring.
Adapting the Project for Different Ages
Felt cupcakes can be simplified or expanded based on the age and abilities of the child involved. This flexibility makes them a long-lasting craft concept that can grow with your family or classroom.
| Age Group | Recommended Features | Safety and Complexity |
|---|---|---|
| Toddlers (2–3) | Large pieces, sewn-on decorations | Avoid beads and small buttons; use sturdy stitching and simple shapes. |
| Preschoolers (4–5) | Mix-and-match frosting, removable tops | Supervise during play; allow them to choose colors and help with stuffing. |
| School-age (6+) | Detailed toppings, embroidery details | Introduce basic stitching tasks and let them design custom flavor sets. |
Using Felt Cupcakes for Quiet, Educational Play
Beyond being cute, felt cupcakes are practical teaching tools that can be used to reinforce basic skills through play. Because they are soft and silent, they are especially useful for quiet corners at home, in classrooms, or during travel.
- Practice counting and simple math by asking children to “serve” a certain number of cupcakes or toppings.
- Encourage descriptive language as kids explain flavors, textures, and imaginary ingredients.
- Use pretend bakery scenarios to introduce concepts like taking turns, using polite phrases, and handling play money.
Storage and Gifting Ideas
Once you start making felt cupcakes, it is easy to build a full set that deserves thoughtful storage. Attractive storage can double as part of the play scene, while also protecting your handiwork between tea parties.
- Repurpose a small bakery-style cardboard box or metal tin as a cupcake carrier and gift box.
- Store toppings in labeled jars or small fabric pouches so kids can easily find and sort them.
- Create themed sets (birthday, holiday, fruit, or “ice cream” flavors) and tie them together with ribbon for gifts.
Care, Cleaning, and Durability Tips
With a bit of maintenance, your felt cupcake collection can last through many years of pretend play. Felt does not fray, but it can stretch or pill if handled roughly, so thoughtful care goes a long way.
- Spot clean with a damp cloth and mild soap; avoid soaking fully stuffed pieces in water.
- Trim any loose fibers with small scissors rather than pulling them.
- Reinforce frequently handled seams with a second line of stitching if you notice any gaps.
Frequently Asked Questions
Do felt cupcakes require a sewing machine?
No, this project is designed for hand sewing and works particularly well with simple stitches, making it accessible for beginners and older children.
What type of felt works best?
A medium-thickness wool blend or high-quality craft felt offers the best balance of softness and structure, helping cupcakes stand upright without becoming floppy.
Are felt cupcakes safe for toddlers?
They can be safe for toddlers if you avoid small parts like beads or loose buttons and secure all pieces with strong stitching and larger, easy-to-grab shapes.
How many cupcakes should I make for a play set?
Four to six cupcakes with several different frosting and topping options are usually enough for one or two children to play bakery, host pretend parties, or share with stuffed animals.
Can children help make the cupcakes?
Yes, children can choose colors, help with stuffing, and, if old enough, learn simple stitches under supervision, turning the project into a collaborative crafting experience.
Bringing Your Felt Bakery to Life
With a few sheets of felt, some basic hand-stitching, and a little imagination, you can create an entire bakery of soft cupcakes that never expire. Whether you use them as teaching tools, travel toys, or thoughtful handmade gifts, these cheerful creations will brighten playtime and introduce children to the joy of handcrafted objects.