Few things thrill kids more than hearing their name called and feeling a medal placed proudly around their neck. A simple homemade “gold” medal turns any game, chore challenge, or backyard race into a moment that feels straight out of the Olympic podium ceremony.
This guide walks you through designing and crafting your own Olympic-style gold medals from scratch, using materials you likely already have at home. You will find step-by-step instructions, creative alternatives, safety and cleanup tips, and playful ways to weave learning and sportsmanship into the activity.
Why Make Your Own Gold Medals?
Homemade medals bring more than glitter and shine; they give kids a tangible symbol of effort, teamwork, and perseverance. When children help craft the medals themselves, they are not just receiving a prize, they are participating in the entire celebration of achievement.
Crafting medals is also a great way to channel excitement about major sporting events into a hands-on project. You can pair the activity with reading about athletes, watching events, or creating your own family tournament.
Choosing Your Medal Base: Clay, Cardboard, or Recycled?
Before you begin, decide what you want your medals to be made from. Each base material offers different textures, durability, and levels of mess. Pick one, or try a mix if you are crafting with a group.
| Material | Best For | Pros | Considerations |
|---|---|---|---|
| Oven-bake or air-dry clay | Long-lasting keepsakes | – Feels substantial and “real” – Holds details and textures well | – Requires baking or drying time – Needs a protected surface while working |
| Cardboard or thick paperboard | Large groups or classrooms | – Easy to cut and paint – Uses recycled packaging | – Less durable than clay – Can warp if soaked with paint |
| Jar lids or metal caps | Quick, eco-friendly projects | – Already circular and sturdy – Great way to reuse household items | – May have sharp edges (need sanding or tape) – Heavier on small necks |
Core Supplies You Will Need
You can adapt this list to fit what you already have at home. Think of it as a menu rather than a strict shopping list.
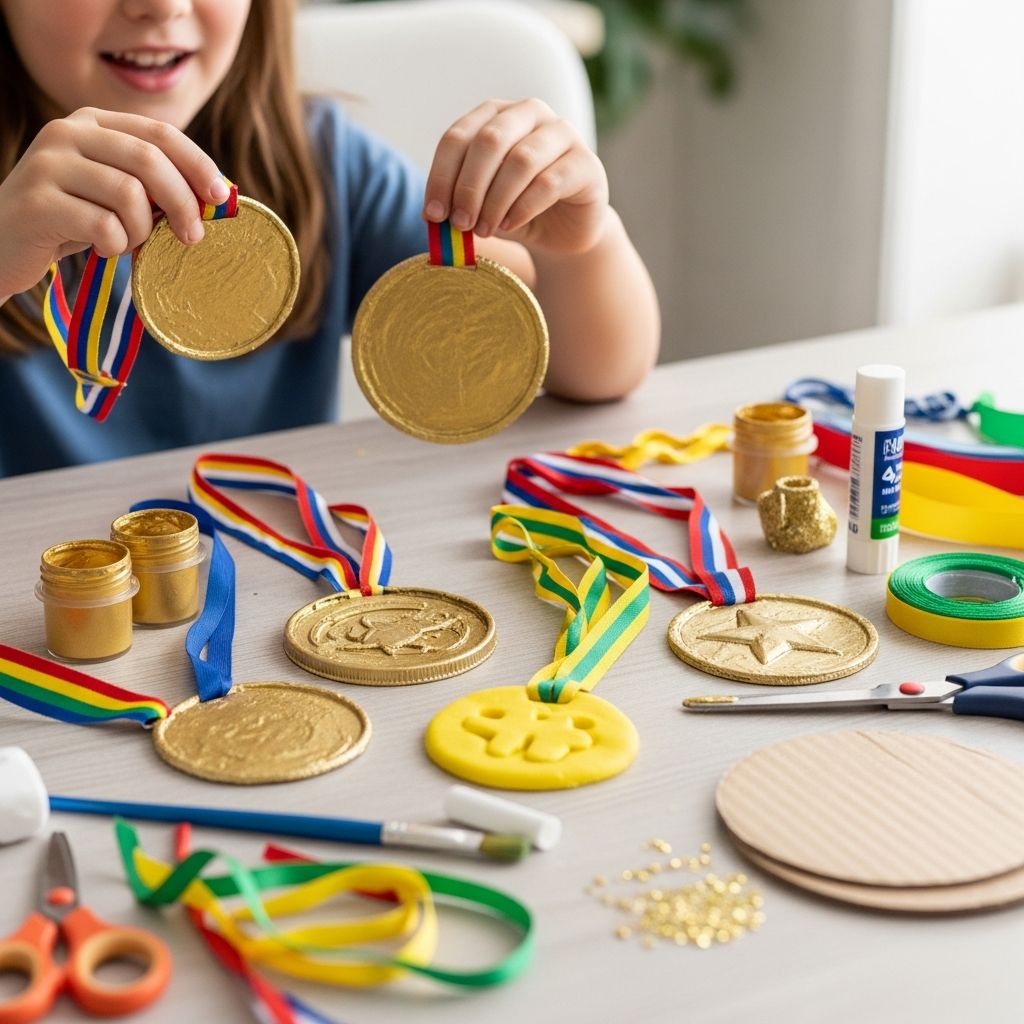
- Medal base: oven-bake clay, air-dry clay, cardboard circles, jar lids, or heavy cardstock.
- Metallic finish: gold acrylic paint, metallic tempera paint, or gold spray paint (adult use only).
- Tools for shaping: round cookie cutters, cups or jars for tracing, scissors, or craft knives (grown-up use).
- Design tools: pencils, blunt skewers, toothpicks, dull butter knives, or stamps for patterns.
- Ribbons or strings: colorful ribbon, yarn, twine, or fabric strips for neck loops.
- Adhesives: white glue, glue stick, or hot glue (used by adults or with close supervision).
- Optional decorations: stickers, sequins, glitter glue, gemstones, or alphabet stickers.
- Protection: table covering, aprons or old shirts, and baking sheets for clay.
Step-by-Step: Classic Clay Gold Medal
If you want medals that feel weighty and special, clay is a satisfying choice. The steps below describe a general approach you can adjust for any brand of oven-bake or air-dry clay.
1. Prepare your workspace
Cover the table with newspaper or a disposable tablecloth, and gather everything before kids sit down. Keep sharp tools, hot glue, and any spray paints reserved for adult handling only.
2. Shape the medal blank
- Soften a portion of clay in your hands until it is easy to press and roll.
- Roll it out into a flat sheet, about the thickness of two or three stacked coins.
- Use a round cookie cutter, a drinking glass, or a small bowl to cut clean circles.
- Gently smooth the edges with your fingers or the back of a spoon.
3. Add designs and textures
Invite children to think about what they want the front of their medal to say. It might feature a sport symbol, a number, their initials, or a phrase like “Super Helper.” Instead of copying real medals, encourage them to invent an emblem that represents their own event or achievement.
- Press small round caps to create ring patterns or circular borders.
- Use skewers or toothpicks to draw stars, lines, or geometric shapes.
- Stamp textures with buttons, lace, leaves, or textured fabric.
- Lightly press letter stamps (or hand-draw letters) to add names or event titles.
4. Create the ribbon opening
You can punch a hole or carve a slot, depending on the look you prefer. Just make sure there is enough space for the ribbon or cord you plan to use.
- Use a straw to punch a round hole near the top of the medal.
- Or slice a narrow horizontal slot with a dull knife (adult job) for a sleek look.
- Wiggle the tool slightly to widen the space; clay can shrink as it bakes or dries.
5. Harden the medals
Follow the instructions on your specific clay package for baking time and temperature, or for air-dry clay, the recommended drying duration. Place medals on a lined baking sheet or tray and give them plenty of room so they do not touch.
When the medals feel firm and completely cool or dry, you are ready to add their metallic shine.
6. Paint the gold finish
Metallic paint brings the transformation from clay disk to “golden” treasure. Children especially enjoy seeing their designs pop once every groove catches the light.
- Use a wide brush to cover the entire front and sides with gold paint.
- Allow it to dry, then add a second and even a third coat for full coverage.
- For extra depth, lightly brush a small amount of darker paint into the grooves, then wipe the surface so designs stand out.
7. Attach the ribbon
- Cut a length of ribbon long enough to slip easily over a child’s head.
- Thread the ribbon through the hole or slot and tie the ends securely.
- Trim any fraying and, if needed, add a small dot of glue to hold knots in place.
No-Clay Alternative: Quick Cardboard Medals
If you prefer a faster, low-mess project, cardboard medals are an excellent option. They work well for birthday parties, school events, or when you need many medals in a short time.
- Trace circles on cardboard using a cup, lid, or small plate.
- Cut out the circles and gently round any rough edges.
- Lightly sketch designs in pencil to guide young artists.
- Paint each circle in gold and let it dry, adding a second coat if the cardboard shows through.
- Use glue, markers, and stickers to decorate numbers, borders, or tiny icons.
- Punch a hole near the top and tie on a ribbon or yarn loop.
These medals may be lighter and simpler, but children are often just as proud of them, especially when they have creative control over color and design.
Creative Themes for Your Homemade Medals
Not every event needs to be a sport to earn a medal. Designing themed sets keeps the project inclusive, especially when children have a wide range of interests.
- Reading champions: Reward milestones such as finishing a new chapter book or reading aloud to a younger sibling.
- Kindness awards: Create medals for acts of empathy, helpfulness, or patience.
- STEM stars: Celebrate science projects, coding challenges, or creative building with blocks.
- Artistic excellence: Honor brave color choices, careful detail, or just the joy of self-expression.
- Family challenges: Use medals for game nights, scavenger hunts, or room-cleanup races.
Safety, Setup, and Cleanup Tips
Medals should feel fun and safe from start to finish. A bit of planning keeps the craft joyful rather than stressful.
- Always supervise children around scissors, hot glue, ovens, and any sprays or solvents.
- Ventilate the room if you are baking clay or using aerosol paints, and keep those steps for adults.
- Lay down washable or disposable coverings to protect tables and floors.
- Have a hand-washing station ready for when crafting is done—especially if children are using paints or glues.
- Check each medal for rough edges or sharp corners and smooth or tape them before kids wear them.
Turning Craft Time into a Mini Olympics
Once the medals are finished, the fun is just beginning. Use them as the centerpiece for a family or classroom “games” that match your space and the ages of your participants.
- Obstacle courses: Set up simple stations like jumping over pillows, weaving around cones, or balancing on a taped line.
- Non-sport challenges: Time how long it takes to build a block tower, complete a puzzle, or sort toys into bins.
- Team events: Pair kids in relay races or cooperative tasks so that medals recognize teamwork, not only individual speed.
When it is time for the medal ceremony, announce each child’s name and a short phrase about what they did well. Focus on effort, creativity, and kindness rather than just first place.
Learning Connections: History, Design, and Character
Crafting medals opens the door to rich conversations that go beyond glitter and glue. You can explore art, history, and character-building all at once.
- History and geography: Talk about where major international sporting events are held and how host cities design their own unique medals each time.
- Design thinking: Ask kids why they chose certain symbols or shapes and what message they want their medal to communicate.
- Sportsmanship: Discuss how athletes react to winning and losing, and how medals can represent perseverance and respect as much as victory.
Adapting the Craft for Different Ages
With a few changes, the same basic project can engage toddlers, grade-schoolers, and teens.
- Toddlers and preschoolers: Pre-cut circles and pre-punch holes. Let them press textures into soft clay or dab on paint and stickers.
- Elementary-age kids: Allow them to sketch their own designs, choose color schemes, and help with safer cutting and gluing.
- Preteens and teens: Challenge them to create intricate patterns, experiment with shading in paint, or design matching sets for an event.
FAQs About DIY Olympic-Style Gold Medals
How long do clay medals take to make from start to finish?
The active crafting portion—shaping, decorating, and adding details—often takes 30 to 60 minutes, depending on how intricate your designs are. Drying and baking add extra time, so plan at least a few hours or split the project across two days so kids can paint once the medals are fully hardened.
What if I do not have metallic paint?
You can mix a warm yellow with a touch of brown to mimic a golden tone, or layer yellow over a white base coat so it appears brighter. Another fun option is to wrap cardboard circles in kitchen foil and add painted accents, which creates a reflective sheen even without specialty paints.
Can these medals be used outdoors?
Clay medals hold up better outdoors than plain cardboard, especially if you finish them with a clear sealer. For cardboard medals, keep them away from rain or damp grass, and store them inside when the games are over so they can last for future events.
Is it better to make medals for first, second, and third place or give one to everyone?
That choice depends on your event and the age group. Many families and teachers like to focus on specific strengths—such as “Great Teammate” or “Most Creative Strategy”—so every child receives recognition without making the experience purely competitive.
How can I store the medals as keepsakes?
Once the event is over, encourage kids to hang medals on hooks, bulletin boards, or bedposts where they can see them. For more fragile cardboard versions, a shallow box or scrapbook-style envelope helps prevent bending while still keeping them accessible for reminiscing.
Final Touches: Make the Moment Feel Special
The true magic of homemade gold medals is the memory tied to them. Dim the lights, play a short musical fanfare, or wave a homemade flag while you call each child forward to receive their medal. A few sincere words about what they accomplished will stick longer than the shine of any paint.
Whether you are celebrating backyard sprints, book-reading marathons, or acts of everyday kindness, these DIY medals transform ordinary moments into stories kids will proudly retell for years to come.