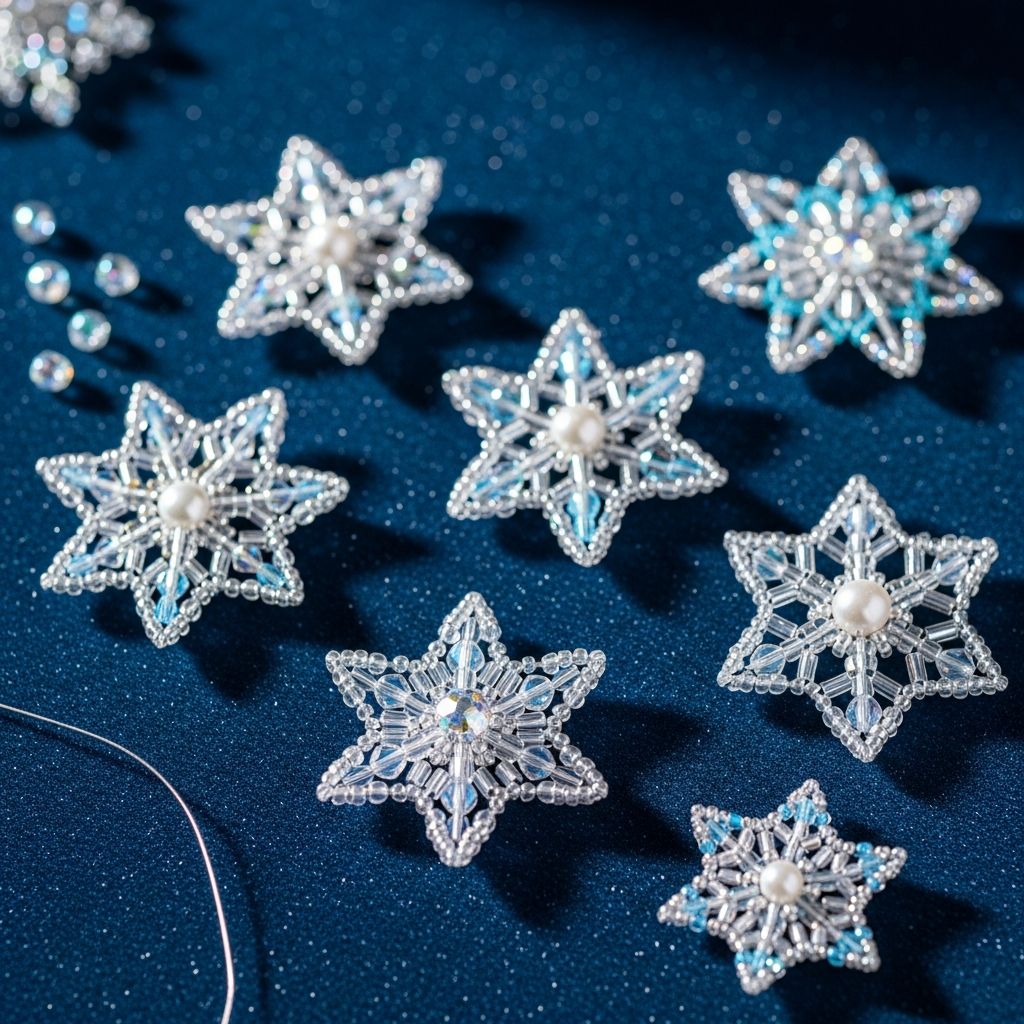
Beaded snowflake ornaments are a beautiful way to bring winter sparkle indoors, using just a handful of beads, wire, and your creativity. These ornaments look intricate, but the basic technique is simple enough for beginners and endlessly customizable for experienced crafters.
Why Beaded Snowflakes Make Perfect Holiday Crafts
Snowflake ornaments are ideal for holiday decorating because they are lightweight, durable, and easy to personalize with different colors and bead styles. Unlike paper crafts that can tear or fade, beaded snowflakes can be enjoyed year after year as part of your seasonal traditions.
They also make thoughtful handmade gifts, package toppers, and keepsakes for classrooms, ornament exchanges, and winter parties.
Essential Supplies and Tools
Before starting, gather all your materials so you can focus on design and assembly. The exact types of beads and wire you choose will determine how delicate, bold, or colorful your finished ornaments appear.
Core Materials
- Snowflake wire forms or craft wire: Use pre-shaped metal snowflake forms for convenience, or straighten and cut craft wire to create your own six-armed base.
- Beads: Glass seed beads, crystal beads, pearls, metallic spacers, or faceted acrylic beads all work well for adding shine and dimension.
- Hanging loop material: Ribbon, metallic cord, fishing line, or ornament hooks for hanging your snowflakes.
Helpful Tools
- Round-nose or chain-nose pliers: For bending loops at the ends of the wires.
- Wire cutters: For trimming excess wire safely.
- Small sorting trays or bowls: To keep beads organized and prevent them from rolling away.
- Measuring tape or ruler: To keep arm lengths consistent if forming your own snowflake base.
Choosing Beads and Color Schemes
Bead selection has the greatest impact on the overall style of your ornaments. Combining finishes, shapes, and sizes creates visual depth while still following a simple pattern.
Popular Color Palettes
- Classic winter: Clear crystals, white pearls, and silver spacers for an icy, frosted look.
- Traditional holiday: Red, green, and gold beads for a Christmas-inspired palette.
- Modern metallics: Mixed metallic beads in silver, gold, and rose gold for a glamorous effect.
- Monochrome: Vary tones of a single color (such as blues or purples) to keep things cohesive yet interesting.
Bead Types That Work Well
- Seed beads: Great as filler beads that line the wire arms and support larger focal beads.
- Faceted crystals: Catch the light and add sparkle, ideal for the outer tips of each arm.
- Pearl beads: Give a soft, snowy feel and pair nicely with metallic accents.
- Spacer beads: Small metal beads that break up color blocks and create rhythm in each arm’s pattern.
Designing Your Snowflake Pattern
Before you start stringing, sketch or test your bead pattern on one wire arm. Once you like the arrangement, you can repeat it around the snowflake for a polished, symmetrical design.
Pattern Planning Tips
- Decide on a repeating sequence of beads: for example, small–small–medium–large–medium–small–small.
- Place the largest bead near the outer end of each arm to act as a focal point.
- Use a consistent total number of beads on each arm so the snowflake looks balanced.
- Alternate two complementary patterns on opposite arms for a more intricate appearance.
Example Pattern Ideas
| Style | Suggested Bead Sequence | Best For |
|---|---|---|
| Icy Elegance | Silver seed bead – clear crystal – pearl – clear crystal – silver seed beads to fill | Formal holiday trees and winter weddings |
| Holiday Classic | Gold spacer – red bead – green bead – red bead – gold spacer – small fillers | Family trees and traditional décor |
| Frosted Pastels | White seed beads – pastel bead – pearl – pastel bead – white seed beads | Children’s rooms and soft winter themes |
Step-by-Step Instructions for Beaded Snowflake Ornaments
The process below assumes you are using a pre-made metal snowflake form with several straight arms. If you are using craft wire, you can first twist or bind wires together to create a simple snowflake base, then follow the same beading steps.
Step 1: Prepare Your Workspace
- Cover your table with a light-colored cloth or tray so you can easily see dropped beads.
- Sort your beads into separate containers by size and color.
- Keep your pliers and cutters within reach but away from small children.
Step 2: Plan and Test a Single Arm
- Lay one arm of the snowflake form flat in front of you.
- Thread beads onto the arm without permanently securing the tip yet.
- Adjust the number of beads or order until the length and look feel right.
Step 3: Secure the End of the Arm
- Use round-nose pliers to bend the final 0.5–1 cm of wire into a tight loop.
- Ensure the loop is fully closed so beads cannot slip off.
- If desired, attach a tiny jump ring or small decorative charm to the loop.
Step 4: Repeat the Pattern
- Slide the same pattern of beads onto each remaining arm, starting from the center and working outward.
- As you finish each arm, create a secure loop at the end using your pliers.
- Check that the total number of beads and arrangement matches your first arm.
Step 5: Add a Hanging Loop
- Choose one arm to act as the “top” of the snowflake.
- Thread ribbon, cord, or fishing line through the loop at the end of that arm.
- Tie a knot or bow, making sure the loop is large enough to hang on a branch or hook.
Optional Step 6: Add Interconnecting Beads
For a more complex snowflake, you can connect the arms with additional beads.
- Cut a length of thin wire or strong beading thread.
- Wrap it around one arm, slide on a few beads, and secure it around the next arm to create a small arch between spokes.
- Repeat around the snowflake at one or more distances from the center to build layers.
Adapting the Craft for Different Skill Levels
One of the best features of beaded snowflakes is how easily you can simplify or elaborate the design to suit different ages and abilities. With a few adjustments, this project can work for young children, teens, and adults alike.
Beginner-Friendly Versions
- Use larger beads that are easier to grip and see.
- Limit each arm to just a few repeating beads instead of a long, complex sequence.
- Pre-bend the wire loops so beginners focus only on sliding beads.
Advanced Variations
- Incorporate layered patterns by adding secondary wires between arms.
- Mix bead shapes such as bicones, rondelles, and teardrops for extra dimension.
- Combine techniques from jewelry making, like wire wrapping or adding small charms and chains.
Creative Ways to Use Beaded Snowflakes
These ornaments are versatile beyond just hanging on a Christmas tree. Because they are flat and relatively lightweight, they fit into many decorating styles and spaces.
- Window décor: Hang snowflakes at varying heights in front of a window to catch natural light.
- Gift accents: Tie a single snowflake to wrapped presents for a keepsake the recipient can reuse.
- Table centerpieces: Lay several snowflakes around candles or greenery for a sparkling winter table.
- Garlands: Attach multiple ornaments to a long ribbon or cord to drape across mantels and stair rails.
Safety and Durability Tips
Because this project involves wire, small parts, and sometimes glass, it is helpful to take a few precautions to keep your crafting session safe and your ornaments long-lasting.
- Always supervise children and avoid very small beads with toddlers or babies present.
- File or bend any sharp wire ends inward to prevent scratches and snags.
- Store finished ornaments in padded boxes or tissue paper to protect delicate beads.
- Avoid hanging heavy glass snowflakes on thin or weak branches that may sag or break.
Simple Troubleshooting Guide
Even careful crafters occasionally encounter issues such as slipping beads or uneven arms. Most problems can be fixed with a few quick adjustments.
| Issue | Likely Cause | Quick Fix |
|---|---|---|
| Beads slide off the end | End loop is too large or not fully closed | Use pliers to tighten the loop and ensure no gap remains. |
| Arms look uneven | Different bead counts or inconsistent wire lengths | Count beads on each arm and adjust; trim and re-loop if needed. |
| Ornament feels floppy | Wire is too thin or not fully hardened | Choose a slightly thicker gauge or add connecting bead arches between arms. |
| Pattern looks cluttered | Too many bead types or colors on each arm | Limit to two or three main colors and repeat them consistently. |
Storage and Long-Term Care
With careful storage, your beaded snowflake ornaments can last for many holiday seasons. Because beads can chip and metal can bend, it is worth taking a few minutes to put them away properly at the end of each winter.
- Wrap each ornament in tissue paper or place in individual compartments of an ornament box.
- Keep them away from extreme heat or moisture to prevent discoloration or rust on metal components.
- Untangle ribbons or hooks before storing so ornaments are ready to hang next season.
Frequently Asked Questions (FAQs)
1. What wire gauge works best for beaded snowflake ornaments?
Many crafters prefer a medium-strength wire that is sturdy enough to hold its shape but still bends easily with pliers. Thicker wire creates a more rigid snowflake, while thinner wire is better suited for lightweight beads and smaller ornaments.
2. Can children make these ornaments?
Older children who can handle small beads safely usually enjoy this craft, especially when the wire loops are pre-bent for them. Younger children may do better with pipe cleaner snowflakes and larger plastic beads, which offer a similar experience with fewer sharp edges.
3. Do I have to use a pre-made snowflake form?
No. You can twist multiple straight wires together at the center to create your own snowflake base, then spread the arms evenly. Pre-made forms simply save time and help keep the arms perfectly aligned.
4. Which beads are best for maximum sparkle?
Faceted glass crystals and high-quality acrylic beads reflect light beautifully, especially when placed at the ends of each arm. Combining them with metallic spacer beads and contrasting seed beads enhances both shine and structure.
5. How can I personalize snowflake ornaments for gifts?
You can tailor color schemes to match a recipient’s décor, or incorporate initial charms and tiny themed beads like stars or bells. Attaching a small tag with the year and occasion also turns each snowflake into a keepsake that marks a specific memory.
Final Inspiration: Let Every Snowflake Be Unique
Just as no two snowflakes are identical, your beaded ornaments can each showcase different patterns, colors, and textures. Start with simple designs, then gradually experiment with more complex combinations as your confidence grows.
Whether you are decorating a tree, brightening a winter window, or creating handmade gifts, beaded snowflakes offer a sparkling reminder that small, carefully chosen details can turn basic materials into something truly special.