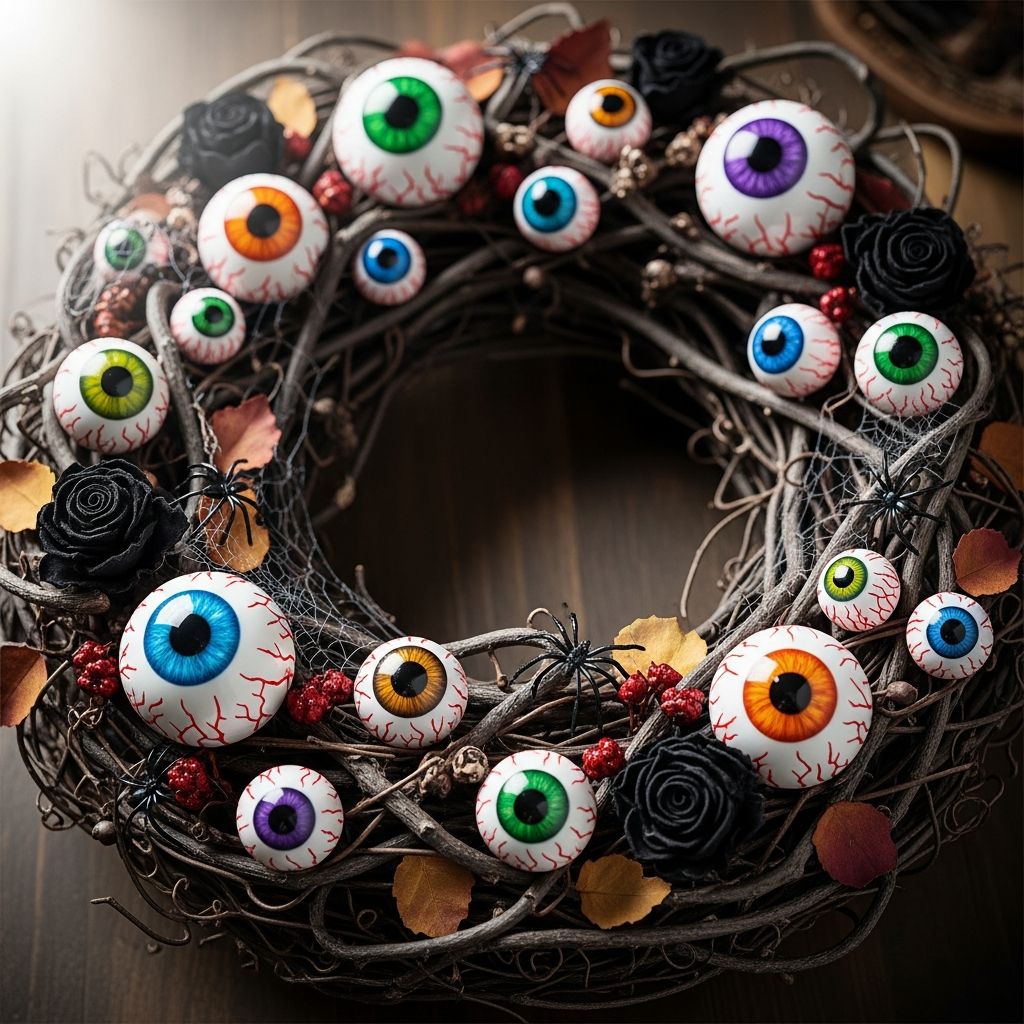
Nothing says “Halloween is here” quite like a front door that looks like it’s watching every visitor who walks by. An eyeball wreath is an easy, dramatic, and surprisingly budget-friendly way to turn your entryway into a spooky showstopper. This guide walks you through everything: planning the design, gathering supplies, assembling the wreath, and finishing it with eerie details that match your style.
Why Make an Eyeball Wreath?
Eyeball wreaths combine the classic round wreath shape with playful, slightly creepy details, so they work for both kid-friendly and grown-up Halloween decor. They are highly customizable: you can make yours cartoonish and colorful, or dark and haunted depending on the colors, textures, and extras you choose. Best of all, the main components are simple—wreath base, eyeballs, glue, and some decorative filler—so you don’t need advanced crafting skills to get a professional-looking result.
Planning Your Design Before You Shop
Before buying supplies, it helps to pick a rough style and color palette. This prevents impulse purchases and makes your final wreath look intentional instead of random.
Choose Your Wreath Style
Ask yourself how you want your wreath to feel when someone sees it for the first time. A cartoon-inspired wreath with bright colors and oversized eyeballs will feel whimsical, while a dark wreath with subtle eyes peeking out from shadows will feel eerie and mysterious.
- Playful: Neon or bright ribbons, multi-colored eyeballs, glitter accents.
- Classic spooky: Black, white, and blood-red elements with sharp contrasts.
- Haunted house: Tattered fabric, faux cobwebs, muted colors like gray, mossy green, and antique gold.
- Minimalist: Monochrome base and a small cluster of large eyes on one side.
Color Palette Ideas
Pick two to three main colors and one metallic or neutral to keep the wreath cohesive. The eyeballs themselves will usually be white, so plan a background that makes them pop.
- Black + white + neon green (high contrast, bold look).
- Purple + orange + silver (classic Halloween but fun).
- Deep green + black + copper (witchy and sophisticated).
- Charcoal gray + burgundy + bone white (gothic and moody).
Materials and Tools You’ll Need
You can build an eyeball wreath with supplies from a craft store, dollar shop, or items you already have in your stash. The table below summarizes core options and how they affect the final look.
| Component | Recommended Options | Effect on Look & Feel |
|---|---|---|
| Wreath base | Wire frame, foam ring, or grapevine wreath | Wire is lightweight and easy to wrap; foam allows full coverage; grapevine gives a rustic, natural vibe. |
| Eyeballs | Plastic ornaments, ping-pong balls, or pre-printed eyeball decorations | Ping-pong balls are light and cheap; ornaments look polished; pre-printed pieces save painting time. |
| Covering material | Ribbon, mesh, fabric strips, or faux foliage | Mesh and ribbon feel festive; fabric strips look distressed; foliage hides gaps and adds dimension. |
| Adhesive | Hot glue gun with glue sticks | Fast-drying, strong bond for plastic and fabric; ideal for most Halloween wreath projects. |
| Extras | Bats, spiders, bones, small signs, lights | Accents reinforce your theme and fill any empty spots on the wreath. |
Basic Supply Checklist
- 1 wreath base (wire frame, foam, or grapevine).
- 20–60 eyeballs (quantity depends on wreath size and density).
- Rolls of ribbon, mesh, or strips of fabric to cover the base.
- Hot glue gun and plenty of glue sticks.
- Scissors and optional wire cutters.
- Floral wire or pipe cleaners for hanging and bow-making.
- Optional: faux cobwebs, mini skulls, plastic spiders or bats, LED fairy lights.
Preparing the Eyeballs
The eyeballs are the star of the wreath, so spend a little extra time making them look expressive. You can buy ready-made eyeball pieces, but customizing them adds personality and makes your wreath unique.
Creating DIY Eyeballs
If you’re starting with blank spheres such as ping-pong balls or plain ornaments, you can paint your own designs quickly. Using paint markers or acrylic paint, sketch an iris and pupil in the center, then add wavy red lines around the sides for a bloodshot effect.
- Use a small round object (like a coin) as a guide to draw circular irises.
- Vary iris colors: bright green, icy blue, amber, or even neon pink.
- Add a tiny white dot of paint as a highlight on the pupil to make each eye look glossy and alive.
Quick Customization Tips
Not every eyeball needs to match. A mix of different sizes and colors will feel more playful and less factory-made. You can also intentionally tilt a few irises off-center so that it looks like some eyes are glancing up, down, or sideways.
- Combine large eyes in the center with smaller ones along the edges.
- Create “monster eyes” by adding small felt eyelids or eyelashes to a few pieces.
- Seal painted designs with a clear spray or brush-on sealer if your wreath will hang outdoors.
Step-by-Step Assembly Instructions
Once your eyeballs are ready, it’s time to build the wreath itself. The process is simple: cover the base, place the eyeballs, secure everything with glue, and add finishing touches.
Step 1: Cover the Wreath Base
Start by wrapping your base so no raw frame shows through. This creates a clean background and gives the glue more surface area to grip.
- Attach the end of your ribbon, mesh, or fabric strip to the back of the base with hot glue.
- Wrap the material all the way around the base, overlapping slightly each time for full coverage.
- Secure the final end with more glue on the back where it will not be visible from the front.
- If you want a layered look, repeat with a second, thinner ribbon in a contrasting color.
Step 2: Plan the Eyeball Layout
Before gluing anything, place the eyeballs on the wreath to experiment with compositions. This dry run helps you avoid clumps or awkward gaps.
- Even coverage: Distribute eyeballs around the entire circle for maximum impact.
- Clustered design: Group most of the eyeballs on the bottom or side for an asymmetrical, modern look.
- Ring of eyes: Create an inner or outer ring of tightly packed eyes and leave the rest more open.
Step 3: Glue the Eyeballs in Place
Once satisfied with the layout, glue the eyeballs down one by one. Work in small sections so you can still adjust neighboring pieces if needed.
- Pick up one eyeball from your test layout and add a generous dab of hot glue to the back or bottom.
- Press it firmly onto the wrapped base and hold for several seconds until the glue sets.
- Continue around the wreath, repositioning slightly if you notice uneven gaps.
- Allow the wreath to rest flat for 10–15 minutes so all glue cools thoroughly.
Step 4: Add Decorative Fillers
With the eyes secured, look for small patches of visible base and fill them with decorative elements. This step also reinforces your overall theme.
- Tuck small pieces of faux spiderweb between eyeballs for added creepiness.
- Glue in mini spiders, bats, or bones to break up the pattern visually.
- For a glam twist, add a few glittery leaves or metallic sprays in between the eyes.
Embellishments and Variations
Once you’ve mastered the basic wreath, try enhancing it with extra features that suit your space or event. Small changes in materials can dramatically change the vibe of the finished piece.
Lighting Ideas
Lights will make the eyeballs glow at night and draw attention from the sidewalk. Make sure to choose low-heat LED lights, especially when working with plastic and mesh.
- Wrap a string of battery-operated lights around the base before attaching eyeballs.
- Weave tiny lights between the eyes and pull a few bulbs forward so they shine on the eyeballs.
- Hide the battery pack on the back of the wreath with a small pocket of fabric or tape.
Themed Eyeball Wreath Concepts
You can build an entire Halloween theme around your eyeball wreath by tailoring it to specific characters or motifs. Consider matching your porch decorations, costumes, or indoor decor for a unified look.
- Witch’s Keep: Add a miniature witch hat, faux broom bristles, and green-tinted eyeballs.
- Mad Scientist Lab: Mix in plastic beakers, neon slime drips made from hot glue, and bright blue or yellow eyes.
- Haunted Forest: Use a grapevine base, add moss and faux branches, and nestle eyes deep inside the twigs.
- Monster Party: Attach felt horns, goofy smiles, and oversized lashes to some of the eyes.
Hanging, Safety, and Weather Tips
A little planning around where and how you hang your wreath will help it last all season. Consider sun exposure, moisture, and the traffic level at your door.
Best Ways to Hang Your Wreath
Because eyeball wreaths can be a bit heavier than plain ribbon wreaths, choose a sturdy hanging method. Avoid thin adhesive hooks that might fail in cold or wet weather.
- Use a strong over-the-door metal hanger rated for more weight than your finished wreath.
- Attach a loop of floral wire or ribbon securely around the top of the frame for easy hanging.
- If hanging on a wall, use a nail or screw anchor and loop wire directly over it.
Weather and Durability Considerations
If your door is exposed to the elements, opt for plastic-based materials and outdoor-safe paints. Avoid paper elements or fabrics that absorb water easily, as they can sag or discolor.
- Choose waterproof or water-resistant ribbons and meshes when possible.
- Spray painted surfaces with an outdoor clear coat to reduce fading.
- Bring the wreath indoors during intense storms or extreme heat to extend its life.
Storage and Reuse After Halloween
With simple care, your eyeball wreath can become a returning favorite year after year. Proper storage prevents crushed eyeballs, tangled embellishments, and chipped paint.
End-of-Season Care
Before putting the wreath away, inspect it for loose pieces or damage. Fixing small issues now means you can hang it immediately next season without last-minute repairs.
- Gently dust off cobwebs and debris with a soft brush or cloth.
- Re-glue any wobbly eyeballs or decorations.
- Remove batteries from light packs to prevent corrosion over time.
Smart Storage Ideas
Store the wreath in a container that protects it from crushing and dust. A clear container also makes it easy to spot at the start of the next Halloween season.
- Use a wreath storage box or large plastic bin with a lid.
- Hang the wreath on a hook in a closet or basement, covered loosely with a plastic bag.
- Keep it in a cool, dry place away from direct sunlight to prevent fading.
FAQs About Eyeball Wreaths
How long does it take to make an eyeball wreath?
For a medium-sized wreath, expect about two to three hours from start to finish, including painting or customizing the eyeballs. If you use pre-made eyes and minimal embellishments, you can complete the project in under two hours.
Can kids help make the wreath?
Yes, kids can help with safe tasks like arranging eyeballs, choosing colors, and placing lightweight decorations. Adults should handle hot glue, sharp tools, and any cutting or wiring steps for safety.
What can I use instead of a traditional wreath base?
If you don’t have a standard wreath form, you can cut a ring from sturdy cardboard or foam board and wrap it heavily in fabric and tape for reinforcement. Just make sure the final structure is strong enough to support your eyeballs and embellishments.
How many eyeballs do I really need?
The number of eyeballs depends on the size of your base and how dense you want the design. A small wreath might need around 20–30 eyes, while a large, fully covered wreath could use 50 or more for a dramatic “wall of eyes” effect.
Can I reuse the eyeballs for other projects later?
If you glue the eyeballs directly and firmly onto the base, removing them later may damage both the eyes and the wreath. If you want flexible reuse, try wiring some of the eyeballs or attaching them to picks that can be removed and repurposed in centerpieces, garlands, or table decor.
With a little creativity and a pile of watchful eyes, your Halloween front door can transform from ordinary to unforgettable. Use this guide as a framework, then experiment with your own colors, textures, and themes to craft a wreath that truly keeps an eye on your neighborhood.