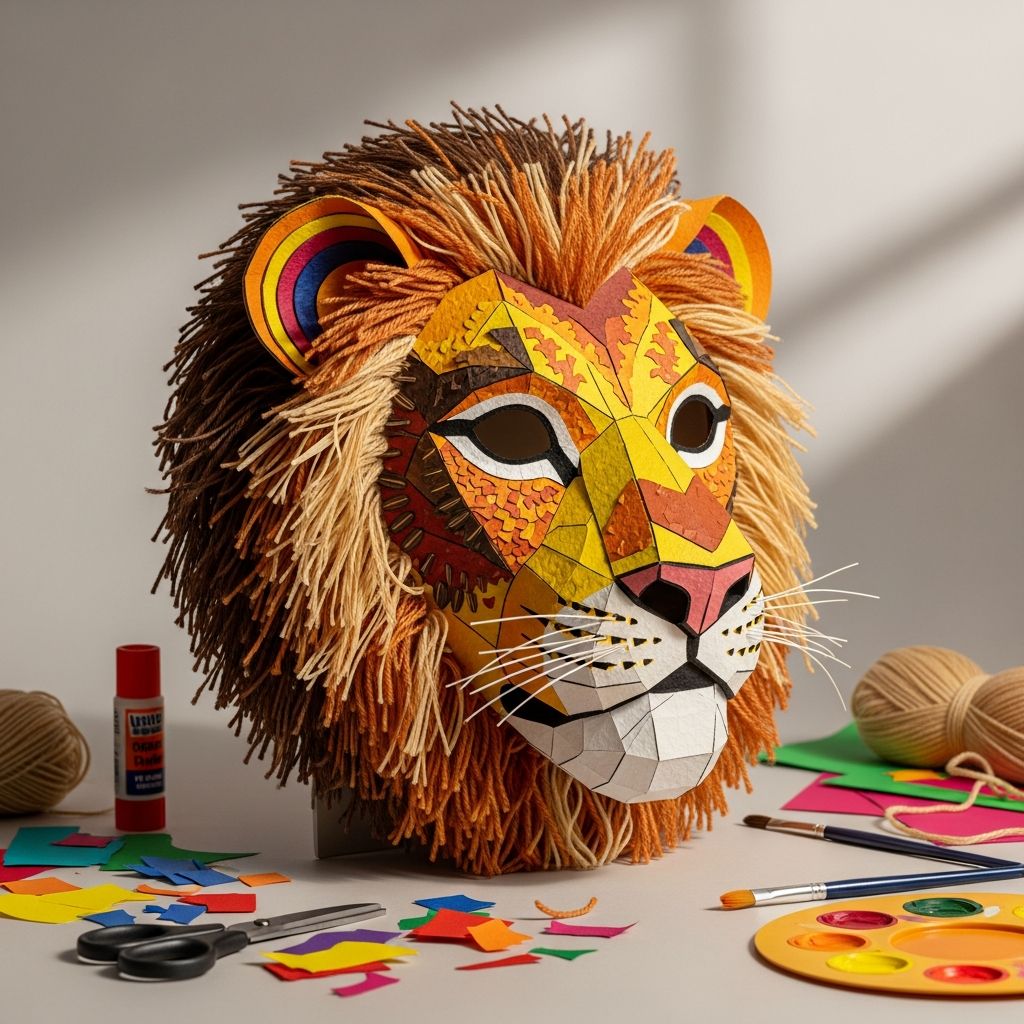
Making an African lion mask is a fun, hands-on project that brings art, culture, and imagination together for the whole family. This guide walks through the materials, preparation, and step-by-step process to create a bold lion mask that kids can wear for pretend play, school presentations, or costume parties.
Why Make an African Lion Mask?
A lion mask craft introduces children to African wildlife and traditional mask-making while building fine motor skills, creativity, and confidence. It offers a screen-free activity that families can enjoy together and adapt to different ages and skill levels.
- Connects children with the idea of the lion as a symbol of strength and courage.
- Encourages kids to experiment with colors, shapes, and textures while learning basic design concepts like symmetry.
- Provides a versatile prop for storytelling, dramatic play, and classroom projects.
Materials and Supplies
This project relies largely on basic art supplies and recyclables. Feel free to substitute with what you already have at home, as long as the materials are safe, lightweight, and easy for children to handle.
- 1 large paper plate or 10-inch lightweight cardboard circle (for the mask base)
- Corrugated cardboard (for structure and extra features)
- Construction paper or craft foam in yellow, orange, brown, and black
- Scissors (child-safe scissors for young kids)
- Craft glue or a low-temperature glue gun (adults only)
- Markers, crayons, or paints in warm colors
- Elastic cord, ribbon, or string (to secure the mask)
- Pencil and ruler (for tracing shapes and keeping features symmetrical)
- Optional: feathers, yarn, tissue paper strips, sequins, or beads for extra decoration
Optional Decorative Items
To personalize the mask, children can choose from a variety of embellishments that add dimension and visual interest to the lion’s mane and facial features.
- Yarn or raffia for a textured mane.
- Metallic markers or glitter glue for highlighting the eyes and nose.
- Patterned paper scraps for stripes, spots, or tribal-inspired markings.
Safety Tips for Family Craft Time
Because this is a family project, safety and supervision are important, especially when cutting cardboard or using stronger adhesives. Adults should help with any steps that involve sharp tools or hot glue.
- Use child-safe scissors for younger children and reserve craft knives or box cutters for adults.
- Keep hot glue guns and other heated tools out of children’s reach.
- Ensure all paints, glues, and markers are labeled non-toxic and suitable for children.
- Measure and adjust the eye and nose openings carefully for clear visibility and safe breathing.
Planning Your Lion Mask Design
Before cutting or gluing, spend a few minutes sketching the lion face on scrap paper. Talk with children about what makes a lion recognizable: large eyes, a strong muzzle, whiskers, and of course, a dramatic mane.
- Discuss symmetry: features on the left side should mirror those on the right.
- Encourage kids to exaggerate certain features (big eyes, long nose, extra-tall ears) to make the mask more expressive.
- Choose a color scheme based on real lions (golden and brown) or imaginative ones (reds, oranges, or even blues for a fantasy lion).
Basic Lion Mask Layout
The lion mask is typically divided into three visual areas: the inner face where the eyes, nose, and mouth appear; the ear shapes on top; and the mane surrounding the entire outer edge. Planning these sections beforehand makes the assembly smoother and more enjoyable.
Step-by-Step Instructions
The steps below outline a straightforward method to build an African lion mask using a plate or cardboard base. Adjust the difficulty level to match the age and experience of the child.
Step 1: Prepare the Mask Base
Begin by creating a sturdy base for the lion mask. A large paper plate is usually strong enough for children’s play, but you can reinforce it with cardboard if needed.
- Place the paper plate upside down on a sheet of corrugated cardboard and trace around it to create a circle.
- Cut out the cardboard circle and glue the plate onto it for extra strength, or simply use the cardboard circle by itself as the mask base.
- Lightly mark the horizontal and vertical center lines with a pencil to help keep features aligned.
Step 2: Mark and Cut Eye Openings
Clear, comfortable eye openings are essential for safety and for kids to enjoy wearing their mask. Take time to measure their approximate eye position before cutting.
- Have the child hold the plate or cardboard up to their face and lightly mark where their eyes are.
- Draw almond-shaped or oval eyes symmetrically around the center line.
- Carefully pierce the center of each eye shape and cut along the drawn line to create openings.
- Check the fit on the child’s face and adjust the size of the openings as needed for good visibility.
Step 3: Shape the Lion’s Nose and Muzzle
The lion’s nose and muzzle give the mask character and help distinguish it from other animals. A slightly exaggerated, stylized nose works especially well for children’s crafts.
- Draw an upside-down triangle or rounded triangle below the eye openings for the nose.
- Extend two curved lines downward from the sides of the nose to suggest the muzzle area.
- Cut a small slit or opening below the nose if the child prefers a mouth opening, or simply draw the mouth and whisker spots with markers.
- Glue on a separate piece of black or brown paper in the shape of the nose to add contrast.
Step 4: Add Ears to the Mask
Lion ears are small and rounded compared with the rest of the head, but they play an important role in the silhouette. Layering cardboard or foam behind them keeps them from drooping.
- Cut two rounded triangle shapes from cardboard or craft foam for ears.
- Cut smaller inner ear shapes from lighter-colored paper to glue on top.
- Attach the ears to the top of the mask base using glue, placing them symmetrically above the eye line.
- Hold them in place for a moment or tape them temporarily until the glue dries.
Step 5: Create the Mane
The mane is the most dramatic part of the lion mask. It can be made from paper strips, yarn, or a combination of materials to create a layered, textured effect that radiates out from the face.
- Cut strips of construction paper in yellow, orange, red-brown, and tan, approximately 1–2 cm wide and 10–15 cm long.
- Fold or curl the ends of the strips slightly to give them movement and volume.
- Glue the strips around the outer edge of the mask base, overlapping colors and directions to create a full mane.
- For more texture, mix in yarn pieces or raffia tied into small bundles and glued between paper strips.
Step 6: Paint and Decorate the Face
Once the basic structure is in place, children can paint or color the face to give their lion personality. Encourage them to think about expression—kind, fierce, sleepy, or playful.
- Paint the central face area in a warm base color such as golden yellow or light brown and let it dry.
- Use darker tones around the eyes, nose, and muzzle to add depth and definition.
- Draw whisker spots, lines under the eyes, and decorative patterns using markers.
- Add finishing touches such as white fangs, stylized stripes, or geometric shapes to echo African-inspired designs.
Step 7: Attach the Strap or Handle
To wear the mask comfortably, you can either attach elastic around the back of the head or add a handle for children who prefer to hold the mask in front of their face.
- Punch a small hole on each side of the mask at about eye level.
- Thread elastic cord, ribbon, or string through the holes and tie knots on the inside to secure it.
- Adjust the length so the mask fits snugly but comfortably on the child’s head.
- As an alternative, glue a craft stick or dowel to the bottom back of the mask as a handheld option.
Simple Lion Mask Features Table
The following table summarizes key visual features that help the mask read as a lion while still leaving room for creative variation.
| Feature | Typical Lion Look | Creative Variations |
|---|---|---|
| Eyes | Almond-shaped with vertical pupils | Oversized eyes, different colors, or stylized outlines |
| Nose and Muzzle | Dark, triangular nose with rounded muzzle | Extended nose, heart-shaped nose, or patterned muzzle area |
| Mane | Golden to dark brown around the face | Multi-color mane, patterned strips, or mixed yarn and paper textures |
| Ears | Small, rounded ears above the head | Taller, pointed, or patterned ears for a more dramatic silhouette |
| Decorations | Subtle facial markings | Bold geometric designs, dots, or stripes inspired by traditional motifs |
Incorporating African Mask-Inspired Elements
While this project focuses on a lion specifically, it can also introduce children to the idea that many African cultures use masks in ceremonies, celebrations, and storytelling. Emphasize that the craft is a playful, respectful homage rather than a replica of any one traditional design.
- Use bold, clear shapes and symmetrical patterns around the eyes and forehead.
- Add stripes, dots, or triangles in repeating sequences to echo common decorative approaches.
- Discuss with kids how masks can symbolize traits such as bravery, leadership, or protection.
Adapting the Project for Different Ages
This lion mask craft can be easily simplified for toddlers or made more elaborate for older children and preteens. Adjust the steps so that every child feels successful and engaged.
- For younger children, pre-cut the eye holes, ears, and mane strips, then let them focus on gluing and coloring.
- For older kids, invite them to design their own mane pattern or experiment with 3D features like raised eyebrows or layered snouts.
- Include optional research time where older children learn a few facts about lions or African mask traditions and present them while wearing their mask.
Using Your African Lion Mask
Once complete, the lion mask can be the centerpiece of many imaginative activities at home or in the classroom. Encourage children to use it beyond a single art session so that the craft becomes part of ongoing learning and play.
- Stage a mini play or storytelling circle where each child wears an animal mask and tells a short story.
- Use the mask for a dress-up day, themed birthday party, or a school project about African wildlife.
- Combine the craft with a reading activity by pairing it with picture books or informational books about lions and savanna habitats.
Frequently Asked Questions (FAQs)
1. How long does it take to make an African lion mask?
For a simple version with a paper plate and paper mane, most families can complete the mask in about 45 to 60 minutes, including drying time for glue and paint. More detailed masks with layered textures and advanced designs may take longer, which can be spread across several shorter craft sessions.
2. Can this project be done in a classroom or group setting?
Yes, the mask is well-suited to classrooms, scout meetings, and community groups. To make it run smoothly, prepare materials in advance by pre-cutting the mask bases, eye openings, and mane strips, then set up stations for painting, gluing, and decorating to avoid crowding and waiting time.
3. What if my child is uncomfortable wearing a mask over their face?
If a full-face mask feels overwhelming, attach a handle instead of an elastic strap so the child can hold the mask in front of their face like a fan. Another option is to scale down the design into a half-mask that covers only the upper part of the face and leaves the mouth and chin visible.
4. Which age group is this craft best for?
With adjustments, this craft can be enjoyed by children from preschool through early teens. Younger children benefit from simple designs and lots of adult assistance, while older kids enjoy taking more control of the planning, cutting, and detailing stages.
5. Can we reuse or recycle parts of the mask?
Many components of the mask come from recyclable materials such as cardboard and paper. If the mask becomes worn out, you can remove and recycle cardboard and paper pieces where local guidelines allow, and repurpose any embellishments like yarn or beads for future crafts.
6. How can we store the finished mask?
Store the mask in a dry place away from heavy objects that might crush the ears or mane. Hanging it on a wall or placing it upright on a shelf not only protects it but also turns the project into a decorative reminder of family creativity.
Final Thoughts on This Family Craft
An African lion mask project brings together imaginative play, cultural appreciation, and hands-on learning in a way that is accessible for almost any family or classroom. With simple materials and thoughtful guidance, children can design a powerful lion face that reflects both the majesty of the animal and their own artistic style.