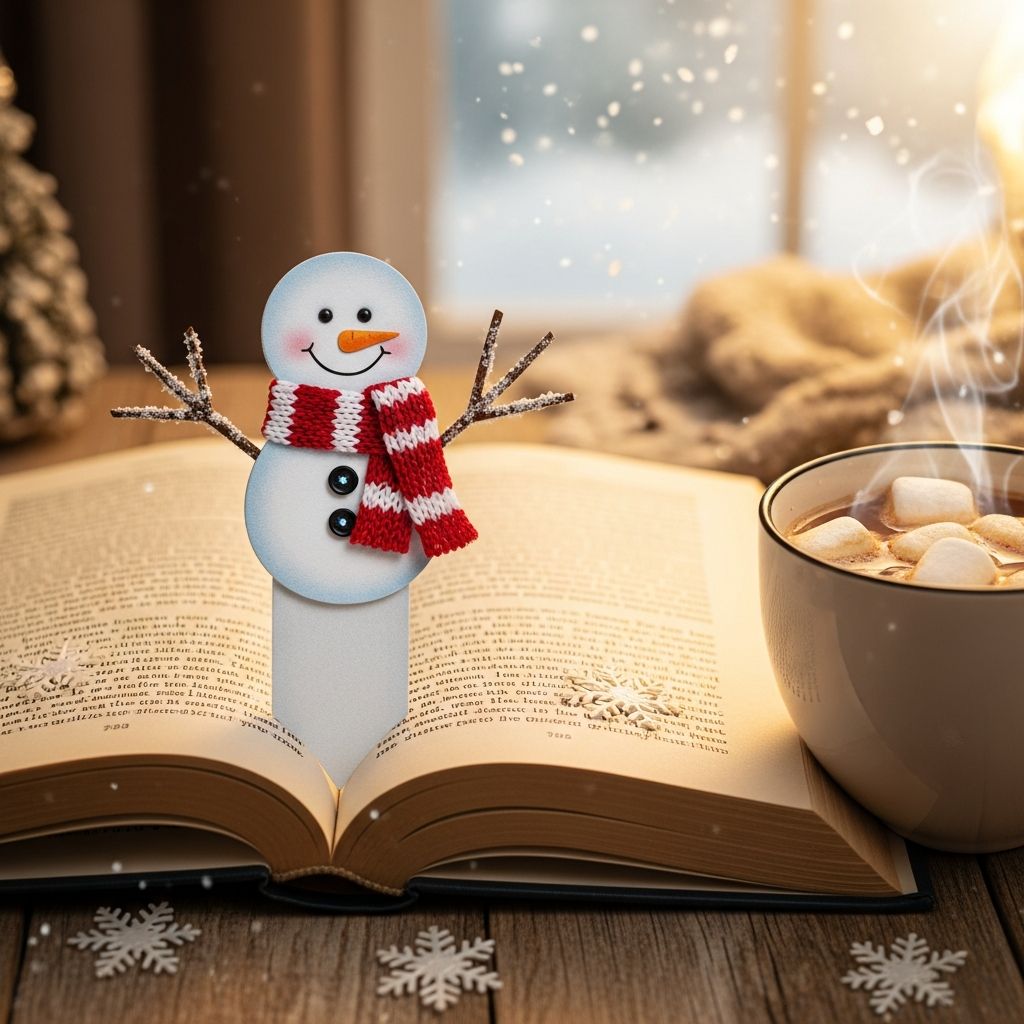
When the weather cools and blankets, hot cocoa, and chapter books call your name, a handmade snowman bookmark adds just the right touch of cozy charm to reading time. This guide walks you through creating a cheerful snowman buddy who peeks out from your book and keeps your page safe until your next reading break.
Why Make a Snowman Bookmark?
A snowman bookmark is a simple handmade project that blends creativity with literacy. It encourages kids to read more often because they are excited to use something they made with their own hands. Adults, too, enjoy the nostalgic, wintry feel of a snowman marking their place in a favorite mystery or holiday novel.
This project also works perfectly as a low-cost classroom craft, a library program activity, or a quick family project during winter break. You can customize the colors, faces, and accessories so every snowman feels unique, turning a basic idea into a memorable seasonal tradition.
Supplies You Will Need
The charm of this craft is that it uses affordable, easy-to-find materials. You can gather most of these from your craft bin or a quick trip to a dollar store or supermarket craft aisle.
- Wooden craft sticks (standard popsicle stick size works well)
- White acrylic paint or white craft paint
- Small paintbrush or foam brush
- Black permanent marker or paint pen for eyes and buttons
- Orange paper, foam, or marker for the carrot nose
- Scraps of felt, ribbon, yarn, or fabric for a scarf
- Colored markers or pencils for cheeks and details
- School glue or tacky craft glue
- Scissors (child-safe if kids are involved)
- Optional: mini pompoms, sequins, glitter glue, or stickers for extra flair
If you do not have paint available, you can wrap the craft stick in white paper or use white tape to create the snowman body. This flexibility makes the project accessible in a variety of settings, including classrooms with limited supplies.
Step-by-Step Instructions
Follow these steps to build a basic snowman bookmark. Once you understand the process, you can adapt the design to match your style, color preferences, and time constraints.
1. Prepare and Paint the Base
Lay down scrap paper or a craft mat to protect your work surface. Place the wooden craft stick flat and apply a thin, even layer of white paint to the entire front side. Allow it to dry, then add a second coat if the wood grain still shows through. Flip and paint the back if you want your bookmark to look finished from every angle.
While the paint dries, you can cut out tiny accessories, such as a scarf strip from felt or fabric and a small orange triangle for the carrot nose. Getting these details ready ahead of time helps keep kids involved when they are eager and the paint is not yet dry.
2. Mark the Snowman Face and Body
Decide which end of the stick will be the “head.” Lightly sketch a guideline with a pencil about one-third of the way down from the top to show where the scarf or neck will sit. Above this line, you will create the snowman’s face; below it, you can add buttons and decorative accents.
- Draw two round or oval eyes with a black marker.
- Add a dotted or curved line of coal “smile” dots.
- Use a pale pink or red pencil to lightly color small circles for cheeks.
If you prefer, you can give each snowman a different personality: sleepy eyes, winking eyes, or big surprised eyes. This personalization is especially fun in group settings, where kids can compare their snowmen at the end.
3. Attach the Carrot Nose and Scarf
Cut a tiny carrot-shaped triangle from orange paper or foam. Place a small dab of glue in the center of the face and press the nose in place, angling it slightly to one side to create a playful look. Let it rest while you prepare the scarf.
Cut a thin strip of felt, ribbon, or fabric long enough to wrap around the stick once with extra length to hang down like scarf tails. Add a dot of glue where you marked the neck line and press the middle of the scarf strip there. Wrap each side gently around the stick and secure any overlapping areas with a bit more glue. Trim the ends to your preferred length and add small fringe cuts if the material allows.
4. Add Buttons and Finishing Details
Once the face and scarf are in place, decorate the snowman’s body. Draw two or three black coal buttons down the center with a marker or attach mini pompoms or sequins for a dimensional look. Keep the decorations mostly on the upper part of the stick so the lower end remains flat and thin to slide easily between book pages.
At this stage, you can add a few more details, such as a dotted border on the scarf, tiny snowflakes on the body, or a name or short message on the back. Personalizing each bookmark makes it a thoughtful gift or party favor, especially when paired with a book or winter-themed goodie bag.
5. Let Everything Dry Completely
Before using your snowman bookmark, allow all paint and glue to dry completely. This prevents smudges on the pages of your book and keeps small attachments from sliding out of place. Once dry, your snowman is ready to slide between pages and peek out at the top, cheerfully guarding your spot.
Design Variations to Try
One of the joys of this project is how easily it can be customized. Whether you are crafting with a large group or just a few children at home, variations keep the activity exciting and encourage creativity.
- Hat styles: Add a top hat, beanie, or earmuffs from paper or felt.
- Colorful scarves: Use different patterns and textures, such as plaid fabric or sparkle ribbon.
- Expressions: Experiment with laughing, winking, or surprised faces.
- Theme sets: Make a family of snowmen inspired by favorite book characters or family members.
- Glitter accents: Outline the scarf or sprinkle the body with glitter glue for a frosty shimmer.
These choices turn a basic craft into an open-ended art experience, giving kids ownership over the final design. The more options you offer, the more likely children are to experiment and feel proud of their creations.
Helpful Tips for Crafting with Kids
This snowman bookmark craft works well for a range of ages, but a few simple adjustments help it run smoothly in homes, classrooms, and community programs. Setting up the space and expectations in advance can turn the activity into a relaxed, enjoyable experience for everyone.
- Pre-paint craft sticks for very young children to save drying time.
- Pre-cut noses, scarves, and hats to avoid long waits with scissors.
- Provide smocks or old T-shirts to protect clothes from paint.
- Use washable markers and glue when possible, especially with toddlers.
- Offer sample snowmen for inspiration but encourage original ideas.
As kids work, ask open-ended questions like “What expression will your snowman have?” or “What colors will you use?” This encourages language development and creative thinking alongside fine motor practice.
Safety and Age Considerations
Like most simple crafts, this activity is safe when supervised appropriately. Still, it is important to consider the age and abilities of the children involved. Tailor the materials to match their developmental stage and comfort level.
- For toddlers and preschoolers, avoid very small embellishments that could pose a choking risk.
- Provide child-safe scissors and pre-cut small pieces when working with younger children.
- Supervise the use of permanent markers or paint pens, reserving them for adults or older kids.
- Remind children never to put craft materials in their mouths.
With thoughtful planning, this snowman bookmark becomes a gentle way to introduce crafting rules and safe tool use, building confidence for future projects.
Perfect Occasions for Snowman Bookmarks
Snowman bookmarks fit naturally into many seasonal events and themes. Because they are flat, lightweight, and inexpensive to make, they can be produced in large quantities without overwhelming your budget or storage space.
- Winter classroom art centers or literacy units
- Library winter reading challenges or storytime handouts
- Holiday parties or classroom gift exchanges
- Family craft nights during school breaks
- Stocking stuffers or book-themed gift toppers
Pairing the bookmark with a book or reading log reinforces the bridge between crafting and reading, helping children see books as part of a cozy and enjoyable routine.
Simple Snowman Bookmark Ideas at a Glance
The table below summarizes a few popular variations so you can quickly choose an approach that suits your time, materials, and group size.
| Version | Best For | Main Materials | Time Needed |
|---|---|---|---|
| Classic Painted Stick Snowman | Family craft nights and classroom centers | Wooden stick, white paint, markers, felt scarf | About 30–40 minutes including drying |
| No-Paint Paper Wrap Snowman | Large groups with limited cleanup time | White paper, glue, markers, paper accessories | About 20–25 minutes |
| Embellished Sparkle Snowman | Older kids who enjoy detailed decoration | Painted stick, glitter glue, sequins, mini pompoms | 40–60 minutes with extra decoration |
| Mini Bookmark Gift Set | Holiday gifts or classroom exchanges | Multiple sticks, assorted fabrics, tags for names | Varies based on quantity |
FAQ: Snowman Bookmark Craft
Can I make this craft without paint?
Yes. Instead of using paint, you can wrap the craft stick in white paper or white tape, then draw the face and buttons on the surface. This option dries instantly, reduces mess, and works well in group settings or when time is limited.
How can I adapt this project for very young children?
For toddlers and preschoolers, pre-assemble some elements, such as painting the sticks and cutting out noses and scarves ahead of time. Offer larger embellishments, use washable markers and glue, and let them focus on placing features and adding color rather than handling sharp tools.
Will the bookmark damage the pages of a book?
As long as you keep bulky decorations near the top of the stick and allow all paint and glue to dry fully, the bookmark should slide comfortably between pages. Avoid very thick embellishments near the bottom so the book can close almost completely without stressing the spine.
Can these bookmarks be used as gifts?
Snowman bookmarks make thoughtful, inexpensive gifts for classmates, teachers, relatives, and reading buddies. You can write the recipient’s name or a short message on the back and pair the bookmark with a winter-themed book or a handwritten note for an extra-special touch.
How should I store multiple snowman bookmarks?
Once everything is fully dry, group bookmarks in a shallow box or container so the snowman faces remain visible. Keep them flat and avoid stacking heavy objects on top to prevent bending. If you are preparing them for a classroom or party, you can slip each bookmark into a small envelope or clear bag for easy distribution.
Bringing Winter Magic to Your Bookshelf
This snowman bookmark craft transforms a plain wooden stick into a tiny character that quietly waits for your next reading session. The process is straightforward, the materials are affordable, and the final result is both useful and heartwarming.
Whether you create a single snowman for your own novel or a whole blizzard of snowy friends for gifts and classroom activities, this simple DIY brings a touch of winter magic to every page you mark.