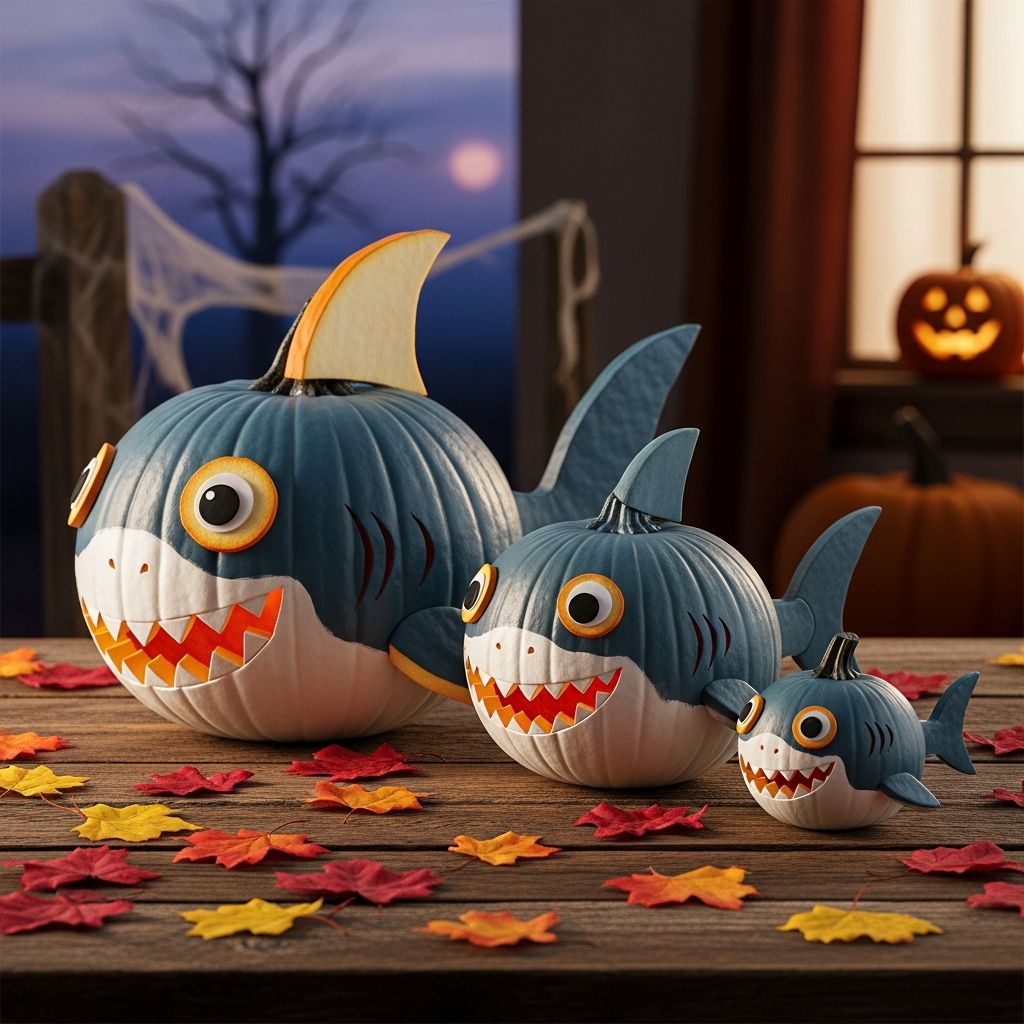
Character pumpkins are a fun way to decorate for Halloween without relying on spooky faces or complicated carving. This guide walks you through creating an entire shark family from simple pumpkins using mostly paint and easy craft supplies.
The project is designed for families: adults handle cutting and hot glue, while kids can help paint, choose colors, and arrange the display. By the end, you will have a group of cheerful shark pumpkins that look great on a porch, mantel, or Halloween party table.
Why Choose Shark-Themed Pumpkins?
Shark characters are instantly recognizable, colorful, and expressive, which makes them perfect for turning basic pumpkins into playful decorations. Instead of scary faces, these pumpkins bring bright smiles and bold colors, ideal for younger children.
A full shark “family” allows each child in the household to claim a character, customize colors, and help with part of the project. You can stick closely to familiar pink, blue, and yellow sharks, or invent your own ocean creature crew for a unique twist.
Planning Your Shark Pumpkin Family
Before buying supplies, decide how many sharks you want. Many families like one large pumpkin for a parent shark and several smaller pumpkins for baby or sibling sharks. This makes the display feel connected while still giving each pumpkin its own personality.
Think about where the pumpkins will live: outdoors on steps or a porch, or inside as a centerpiece. Indoor displays can rely more on paint and paper, while outdoor displays benefit from stronger adhesives and weather-resistant materials.
Suggested Shark Characters and Colors
Use color to differentiate each shark and keep track of which child is working on which pumpkin. You can copy familiar tones from popular shark songs or invent your own ocean color palette.
| Shark Character | Suggested Pumpkin Size | Main Color | Extra Details |
|---|---|---|---|
| Baby Shark | Small pumpkin | Bright yellow | Extra-wide smile, big eyes |
| Parent Shark | Medium or large pumpkin | Pink or blue | Taller dorsal fin, slightly larger teeth |
| Grandparent Shark | Medium pumpkin | Pale blue, gray, or lavender | Rounder eyes, gentle expression |
| Custom Shark | Any size | Teal, coral, or white | Accessories like glasses, bow tie, or hat |
Materials and Tools Checklist
Gather your supplies before starting so kids can stay focused and excited. Most of these items are easy to find at craft stores or discount shops, and many can be swapped for alternatives you already have at home.
- Real or faux pumpkins in various sizes
- Acrylic craft paint in white and your chosen shark colors (yellow, pink, blue, gray, etc.)
- Small and medium paintbrushes, plus a foam brush for large areas
- Black paint or a permanent marker for eyes and outlines
- Red or dark pink paint for mouths and tongues
- Craft foam or thick cardstock for fins and teeth (white plus matching shark colors)
- Pencil and scissors for drawing and cutting fin shapes
- Craft glue or a low-temperature hot glue gun (adults only)
- Optional: googly eyes, glitter glue, stickers, and ribbon for extra personality
- Scrap paper, cardboard, or a plastic tablecloth to protect your work surface
- Paper towels or wipes for fast clean-up between steps
Prepare the Pumpkins
Start by cleaning each pumpkin with a damp cloth to remove dirt and dust. A clean surface helps the paint stick better and last longer, especially if you are displaying the pumpkins outside.
Decide whether you want to carve or keep this a completely no-carve project. A no-carve approach is safer and faster and keeps the pumpkins looking fresh longer. If you prefer a glowing effect, you can place battery-operated tea lights around them or use hollow faux pumpkins.
Step-by-Step: Painting the Shark Bodies
Painting the pumpkin transforms the round shape into the body of your shark. It helps to do this step in stages so each layer dries completely, keeping colors bright and clean.
- Prime if desired. For very dark pumpkins, start with a thin coat of white paint as a base. This makes your shark colors more vibrant once dry.
- Paint the main color. Use a foam brush or wide paintbrush to cover the pumpkin with your chosen shark color, leaving a clean area near the bottom for the white belly if you want that detail.
- Create the belly. Once the first color is dry, paint a wide, rounded section of white on the front and underside of the pumpkin to act as the shark’s belly. This does not need to be perfectly even; a soft curve looks natural and cute.
- Touch up. Add a second coat where needed to cover any streaks or thin spots. Allow everything to dry fully before moving on to faces and fins.
Designing Friendly Shark Faces
The face is where each shark’s personality shines. Sketch lightly in pencil before painting if you feel nervous; the lines will usually disappear under paint or can be erased gently.
- Eyes: Paint simple circles or ovals in white, then add smaller black circles for pupils. For extra cuteness, leave a tiny white dot in the pupil to mimic a light reflection.
- Mouth: Draw a wide crescent or almost semi-circle across the white belly area using red or dark pink paint. The bigger the smile, the more playful the shark looks.
- Teeth: Once the mouth is dry, add small white triangles along the top or bottom edge to suggest teeth. You can keep them rounded and cartoony rather than sharp if you prefer a gentle look.
- Details: Outline eyes and mouth with a thin brush and black paint or marker for a more defined, animated style.
Create and Attach Fins
Fins instantly transform a painted pumpkin into a recognizable shark. Using craft foam or sturdy cardstock keeps them lightweight and easy to glue in place.
- Draw fin templates. On scrap paper, sketch three basic shapes: a tall dorsal fin for the top, and two smaller side fins that curve backward. Adjust size to match each pumpkin.
- Cut foam or cardstock. Trace the paper templates onto foam or cardstock in the shark’s main color. Cut carefully, smoothing any jagged edges.
- Add contrast. If desired, glue a slightly smaller white or lighter-colored shape on top of each fin for a layered look.
- Attach the fins. Adults can use a low-temperature hot glue gun to attach the dorsal fin on the back or top and the side fins toward the lower half of the pumpkin. Hold each piece in place for a few seconds to be sure it adheres.
Personalize Each Shark
Once the basic sharks are complete, invite kids to customize them with accessories and small details. This step is where the craft becomes a family memory rather than just a decoration.
- Use glitter glue to add sparkling scales or an underwater shimmer along the sides.
- Add bows, tiny paper hats, or felt bow ties to indicate different family members or personalities.
- Draw freckles, eyelashes, or silly eyebrows to make each shark distinct and expressive.
- Paint small fish or bubbles around the belly area to hint at a full underwater scene.
Kid-Friendly Roles and Safety Tips
Divide tasks so everyone contributes without crowding the work area or handling unsafe tools. Young children can help choose colors, paint large areas, and place stickers or non-toxic decorations.
- Reserve cutting, hot glue, and any sharp tools for adults or older teens.
- Use washable aprons or old T-shirts to avoid paint-stained clothing.
- Provide smaller pumpkins for toddlers so they can work alongside older siblings without pressure to be precise.
Displaying Your Shark Family Pumpkins
After everything is dry, arrange your sharks together to tell a story. You might line them up from smallest to largest on your front steps or cluster them around a blue tablecloth “ocean” on a party table.
Battery-operated tea lights, string lights, or blue LED candles add a gentle glow around the sharks at night without needing to carve or cut into the pumpkins. Scatter seashells, faux seaweed, or paper fish nearby to complete the theme.
Variations and Theme Ideas
Once you master the basic shark design, it becomes easy to branch out into new themes or coordinate with other decorations. You can adapt the same process for different characters and color schemes.
- Underwater Parade: Create a whole lineup of ocean animals such as dolphins, turtles, and jellyfish using similar painted shapes and foam pieces.
- Costumed Sharks: Dress your sharks as pirates, superheroes, or wizards using capes, hats, and small felt accessories.
- Glow-in-the-Dark Sharks: Add glow-in-the-dark paint to teeth, eyes, or fins so your pumpkins stand out after sunset.
- Mini Shark Army: Use miniature pumpkins for a group of baby sharks that can line windowsills or bookcases.
Frequently Asked Questions
Do these pumpkins require carving?
No, this project is designed as a no-carve craft, which keeps it safer and more child-friendly. If you prefer a carved look, you can adapt the painted design by cutting out the mouth or eyes and placing a light inside.
How long will painted pumpkins last?
Whole, uncarved pumpkins usually last much longer than carved ones, especially if kept in a cool, dry spot. Over time, outdoor pumpkins may fade slightly, so consider adding a clear sealer spray if you expect rain or strong sun.
Can kids do most of the work?
Children can handle many of the steps, including painting the base colors, adding simple faces, and inventing accessories. Adults should still manage any use of sharp tools, hot glue, or aerosol sealers.
What if I do not have craft foam?
Cardstock, thin cardboard, or even painted cereal-box pieces can stand in for foam fins and teeth. Just avoid very thin paper, which tends to sag or wrinkle when exposed to humidity.
How can I make this project more eco-friendly?
Use real pumpkins that can be composted after the season, and repurpose cardboard for fins instead of buying new foam sheets. You can also save removable accessories such as bows or hats to reuse on next year’s decorations.
Make Halloween Memories Under the Sea
Turning pumpkins into a shark family is a playful way to celebrate Halloween with younger kids or anyone who prefers cute over creepy. With a few coats of paint, some simple fins, and a handful of creative details, your porch or living room can feel like a friendly underwater adventure all season long.