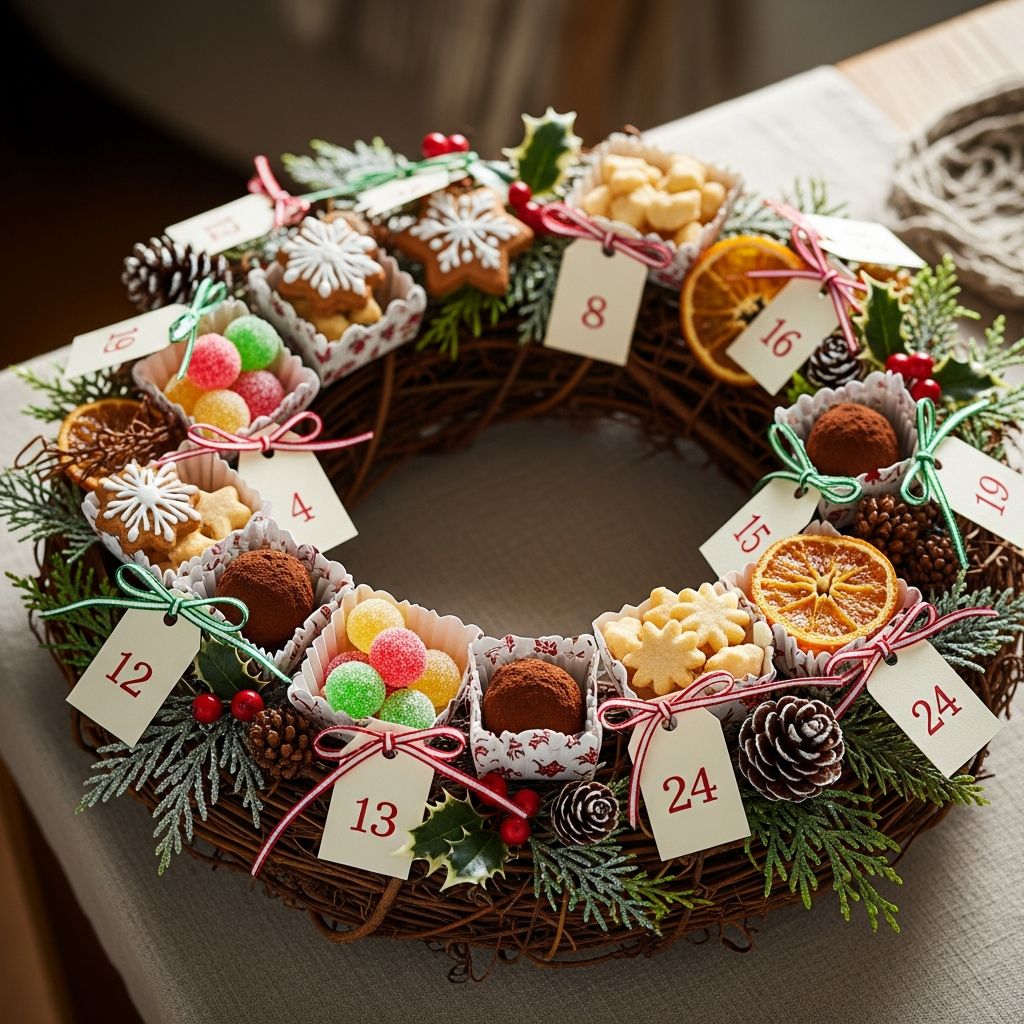
A wreath-style advent calendar combines holiday decor with the excitement of daily surprises. This guide walks you through creating a reusable treat wreath advent calendar, choosing safe fillers, and turning the countdown into a meaningful family tradition.
Why Make a Wreath Advent Calendar?
Store-bought advent calendars can be fun, but a handmade version lets you tailor every detail: colors, materials, treats, and even daily activities. A wreath shape doubles as wall or door decor while keeping all the little surprises in one pretty display.
- Customizable: Match your home’s style, your kids’ ages, or a favorite holiday theme.
- Budget-friendly: Use craft scraps, leftover ribbon, and low-cost treats or activities.
- Re-usable: With gentle storage and safe materials, you can bring it out year after year.
- Memory-making: Each little bundle can hide a snack, a note, or a simple family activity.
Planning Your Treat Wreath
Before you start gluing or tying anything, take a few minutes to plan. A little forethought makes the actual crafting smoother and helps you avoid mid-project supply runs.
Decide on Size and Display Location
First, figure out where you want to hang your wreath and how much space you have.
- Front door: Choose durable materials and secure attachments, especially if the door opens frequently.
- Interior wall: Paper cups or lightweight bags work well if the wreath won’t be bumped often.
- Above a mantle: Avoid hanging too low if you have pets or toddlers who may tug on it.
Measure the available space with a tape measure, then pick a wreath base size that is easy to reach but not so large that it becomes heavy when fully loaded.
Pick a Theme and Color Palette
You do not need an elaborate theme, but a simple concept helps your wreath look cohesive.
- Traditional red, green, and white
- Metallics like gold and silver
- Woodland or nature-inspired (greens, browns, kraft paper, twine)
- Children’s favorites (bright rainbow colors, favorite characters through stickers or tags)
Choose two or three dominant colors and repeat them in ribbon, paper, and number tags.
Materials and Tools
Most of the supplies can be found in a basic craft stash or at any general craft store. When crafting with or for children, non-toxic materials are strongly recommended, especially for items that might be handled frequently or end up near mouths.
| Item | Purpose | Notes |
|---|---|---|
| Wreath base (wire, foam, or sturdy cardboard) | Forms the ring shape | Cardboard is great for a budget-friendly option. |
| Small containers (paper cups, mini bags, or boxes) | Hold the daily treats | Aim for 24 or 25, depending on your countdown. |
| Ribbon, twine, or yarn | Attaches containers and adds decoration | Choose sturdy ribbon for heavier treats. |
| Decorative paper or fabric | Covers base or wraps containers | Scrapbooking paper, tissue, or fabric strips all work. |
| Number stickers, stamps, or markers | Label days 1–24 (or 25) | Make them large enough for kids to see easily. |
| Glue gun or strong craft glue | Secures fabric, paper, and ties | Use with adult supervision only, especially hot glue. |
| Hole punch or awl (optional) | Makes holes for hanging strings | Useful if your containers do not have handles. |
Step-by-Step: Building the Wreath Base
This section describes one straightforward method. Feel free to adapt it to use materials you already have at home.
1. Create or Prepare the Ring
If you have a premade wreath form, you can skip cutting and move directly to covering it. Otherwise:
- Draw two concentric circles on cardboard using a plate and a bowl or any round objects.
- Cut the outer circle with scissors or a craft knife.
- Carefully cut out the inner circle to create a ring.
Reinforce thin cardboard by gluing two rings together and letting them dry under a stack of books.
2. Cover the Base
The wreath ring looks more polished when covered. You can:
- Wrap it with strips of fabric or ribbon, slightly overlapping each wrap.
- Use green crepe paper for a leafy effect.
- Cover it in kraft paper and then add small paper leaves or stars.
Secure the ends with glue and hide any visible seams at the back.
3. Add a Hanger
Attach a loop of ribbon or twine at the top of the ring. Tie a firm knot and glue it in place to keep it from shifting. This loop will support the weight of the finished wreath, so test the strength by pulling gently before you add any treats.
Preparing the Treat Holders
The containers are what children interact with every day, so they should be sturdy, easy to open, and sized to hold small items.
1. Choose Your Container Style
Popular options include:
- Mini paper bags: Easy to decorate and lightweight.
- Paper cups: Punch two holes near the rim and thread ribbon to hang them.
- Small envelopes: Best for flat items or notes. These can dangle like ornaments.
- Felt pouches: Sew or glue the sides and decorate with simple shapes.
2. Decorate and Number Each Container
Invite children to help decorate if they are old enough, using crayons, stickers, or stamps. Add numbers 1 through 24 (or 25) in any pattern you like. Consider:
- Arranging numbers around the ring in order (1–24 going clockwise).
- Scattering numbers randomly for a daily “search and find.”
- Color-coding weekends or special days with different shapes or borders.
3. Attach Strings or Ribbons
Cut equal lengths of ribbon or twine for each container. Knot one end to the container handle or hole. Leave enough length so that the containers hang slightly below the wreath base, creating a full, layered look without overcrowding.
Filling the Wreath: Treat and Activity Ideas
A treat wreath can hold much more than candy. Many families combine small snacks with simple activities and non-food goodies. Health organizations recommend limiting sugary treats for children and balancing them with active play and nutrient-rich foods, especially during the holidays.
Sweet (and Savory) Edible Ideas
- Individually wrapped dark chocolate squares
- Mini cookie packs or homemade cookies in food-safe wrap
- Small bags of dried fruit or trail mix (age-appropriate to avoid choking hazards)
- Herbal tea bags for older kids or adults
- Holiday-shaped crackers or pretzels
Non-Food Surprises
- Stickers or temporary tattoos with winter designs
- Mini erasers, pencil toppers, or colorful paper clips
- Small ornaments children can add to a tabletop tree
- Beads and cord for a simple bracelet craft
- Little notes of encouragement or jokes
Activity Slips to Encourage Connection
Short, simple activities can become the most memorable part of the calendar. Write each activity on a small slip of paper and tuck it into a container. Ideas include:
- “Read a favorite winter story together tonight.”
- “Wear pajamas and watch a holiday movie.”
- “Make paper snowflakes and hang them in the window.”
- “Go for an evening walk and count how many wreaths you see.”
- “Pick a toy to donate to a local charity.”
Including generosity-themed activities can help children understand the season’s focus on giving and community.
Assembling the Treat Wreath
Once your base and containers are ready, the final assembly goes fairly quickly.
1. Fill and Close Each Container
- Place treats, notes, or small objects inside each bag or cup.
- Fold or tie the tops closed so that their contents remain a surprise.
- Mark particularly special days (like the final day) with a slightly larger or more decorated container.
2. Attach Containers to the Wreath
Hang each container by tying or gluing its ribbon or twine to the wreath base. Distribute weight evenly around the ring to keep it hanging straight.
- Hang longer ribbons toward the bottom and shorter ones near the top for a cascading effect.
- Alternate colors or patterns to keep the design balanced.
- Check that no container is so heavy that it pulls the wreath out of shape.
3. Add Final Decorative Touches
Fill any gaps with small accents:
- Paper or felt leaves
- Mini bows, bells, or pom-poms
- Snowflake or star cutouts
Step back and view your wreath from a distance. Adjust any crooked containers and trim stray ribbon ends.
Safety and Durability Tips
Because the wreath will be handled daily, it is worth considering a few safety and durability guidelines.
- Use non-toxic glues, paints, and markers whenever possible, especially if young children may handle or mouth decorations.
- Avoid very small parts that could pose a choking risk for young children; larger items or sealed bags are safer.
- Test the hanging mechanism with a gentle tug before adding all the containers.
- Store the finished wreath in a dry place after the season, ideally in a box slightly larger than the wreath, to prevent crushing.
Variations to Try in Future Years
One of the best aspects of this project is how easily it can evolve as your family grows and your interests change.
- Book-based wreath: Instead of treats, fill each day with a slip referencing a picture book you will read together.
- Service-focused countdown: Fill containers only with acts of kindness, such as writing thank-you notes or preparing a donation bag.
- Craft supply countdown: Stock each day with a tiny craft item; combine them all on the final day for a special project.
- Travel-friendly mini version: Create a smaller, lightweight wreath if you plan to be on the road during part of the month.
Frequently Asked Questions (FAQs)
How many days should a wreath advent calendar have?
Traditional advent calendars count 24 days, starting on December 1 and ending on December 24. Some families add a 25th container for an extra surprise on the holiday itself; either option works as long as you plan your fillers accordingly.
Can I make this project with very young children?
Yes, but adjust the tasks. Adults or older children can handle cutting, gluing, and hot tools, while toddlers can help stick on pre-cut shapes, choose colors, or place number stickers. Always supervise closely when small pieces or sharp tools are involved.
What if I do not want to include candy?
You can skip food entirely and fill the wreath with activity notes, small toys, craft supplies, or family coupons (like “choose tonight’s story” or “extra game night”). Many parents find that children are just as excited about experiences as they are about sweets, especially when the activities are simple and playful.
How far in advance should I prepare the wreath?
Building the wreath base and containers can be done weeks ahead of time. Filling them can wait until a few days before the countdown starts, especially if you are including perishable treats. Aim to complete everything before the first day of opening so you can simply enjoy the daily routine.
Can this wreath be reused next year?
If you choose durable materials and open the containers carefully, you can absolutely reuse the wreath. Many people refill the same base each year but refresh or replace only the most worn containers, gradually updating colors or themes as their family’s preferences change.
References
- Art and craft materials — safety tips — Better Health Channel (Victoria State Government). 2023-02-01. https://www.betterhealth.vic.gov.au/health/healthyliving/art-and-craft-materials-safety-tips
- Added Sugars and Kids — American Heart Association. 2023-06-15. https://www.heart.org/en/healthy-living/healthy-eating/eat-smart/sugar/added-sugars-and-kids
- Healthy Eating During the Holidays — U.S. Department of Agriculture, MyPlate. 2022-11-30. https://www.myplate.gov/tip-sheet/healthy-eating-holidays
- Child choking prevention — Centers for Disease Control and Prevention. 2023-01-10. https://www.cdc.gov/safechild/choking/index.html
- Raising Caring Kids: Giving — University of Wisconsin–Madison Extension. 2017-09-01. https://parenting.extension.wisc.edu/article/raising-caring-kids-giving/