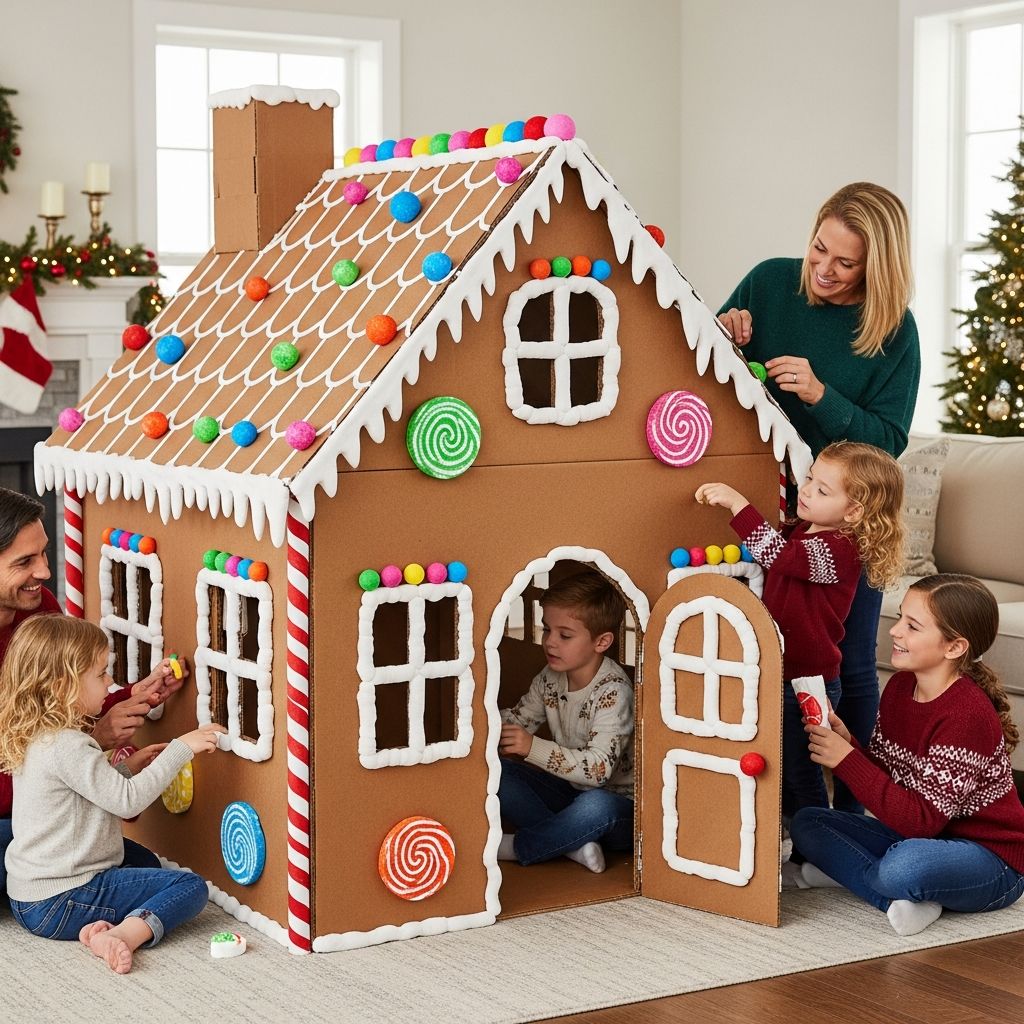
Creating a life-size gingerbread house that children can actually step into is one of those magical projects that instantly transforms an ordinary room into a holiday storybook scene. Instead of baking hundreds of cookies, this version uses cardboard, tape, and paint to mimic the classic candy house in a way that is affordable, safe, and reusable year after year.
This guide walks through everything from planning the size and location of your house to constructing sturdy walls, adding whimsical candy details, and turning it into a cozy play space or photo backdrop for holiday gatherings.
Why Make a Walk-In Gingerbread House?
A life-size gingerbread house does more than decorate a room; it becomes a centerpiece for play, imagination, and family traditions. Children can pretend to be bakers, elves, or storybook characters, while adults get to flex their creative muscles in building and decorating the structure.
- It provides a large-scale, immersive decoration that instantly sets a festive mood.
- It doubles as a playhouse, reading nook, or cozy corner for holiday storytelling.
- It can be customized to match your color scheme, theme, or available space.
Planning Your Gingerbread House Layout
Before cutting a single box, take a few minutes to plan the basic layout of your gingerbread house. This helps you avoid last-minute changes and ensures the structure fits your space and needs.
Choose the Location
Start by deciding where the house will live for the season. Popular spots include playrooms, living rooms, loft areas, or school classrooms. Measure the area and note any obstacles such as ceiling fans, low light fixtures, or doorways the structure might block.
- Leave enough room around the house for kids to walk and adults to supervise comfortably.
- Consider visibility from the main living area so everyone can enjoy the view.
- A corner or alcove often works best to support at least one or two sides of the house.
Decide on Size and Shape
Your house does not need to be perfectly to scale; it just has to feel big enough for children to enter. As a starting point, aim for a doorway that is at least 36–40 inches high so most kids can walk or duck through without crouching too much.
| House Style | Approx. Footprint | Wall Height | Best For |
|---|---|---|---|
| Compact Cottage | 3 ft x 3 ft | 4 ft | Small apartments, single toddler |
| Playroom Chalet | 4 ft x 4 ft | 5 ft | Two to three young children |
| Party Pavilion | 5 ft x 6 ft | 5–6 ft | Classrooms, large living rooms, parties |
Sketch a simple floor plan on paper with labeled walls, windows, and doors. This does not need to be artistic; it just gives you a roadmap when you start cutting and assembling cardboard panels.
Gathering Materials and Tools
The beauty of a cardboard gingerbread house is that it uses everyday materials in creative ways. Many items can be repurposed from shipping boxes or recycling bins, making this a budget-friendly project.
Basic Structure Supplies
- Large cardboard boxes or appliance boxes (refrigerator, TV, or moving boxes work well).
- Packing tape and duct tape for strong, long-lasting seams.
- Utility knife or heavy-duty scissors for cutting panels and details.
- Ruler or yardstick to keep edges straight and corners square.
- Hot glue gun and glue sticks for attaching decorative elements.
Decorative and Finishing Materials
- Brown craft paint or tempera paint for the “gingerbread” walls.
- White paint for icing details such as roof lines, swirls, and faux frosting.
- Colored construction paper or foam sheets for candy, gumdrops, and lollipops.
- Paper plates, pom-poms, ribbon, and felt for extra texture and color.
- Battery-operated string lights to add a magical glow without heat or cords.
Optional extras include clear plastic sheets for windows, faux snow batting for the roof, and peel-and-stick Velcro for removable panels that make storage easier.
Building the Cardboard Walls
Once you have a rough plan and supplies assembled, it is time to create the walls that will form the main body of your gingerbread house. Think of each wall as a separate panel that you can decorate and then connect together.
Cutting and Shaping Panels
Flatten your boxes and cut large rectangular pieces to serve as the sides and back of the house. For a storybook look, create a peaked top on the front and back panels by cutting a simple triangle on each one to form the roofline.
- Trace straight lines with a ruler before cutting to avoid jagged edges.
- Mark where the door and windows will go on the front and side walls.
- Keep at least a few inches of solid cardboard between openings to preserve strength.
To make a doorway, cut three sides of a rectangle and leave the top attached, creating a door that can swing open like a flap. For windows, you can either cut open spaces or create faux windows by painting dark rectangles and adding painted frames.
Reinforcing the Structure
Cardboard can bend if left unsupported, so plan to reinforce the walls at the corners and along long edges. This will keep the house standing firm even when kids are climbing in and out.
- Fold spare strips of cardboard into long right-angle pieces and tape them along interior corners as braces.
- Use wide duct tape on the inside seams where two panels meet for extra stability.
- If the floor is slippery, add non-skid pads or tape at the base to prevent shifting.
Designing and Attaching the Roof
The roof is where the gingerbread illusion really comes alive. A well-designed roof not only completes the visual effect but also makes the structure feel like a true little house instead of just a box.
Creating Roof Panels
Cut two large rectangles of cardboard that are slightly longer than the house and wide enough to meet at the peak. Place them together at an angle to test the fit; they should form a shallow triangle when viewed from the side, similar to a traditional cottage roof.
- Score a light line down the center of each roof panel to help it bend slightly if needed.
- Leave a small overhang on all sides to mimic cookie shingles extending beyond the walls.
- Cover the roof pieces with brown paint first, then add white paint for frosting and snow effects.
Securing the Roof Safely
Attach the roof so it feels solid, but consider ways to make it removable if you need to move or store the house later. Lightweight materials are helpful here, because they reduce strain on the walls.
- Use strong tape along the top seam where the two roof panels meet, forming a hinge-like ridge.
- Attach the roof to the walls with strips of duct tape on the interior, or use Velcro if you plan to remove it frequently.
- If the roof area is tall, avoid placing heavy objects on top; rely on paint and paper for decoration instead of real candy.
Painting the Gingerbread Base
Before adding candy decorations, paint the entire structure to look like a giant cookie. This step instantly ties all the cardboard pieces together and sets the stage for the detailed icing and candy that come later.
Choosing Colors and Finishes
Traditional gingerbread houses use a warm brown for the walls and bright white for frosting, but you can customize the palette to match your holiday decor. For a more whimsical look, consider pastel colors or metallic accents.
- Mix a base color of brown with a touch of orange or red to keep the house from looking dull.
- Use a large brush or foam roller for even coverage and quicker painting.
- Apply at least two thin coats of paint for a smooth finish, allowing each coat to dry fully.
Once the brown base is dry, use white paint to outline window frames, doorways, and roof edges to mimic piped royal icing. Wavy lines, dots, and scallops all add to the cookie-like effect.
Creating Candy-Inspired Decorations
This is where the entire family can jump in. Adults can handle cutting shapes, while kids help choose colors, arrange patterns, and glue candy-like pieces onto the walls and roof.
DIY Candy Elements
- Gumdrops: Cut dome shapes out of craft foam or construction paper in bright colors. Add a dusting of white paint or glitter for a sugary look.
- Peppermint Swirls: Use paper plates or circular cardboard pieces and paint spirals of red and white for classic candies.
- Licorice Strips: Cut long, thin strips of colored paper or ribbon to frame doors and windows.
- Lollipops: Glue painted circles to wooden dowels or cardboard sticks and attach them near the entrance.
Cluster decorations around the doorway and windows, just as you would on a small gingerbread house. Balanced repetition of shapes and colors helps the overall design feel cohesive rather than random.
Adding Texture and Dimension
Layering materials gives the house dimension so it does not look flat. Mix soft items with shiny surfaces and different shapes to capture that playful, candy-store feeling.
- Attach pom-poms as mini gumdrops around window frames or roof edges.
- Use felt or foam sheets to create raised panels and borders along the walls.
- Glue faux snow batting along the roof and window ledges for a freshly frosted look.
Lighting and Interior Details
Once the exterior looks sweet enough to eat, turn your attention to the inside. A cozy interior encourages children to stay and play, turning the gingerbread house into a favorite holiday hideaway.
Safe Lighting Options
Lighting adds instant magic, but safety must come first, especially in a structure made from cardboard. Stick with low-heat, battery-powered options that do not require cords kids could trip over.
- String battery-operated fairy lights along the interior roofline for a soft glow.
- Place LED tea lights in safe corners to mimic the look of flickering candles.
- Avoid real candles or traditional light bulbs inside the structure to prevent heat buildup.
Turning It into a Play Space
Think about how children will use the space once the building process is complete. A few thoughtful touches can transform the interior from an empty shell into a miniature holiday room.
- Add soft pillows or small bean bags for reading and pretend play.
- Lay down a small rug or blanket to create a warmer floor surface.
- Include a small basket of holiday books or plush toys to invite longer visits.
Safety, Durability, and Storage Tips
A life-size cardboard house is meant to be fun, not fragile. With a few precautions, you can keep the structure safe for kids and strong enough to survive an entire holiday season.
Keeping Kids Safe
Because children will be climbing in and out of the house, inspect it regularly for loose edges or wobbling. Make any repairs promptly so play remains carefree.
- Check corners and roof connections every few days, especially after active play.
- Trim or tape down any sharp edges left from cutting cardboard.
- Set basic rules, such as no climbing on the roof and no roughhousing inside.
Storing for Next Year
If you want to reuse the house, design it with disassembly in mind. Modular panels that come apart with minimal damage will save time and resources next year.
- Use removable fasteners such as Velcro or binder clips where possible instead of permanent glue on major seams.
- Label each panel with its position (front, back, left side, etc.) before taking it apart.
- Store flat panels in a dry area with a sheet or plastic cover to protect paint and decorations.
Fun Ways to Use Your Gingerbread House
Once your life-size gingerbread house is complete, it can become the focal point of many holiday activities, not just a background decoration. Use it as a versatile prop to create cherished memories.
- Set up a holiday photo booth by placing a chair inside and snapping pictures as kids poke their heads out the window.
- Host a story time corner, reading winter tales or gingerbread-themed books inside the house.
- Create a pretend bakery or candy shop play scenario, with toy food and aprons for kids.
The more often the house is part of everyday fun, the more it becomes a symbol of the season itself rather than a decoration that fades into the background.
Frequently Asked Questions (FAQs)
How long does it take to build a life-size gingerbread house?
Most families can assemble and paint a basic cardboard gingerbread house over the course of a weekend. Plan one day for cutting and building the structure and another for painting and decorating, though you can spread the work out over several evenings if that fits your schedule better.
Can this project be done with a classroom or group?
Yes. For classrooms or group settings, assign small teams to handle different tasks such as painting walls, creating candy decorations, or designing the roof. Supervise cutting and hot glue work closely, and prepare some pieces in advance so children can focus primarily on safe and creative steps like painting and gluing paper candies.
What if I do not have large appliance boxes?
If large boxes are not available, tape multiple smaller panels together to form larger surfaces, or use lightweight foam boards instead of cardboard. The key is to create sturdy rectangles and triangles that can stand upright and be joined securely at the corners.
Is it necessary to paint the inside of the house?
Painting the inside is optional, but a quick coat of warm color can make the space feel more finished and cozy. If time or paint supplies are limited, focus on the exterior first and add interior details later if the kids are still enthusiastic and you have materials left over.
Can we use real candy on the house?
Real candy is tempting, but it can attract pests and may fall off over time, especially in warm rooms. Using paper, foam, and other craft materials gives you a similar look without the mess, and you can save those decorations to reuse each year.
Bring the Gingerbread Story to Life
Building a life-size gingerbread house from cardboard turns a familiar holiday symbol into an interactive experience. Instead of admiring a small cookie house from a distance, children step through the door, look out the windows, and imagine themselves inside the story.
With thoughtful planning, simple materials, and plenty of creativity, you can construct your own walk-in gingerbread wonderland that becomes a beloved part of your family’s holiday traditions for years to come.