The God’s Eye, often called Ojo de Dios, is a simple yet striking yarn weaving project that turns a couple of sticks and some leftover yarn into a bright, geometric decoration. This guide walks you through the process from start to finish with fresh ideas for colors, patterns, and kid-friendly variations.
Everything here is explained in clear, practical steps so that adults, teens, and children can enjoy the process together. With just a little practice, this relaxing craft can become a favorite go-to activity for rainy days, classrooms, or creative afternoons at home.
What Is a God’s Eye Craft?
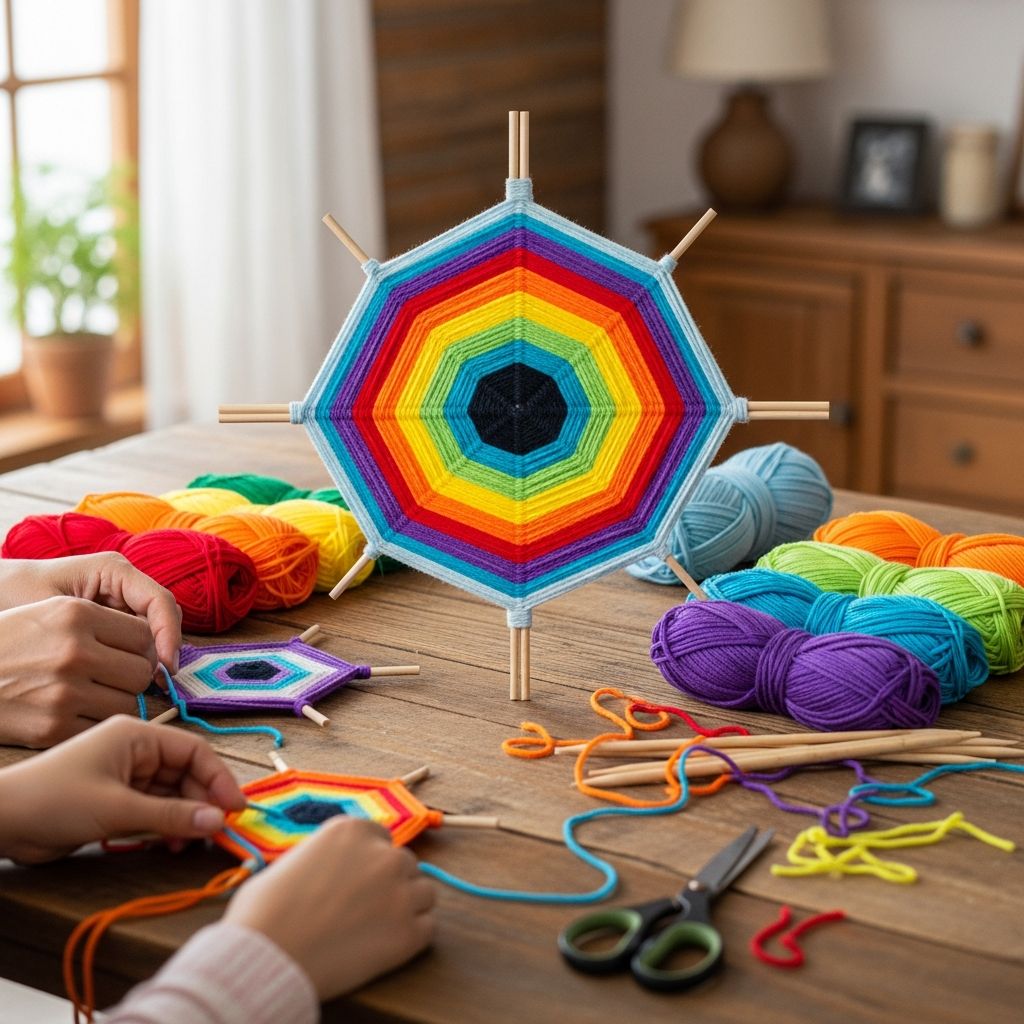
A God’s Eye craft is a woven design made by wrapping yarn around crossed sticks to create a layered, diamond-shaped pattern. Each round of wrapping adds a colorful ring, building up into a textured geometric “eye.”
Although this project uses very simple movements, the finished piece looks surprisingly intricate. By changing yarn colors, stick lengths, and the number of sticks, makers can create everything from tiny ornaments to large wall hangings.
Why This Craft Is Great For Kids
This project is loved by kids because it is repetitive, calming, and quick to personalize. Children quickly see their progress as each ring of yarn forms, which keeps them motivated from start to finish.
- Supports fine motor skills as kids pinch, wrap, and pull yarn around the sticks.
- Reinforces pattern recognition, counting, and color planning in a hands-on way.
- Encourages patience and focus without feeling tedious or complicated.
Materials and Substitutions
This craft is flexible and forgiving. Most homes already have many of the supplies, and there are easy substitutions if you do not have everything on hand.
Basic Supply List
- 2 straight sticks or craft dowels (similar length)
- Yarn in 2–6 colors (any weight, not too slippery)
- Scissors for trimming yarn
- Optional: tape or glue to secure the center for beginners
- Optional: beads, tassels, or ribbon for decoration
Easy Alternatives You Can Use
- For sticks: Popsicle sticks, chopsticks, bamboo skewers with tips cut off, or sturdy twigs from the yard.
- For yarn: Twine, thin ribbon, embroidery thread bundled together, or leftover knitting yarn in mixed textures.
- For hanging: A loop of yarn, fishing line, or a metal ornament hook.
Prepare Your Workspace
Before starting the craft, set up a comfortable area so that kids can focus on the fun part—wrapping and choosing colors. A little preparation prevents tangles and frustration.
- Cover the table with newspaper, craft paper, or a washable cloth if using glue.
- Pre-cut yarn into manageable lengths for young children (about arm-span to chest-width).
- Group colors in small bowls or baskets so they do not roll off the table.
- Keep scissors and any glue out of reach until they are needed, especially with younger kids.
Step-by-Step: How to Start the Center
The center is the foundation of the craft. Once the sticks are secure, the rest of the process is simply repeating a wrapping pattern around and around.
1. Cross the Sticks
- Place one stick horizontally on the table.
- Lay the second stick on top to form a plus sign or an “X,” trying to intersect at the center of both sticks.
- Hold them firmly with one hand or ask a helper to pinch the center.
2. Anchor the First Yarn Color
- Cut a length of yarn (about 60–90 cm is comfortable for beginners).
- Lay a short tail of yarn along one stick and pinch it with your fingers.
- Wrap the long end diagonally across the center, around both sticks, several times to trap the tail and hold the sticks in place.
- Turn the sticks a quarter turn and wrap again across the new diagonal until the center feels secure and the sticks no longer wobble.
For very young children, a small dot of glue where the sticks cross or a piece of tape around the center can make wrapping easier and less frustrating.
The Weaving Pattern Explained Simply
Once the center is firm, the weaving step repeats in a steady rhythm. The yarn goes around one stick at a time, moving in the same direction around the cross so a layered diamond grows outward.
Basic Wrapping Rhythm
- Start with the yarn behind one stick, close to the center.
- Bring the yarn over the front of that stick, then wrap it around to the back and pull it snug.
- Move diagonally to the next stick, bring the yarn over the front, wrap around the back, and pull snug again.
- Continue this same motion—over, around, to the next stick—in a consistent direction (clockwise or counterclockwise).
As more rounds are added, the woven shape grows evenly. Encourage kids to pull the yarn firmly but gently so there are no loose loops or gaps.
Changing Colors Without Tangles
Color changes give each God’s Eye its own personality. Switching colors is simple and can be done whenever a yarn strand runs out or when someone wants a new shade.
How to Switch Colors Smoothly
- Stop wrapping at the back of a stick so the working yarn is hidden from the front.
- Cut the yarn, leaving a small tail that rests along the stick.
- Tie the end of a new color to the tail of the old yarn with a small knot, then pull it tight.
- Continue the wrapping rhythm, making sure to keep the knot on the back side so it does not show on the front.
Advanced crafters who want a very smooth finish can tuck the tails under several wraps instead of leaving knots, but knots work perfectly fine for most family projects.
Creative Design Ideas and Variations
Once the basic technique feels natural, there are many ways to expand this craft. Even small changes in stick length or color order dramatically change the final look.
Fun Color Strategies
- Rainbow rings: Use bright colors in rainbow order, adding just a few wraps of each shade.
- Ombre effect: Start with a very light shade and gradually move to darker tones of the same color family.
- High contrast: Alternate dark and light colors to highlight each ring of the design.
- Monochrome: Use only one color but vary yarn textures (fuzzy, smooth, thick, and thin).
Changing Stick Lengths and Numbers
- Mini ornaments: Use short sticks or cut craft sticks in half for small, quick versions.
- Large wall art: Use long dowels or sturdy branches to create oversized decor pieces.
- Extra points: Add a third or fourth stick, evenly spaced, to create six- or eight-pointed designs with more complex geometry.
Design Options At a Glance
| Design Choice | Best For | Difficulty Level |
|---|---|---|
| Two sticks, three colors | First-time makers and young kids | Very easy |
| Two sticks, many color changes | School projects and group activities | Easy |
| Three or four sticks | Older children, teens, and adults | Moderate |
| Layered God’s Eyes on long sticks | Wall hangings and display pieces | Moderate to advanced |
Finishing Touches: How to End and Display
When the weaving reaches the desired size, the last steps are to secure the yarn, tidy any loose ends, and decide how to show off the finished piece.
Securing the Final Wrap
- Stop with the yarn at the back of a stick.
- Wrap the yarn around that stick one extra time and tuck it under a few existing strands.
- Tie a small knot around the stick or through a loop of yarn and pull tight.
- Trim any excess yarn tails close to the knot so they do not show from the front.
Ways to Display Your God’s Eye
- Attach a hanging loop of yarn at the top for a window or door decoration.
- Hang several in a vertical line to form a colorful wall mobile.
- Use smaller ones as gift toppers or place cards for special occasions.
- Turn mini versions into keychains or backpack charms with simple hardware.
Tips for Crafting With Different Age Groups
The same basic craft can be adapted for preschoolers, older kids, and adults by changing stick size, yarn type, and how much help is provided with the center and color changes.
Preschool and Early Elementary
- Use large, blunt sticks and thick yarn so wraps are easy to see and grip.
- Pre-wrap and secure the center before handing the project to the child.
- Limit color changes to one or two so they can focus on the wrapping motion.
Older Kids, Teens, and Adults
- Encourage planning a color order on paper before starting to introduce design thinking.
- Experiment with unusual materials like metallic yarn, textured fibers, or thin strips of fabric.
- Try multi-stick structures and layered pieces for a more challenging, artistic project.
Safety and Cleanup Tips
Though this is a low-risk craft, a few simple precautions keep it safe and enjoyable for everyone. Quick cleanup helps the project feel complete and leaves the workspace ready for the next activity.
- Blunt any sharp stick ends with sandpaper or cover them with a little tape for younger children.
- Supervise the use of scissors and glue, especially in group settings.
- Collect leftover yarn pieces in a small container; they can be reused for collages or future crafts.
Frequently Asked Questions
How long does a God’s Eye project take?
For a small piece with a few color changes, plan on 20–40 minutes, depending on the child’s age and attention span. Larger, more detailed versions can be worked on over several sessions, making this a nice ongoing project for classrooms or after-school programs.
What if the yarn keeps slipping or the center feels loose?
If the sticks move around, add more wraps across the center in both diagonals until they feel solid. A tiny piece of tape or a small dab of glue under the crossing point can also help, especially for first-time makers who are still learning to keep yarn tight.
Can this craft be adapted for sensory needs?
Yes. Softer, chunky yarn can be very soothing for kids who enjoy tactile activities, while bright colors and clear patterns can be engaging for visual learners. Some children may prefer shorter sessions with small projects, while others find the repetitive wrapping motion calming over longer periods.
Is it possible to reuse the materials later?
Finished God’s Eyes can be kept as decorations, but if you want to reduce waste, gently unwind the yarn and straighten the sticks to use again. This can be a useful part of a discussion about reusing materials and making thoughtful choices in crafting.
How can this project connect to learning goals?
Teachers and parents often use this craft to support learning in several areas at once. It can reinforce counting (number of wraps per color), pattern recognition (repeating color sequences), and planning skills (deciding on a design before starting).
Bringing It All Together
With just a few sticks and some leftover yarn, it is possible to create a colorful piece of art that feels both simple and special. Once the basic wrapping pattern is understood, the God’s Eye becomes a flexible canvas for play with color, symmetry, and texture.
Whether used as a quick weekend craft, a classroom activity, or a family tradition, this weaving project offers a relaxed, creative way to slow down, talk, and make something beautiful together.