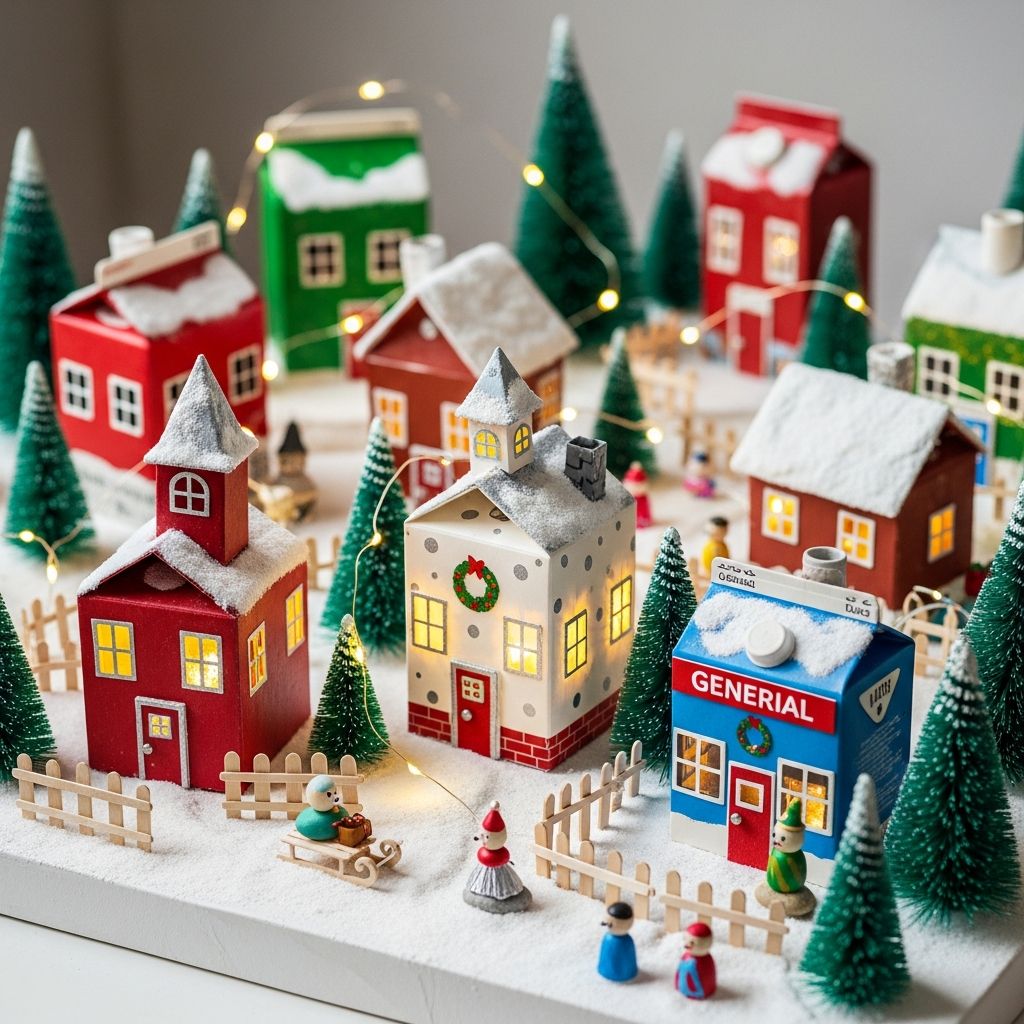
Empty milk and juice cartons can become one of the most charming parts of your holiday decor when you turn them into a glowing winter village. This project blends recycling, creativity, and festive magic into an activity that kids and adults will remember long after the holidays.
Why Make a Milk Carton Village?
Before jumping into the how-to, it helps to understand what makes this craft special. A milk carton village is more than simple decoration; it is a hands-on way to welcome the season and build memories together.
- Eco-friendly: You reuse everyday packaging instead of sending it straight to the recycling bin.
- Budget-conscious: Most supplies are inexpensive or already in your craft drawer.
- Family-friendly: Each person can design a unique “house,” giving the village its own personality.
- Customizable decor: Change colors, styles, and details to match rustic, modern, or whimsical holiday themes.
Gathering Your Materials
One of the joys of this project is how flexible it is. You can keep the supply list very simple or go all-out with intricate details.
- Empty milk or juice cartons (washed, dried, and opened at the top if needed)
- Acrylic craft paint (white, pastels, metallics, or classic “gingerbread” browns)
- Paintbrushes in various sizes
- Permanent marker or pencil for sketching door and window shapes
- Craft knife and scissors (for adults to handle)
- Craft glue or hot glue gun (adults only) and glue sticks
- Cardstock, craft foam, or cardboard for roofs and extra architectural features
- Decorative accents such as glitter, stickers, sequins, faux snow, ribbon, or mini bottle-brush trees
- Battery-operated tealights or mini LED string lights for safe illumination
- Optional: tissue paper, vellum, or baking parchment to “frost” the windows
Preparing and Planning Your Little Town
Before the paint comes out, a few simple steps will make the rest of the project smoother and more enjoyable.
- Wash thoroughly: Rinse cartons with warm soapy water and let them dry completely to avoid odors or mold.
- Check sizes: Collect a mix of small, medium, and large cartons to create a more interesting skyline.
- Sketch a layout: Decide whether your village will be a mountain town, a city street, or a cozy rural cluster.
- Assign roles: Children can choose their building type—bakery, toy shop, library, or imaginary places like “Santa’s Mail Hub.”
Base Coats and Color Themes
Paint is what transforms plain packaging into miniature buildings. Choosing a color palette at the beginning helps everything look cohesive when the village is assembled.
- Classic gingerbread look: Use warm browns for the carton base and white accents for “icing.”
- Snowy Nordic vibe: Stick to whites, creams, soft grays, and muted blues.
- Storybook color pop: Combine bright reds, greens, pinks, and aqua hues for a cheerful display.
- Metallic magic: Add small touches of gold, copper, or silver on doors, trim, or rooftops.
Apply a base coat to each carton. Let it dry and add a second coat if needed so the original printing is fully covered. Younger children can help with broad strokes, while older kids can handle more detailed areas.
Designing Windows, Doors, and Rooflines
Once your base colors are dry, it is time to give every building its own personality. Simple planning makes the cutting and decorating more successful.
- Use a pencil or light marker to roughly outline windows, doors, and special features.
- Vary shapes—arched windows, round portholes, tall narrow panes, and wide shopfronts.
- Consider special building types: a tall church steeple, a town hall clock, or a cozy cottage with a sloping roof.
An adult should carefully cut out windows and doors with a craft knife. For some houses, doors can remain partially attached to act as little flaps; for others, you may leave windows painted on rather than open, especially for very young children’s pieces.
Creating Glowing Windows
Light is what truly brings the village to life, especially at night. Frosted windowpanes make the glow soft and magical.
- Cut pieces of tissue paper, parchment, or thin vellum slightly larger than each window opening.
- Glue them on the inside of the carton so they cover the window frames completely.
- Use warm white battery-operated tealights or micro-LED string lights inside the cartons.
- Leave an opening in the back or bottom of each house so lights can be easily inserted and removed.
Because the light source is enclosed, the finished houses give off a soft glow without the heat or fire risk of real candles.
Adding Architectural Details
Small touches turn simple boxes into realistic buildings. This is where individual creativity really shines.
- Roofs: Cut cardstock or craft foam into rectangles slightly wider than the top of the carton and fold down the center. Glue along the top edge to create sloping roofs.
- Shingles: Draw or stamp repeating scallop patterns, or glue overlapping strips of paper to mimic tiles.
- Chimneys and dormers: Fold small pieces of cardboard into rectangles, glue them to the roof, and paint them to match the building.
- Steps and awnings: Use folded cardboard offcuts as front steps, and add tiny awnings with patterned paper or fabric scraps.
Decorating with Seasonal Charm
Once the basic structure is complete, it is time for the fun of decorating. Encourage children to imagine what would be happening inside each building during the holidays.
- Add painted garlands, wreaths, and strings of “lights” using colorful dots along rooflines.
- Glue small beads or sequins as doorknobs, ornaments, or window details.
- Draw bakery displays, toy shelves, or stacks of books directly on the windowpanes for added storytelling.
- Sprinkle faux snow or fine glitter along roofs and window sills while glue is still wet.
Table: Village Style Ideas
The table below offers a few style concepts you can use as inspiration when planning your village. Mix and match elements to suit your taste.
| Village Theme | Color Palette | Key Details |
|---|---|---|
| Gingerbread Lane | Warm browns, white, red, and green | Icing-style trim, candy dots, heart-shaped windows |
| Snowy Scandinavian Town | White, gray, soft blue, muted red | Simple lines, star motifs, wooden-inspired textures |
| Storybook Main Street | Pastel pink, mint, gold, deep navy | Striped awnings, shop signs, illustrated window displays |
| Winter Woodland Hamlet | Forest greens, cream, earthy browns | Mini trees, animal silhouettes, moss or faux greenery |
Arranging and Displaying Your Village
Once you have a collection of finished houses, the way you arrange them can change the entire mood of the scene. Experiment with height, background, and surrounding decor.
- Mantels and shelves: Place houses in a single row or gentle curve, weaving LED lights and faux garlands between them.
- Table centerpieces: Group a smaller number of buildings on a wooden tray or cake stand with artificial snow.
- Windowsills: Line up houses against a window so they glow from within against the evening sky.
- Kids’ rooms: Create a mini village on a dresser or bookshelf with battery lights on a timer.
Making It a Family Tradition
This craft becomes even more meaningful if you repeat it year after year. Over time, your village can grow into a whole town with its own “history.”
- Assign each family member a new building to add every holiday season.
- Write names and year on the bottom of each carton to remember who created which house.
- Create stories about the people who “live” in the village, turning craft time into storytelling time.
- Photograph the village each year to see how your designs and styles evolve.
Safety Tips and Adaptations for Different Ages
Because this project involves cutting and lighting elements, a few simple guidelines keep everyone safe and comfortable.
- Adults should handle all cutting with scissors or craft knives, especially when creating windows and doors.
- Use only battery-operated lights; avoid real candles or any open flame.
- For toddlers and preschoolers, keep windows painted on instead of cut, and focus on simple painting and sticker placement.
- Older kids and teens can tackle more advanced techniques like layered roofs, signage, or tiny 3D decorations.
Extending the Craft Beyond the Holidays
Although the village is perfect for Christmas and winter, the same idea can stretch into other seasons with a few changes in color and decor.
- Spring villages can feature pastel houses, flower boxes, and painted trees.
- For summer, imagine a beach town with bright facades and bunting banners.
- In autumn, warm oranges, rust tones, and leafy garlands give cartons a harvest feel.
Reusing the basic technique all year long underlines the idea that everyday materials can be transformed again and again with a bit of imagination.
Simple Step-By-Step Summary
For quick reference, here is a streamlined overview you can follow as you craft.
- Collect, wash, and dry milk or juice cartons.
- Plan your village theme and sketch ideas for building types.
- Paint base coats on each carton and let them dry.
- Lightly draw windows, doors, and structural details.
- Adults cut out selected windows and doors where you want light to shine through.
- Glue tissue or parchment inside to cover the window openings.
- Add roofs, chimneys, and other architectural features with cardstock or foam.
- Decorate with paint, markers, glitter, stickers, and small embellishments.
- Place battery-operated lights inside and arrange the houses into a village.
Frequently Asked Questions
How many cartons do I need for a village?
There is no set number, but five to eight cartons in different sizes usually look full and interesting without overwhelming a standard mantel or table. You can always start small and add more houses over time.
What kind of paint works best?
Acrylic craft paint adheres well to carton surfaces and dries quickly, which is helpful when working with children. If the original printing shows through, start with a layer of white or neutral primer, then add your chosen colors.
Can this project be done in a classroom?
Yes, this craft adapts very well to group settings. Ask students to bring clean cartons from home, set up painting stations, and have an adult handle all cutting. The finished houses can form a communal village displayed in a hallway or library.
How do I store the village after the holidays?
Allow all glue and paint to dry completely, then gently wrap each building in tissue paper. Store them upright in a cardboard box or plastic bin, and remove batteries from any lights to prevent leaks.
What if I do not have many craft supplies?
You can still create a charming village with very simple materials. A couple of paint colors, a marker for outlines, and basic paper roofs are enough to define each building, and you can gradually add more detail in future years if you wish.
Bring Your Village to Life
With nothing more than a few saved cartons, basic craft supplies, and some imagination, you can create a winter village that feels personal and one-of-a-kind. Whether you set it on the mantel, the dining table, or a child’s nightstand, it will glow not just with lights, but with the memories of making it together.