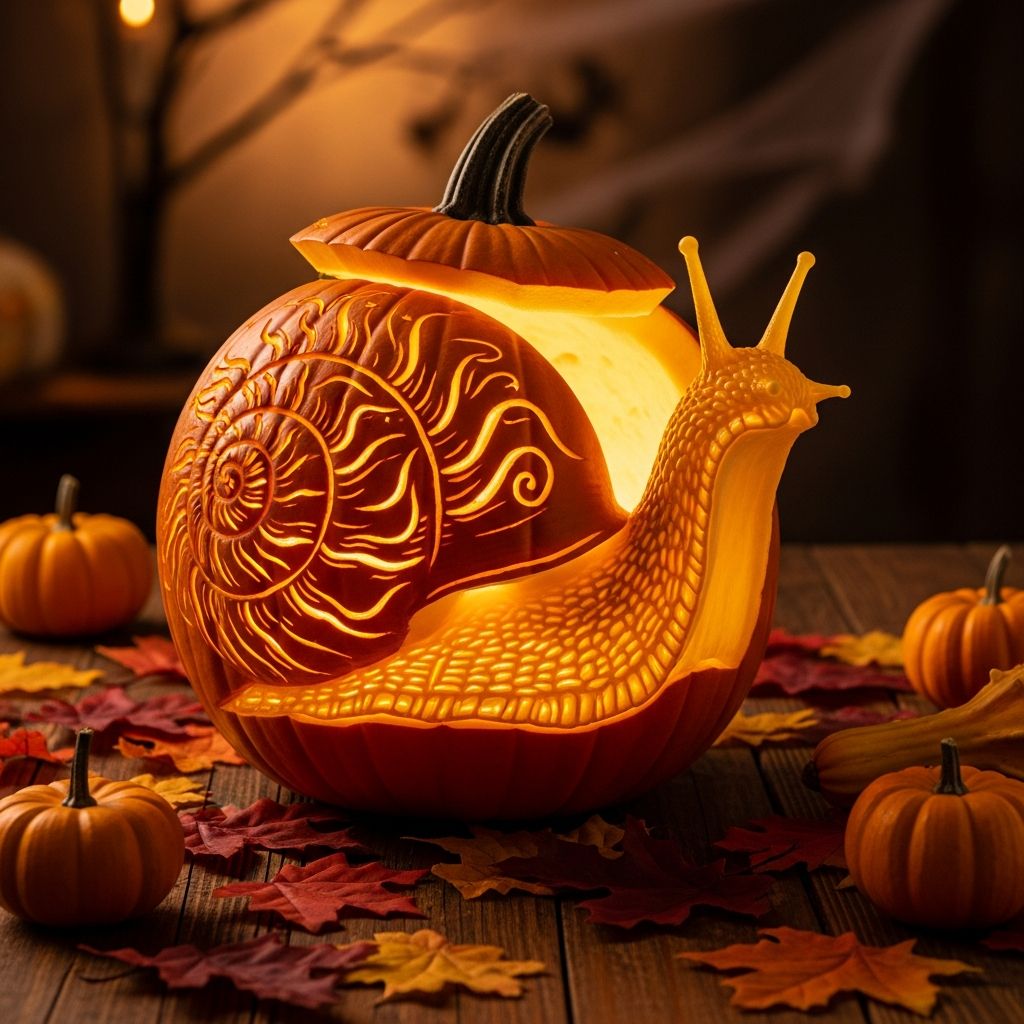
If traditional triangle-eyed pumpkins feel overdone, a glowing 3D snail pumpkin is a playful way to surprise trick-or-treaters and add character to your porch or garden this Halloween.
Why a Snail Pumpkin Belongs in Your Halloween Display
A snail pumpkin combines the charm of garden creatures with the glow of a classic jack-o-lantern, turning everyday produce into a quirky Halloween sculpture. The design looks impressive, yet relies on simple shapes that beginners and kids can tackle with basic supervision.
Because the shell and body use separate vegetables, you can pose your snail in different directions, experiment with fun facial expressions, and create a miniature “pumpkin habitat” around it using leaves, twigs, and flowers.
Supplies and Tools You Will Need
Gather all materials before you start so the carving session stays smooth and enjoyable, especially if you are working with kids.
- One medium, round pumpkin for the snail shell
- One butternut or similar long squash for the body and head
- Two wooden skewers or sturdy cocktail sticks for eye stalks
- Two lightweight balls (ping-pong balls, foam craft balls, or similar) for eyes
- Black permanent marker for drawing pupils and facial details
- Pumpkin carving knife or serrated kitchen knife
- Large spoon or scoop for removing seeds and pulp
- Optional: small hand drill, metal skewer, or thick needle to pierce eye pieces
- Battery-operated tea lights or LED string lights for safe illumination
- Old newspapers or a plastic tablecloth to protect your work surface
Choose a pumpkin that feels heavy for its size, with a firm rind and no soft spots, so your finished snail stands upright and glows evenly once carved.
Planning Your 3D Snail Design
Before the first cut, picture how the snail will sit: the pumpkin becomes the spiral shell lying on its side, and the squash forms the extended body crawling along the ground. A quick sketch on scrap paper can help you decide where the shell opening and glowing cutouts should go.
Think about personality as well—will your snail look cute and wide-eyed, sleepy and slow, or a little spooky with exaggerated pupils and a crooked smile? Having a mood in mind keeps the carving choices consistent and intentional.
Preparing the Pumpkin Shell
The shell is the visual centerpiece of your snail, so take time to clean it well and carve openings that support both structure and glow.
Cleaning and Hollowing
- Spread newspapers on the table and stand the pumpkin upright.
- Cut a wide opening on the side or bottom of the pumpkin where it will rest on the ground, rather than cutting off the top in the usual way.
- Reach in with a scoop and remove seeds and stringy pulp, scraping the inner walls until they are about 2–3 cm thick for easier carving.
Saving the seeds in a bowl allows you to roast them later, turning cleanup into a simple snack project once your decoration is complete.
Shaping a Snail-Like Shell
- Lay the pumpkin on its side and gently roll it until you find a position where it feels stable.
- Trim a thin slice off the new “bottom” area if needed to prevent wobbling while the snail is on display.
- Lightly sketch a spiral or curved pattern onto the surface with a washable marker, echoing the natural swirl of a snail shell.
- Use a carving knife to follow the spiral line, cutting shallow grooves or small window-like openings rather than removing large chunks of pumpkin.
Varying the depth of the cuts lets more or less light shine through, giving your shell subtle texture without compromising its strength.
Creating the Squash Body and Head
The squash forms the body gliding out from under the shell, so its angle and expression bring your snail to life.
Trimming the Base
- Place the squash horizontally and imagine which end will be the head.
- Slice a small portion off the thicker end at a slight diagonal so that, when laid down, the head tilts slightly upward rather than pointing straight ahead.
- Test this by resting the squash on the table; adjust the angle until the “face” end appears alert and visible next to where the shell will sit.
Adding Simple Facial Details
- Use a paring knife to carve a gentle curve into the front for a smile or mouth line.
- Optional: lightly scrape shallow cheeks or nostril marks to give the head more dimension.
- Keep the carving minimal; the comical eyes you add later will handle most of the personality.
Because the squash is solid, there is no need to hollow it, which keeps the body sturdy and easier to handle while attaching the shell and eyes.
Making Expressive Eye Stalks
The long eye stalks turn your sculpture from “just a gourd” into a recognizable snail, and they are surprisingly easy to assemble with a few small pieces.
Building the Eyes
- Use a skewer, nail, or drill bit to make a small hole about halfway into each lightweight ball.
- Insert the blunt end of a wooden skewer into each hole, pushing gently until the ball holds firmly without cracking.
- With a permanent marker, draw large pupils or fun cartoony shapes on the front of each ball to create wide, visible eyes.
Attaching Eyes to the Body
- Decide where the eye stalks should sprout from on the squash head—usually slightly above the imagined mouth line.
- Pierce two small pilot holes in the squash using the knife tip or a metal skewer.
- Carefully push the free end of each wooden skewer into a pilot hole, adjusting the tilt so the eyes angle outward and slightly forward.
If the eye stalks feel wobbly, shorten the skewers slightly or angle them deeper into the squash to gain more stability without splitting the vegetable.
Joining Shell and Body into One Snail
Once shell and body are finished, it is time to arrange them together so they appear as one continuous creature inching across your porch or yard.
- Place the hollowed pumpkin on its side in the position you tested earlier.
- Slide the squash body against the open side of the pumpkin so that the head extends out and the cut base nestles just under or beside the shell edge.
- If needed, trim a tiny wedge from the squash where it meets the shell to help the two pieces sit flush.
- For extra stability, insert one or two wooden skewers through the back of the squash into the pumpkin flesh, hiding these connections from view.
Step back several times to view the snail from different angles, fine-tuning the body’s curve and the shell’s tilt until you are happy with the overall silhouette.
Safe Lighting Ideas for a Glowing Snail
Lighting transforms your sculpture from daytime decoration into a glowing nighttime guardian for your garden path or doorway.
- Place one or two battery-operated tea lights inside the pumpkin shell through the bottom opening.
- For a brighter effect, coil a short LED string light inside, tucking the battery pack toward the back where it will not be seen easily.
- Avoid real candles in this project, since the shell lies on its side and open flames can scorch the interior or pose a fire risk.
- If your eye pieces are translucent, aim a small external light source toward them so they catch reflections and seem to glow too.
Test the lighting in a darkened room before placing the snail outside so you can adjust the positions of the LEDs for maximum sparkle.
Decorating the Snail’s Mini Garden
A simple base of natural elements turns your snail from a stand-alone pumpkin into a full miniature scene that guests will want to photograph.
- Scatter dry leaves, acorns, and small branches around the base to mimic a forest floor.
- Add small potted flowers, moss, or herbs for a whimsical “snail in the garden” vibe.
- Position tiny plastic insects, faux mushrooms, or toy frogs near the snail to create a playful micro-habitat.
- Use a flat wooden board or stepping stone as a stage if your yard is uneven or muddy.
Because the shell glows from within, low decorative elements allow the light to stay visible while still framing the snail in a cozy setting.
Tips for Crafting with Kids
This project is an excellent family activity, provided adults handle sharp tools and younger helpers focus on low-risk tasks that still feel creative.
- Assign children jobs such as scooping seeds, drawing shell spirals with markers, or arranging leaves and props around the finished snail.
- Let older kids help with simple scraping or shallow cuts while you closely supervise and maintain control of the main knife.
- Explain in advance which tools are “grown-up only” and keep them out of reach when not in use.
- Use child-safe LED lights that do not heat up, especially if curious hands are likely to touch the pumpkin.
Taking photos at each stage can also encourage kids to celebrate their progress and remember the crafting session as part of your family’s Halloween traditions.
Care, Storage, and Longevity
Because a large portion of the pumpkin flesh is exposed, a 3D snail display naturally has a short life, but a few simple habits can help it look fresh longer.
| Tip | How It Helps |
|---|---|
| Keep it in a cool, shaded area during the day | Slows drying and wilting of the exposed pumpkin flesh. |
| Bring the display indoors on very warm afternoons | Prevents premature mold and collapsing. |
| Light the snail only during viewing hours | Reduces heat and moisture buildup inside the shell. |
| Discard promptly once soft spots or odor appear | Maintains hygiene and avoids attracting insects or animals. |
Expect the snail to look its best for one to three evenings, making it ideal for a party, neighborhood event, or Halloween night itself.
Creative Variations to Try Next Time
Once you master the basic snail structure, it becomes a flexible template you can customize for different themes, moods, and holidays.
- Spooky forest snail: Carve jagged shell openings, add dark circles around the eyes with marker, and scatter faux spiderwebs around the base.
- Fairy-tale snail: Cut small star or heart windows into the shell and place tiny figurines or glittery stones near the body.
- Family of snails: Use smaller gourds and mini pumpkins to create “baby” snails following the same method.
- Daytime garden sculpture: Skip internal lighting and focus on painted details, using non-toxic acrylics to decorate the shell with flowers or patterns.
Documenting your favorite variations can turn the snail pumpkin into a recurring seasonal tradition that evolves with your skill and imagination each year.
Frequently Asked Questions
How long does a 3D snail pumpkin take to make?
For most people, the full project takes one to two hours from start to finish, including cleaning the pumpkin, carving the shell, trimming the squash, and arranging decorations. Setting up all your tools in advance and inviting helpers to manage simpler tasks can shorten the overall time.
Can this project work with artificial pumpkins?
Yes, foam craft pumpkins and artificial gourds can be used if you prefer a reusable display, but they require different tools such as craft knives, hot glue, or small screws instead of wooden skewers. With durable materials, you can store the snail and bring it back out each Halloween.
What if I don’t have a butternut squash?
Any long, firm vegetable or gourd with a gentle curve can become a snail body, including elongated pumpkins, decorative gourds, or even a thick cucumber for a short-term indoor centerpiece. Choose something that sits securely without rolling and is sturdy enough to hold eye stalks.
Is it safe to leave the snail outside overnight?
It is generally fine to leave the snail outside for a few nights if the weather is cool and dry and you are using battery-powered lights. Just remember that animals may be attracted to the scent, so place the display where pets and wildlife cannot easily knock it over.
Can this be adapted for other holidays?
Absolutely—by swapping the surrounding decorations and adjusting the colors, you can reimagine the snail as a winter, spring, or harvest character. For example, use pinecones and evergreens for a winter snail, or bright flowers and pastel ribbons for a springtime version.
Bring a Little Garden Magic to Halloween Night
A glowing 3D snail pumpkin offers a refreshing alternative to the usual scary faces, blending charm, creativity, and just enough spookiness for Halloween. With a couple of simple vegetables, a few basic tools, and a bit of imagination, you can build a centerpiece that delights neighbors, guests, and kids long after the porch lights go out.