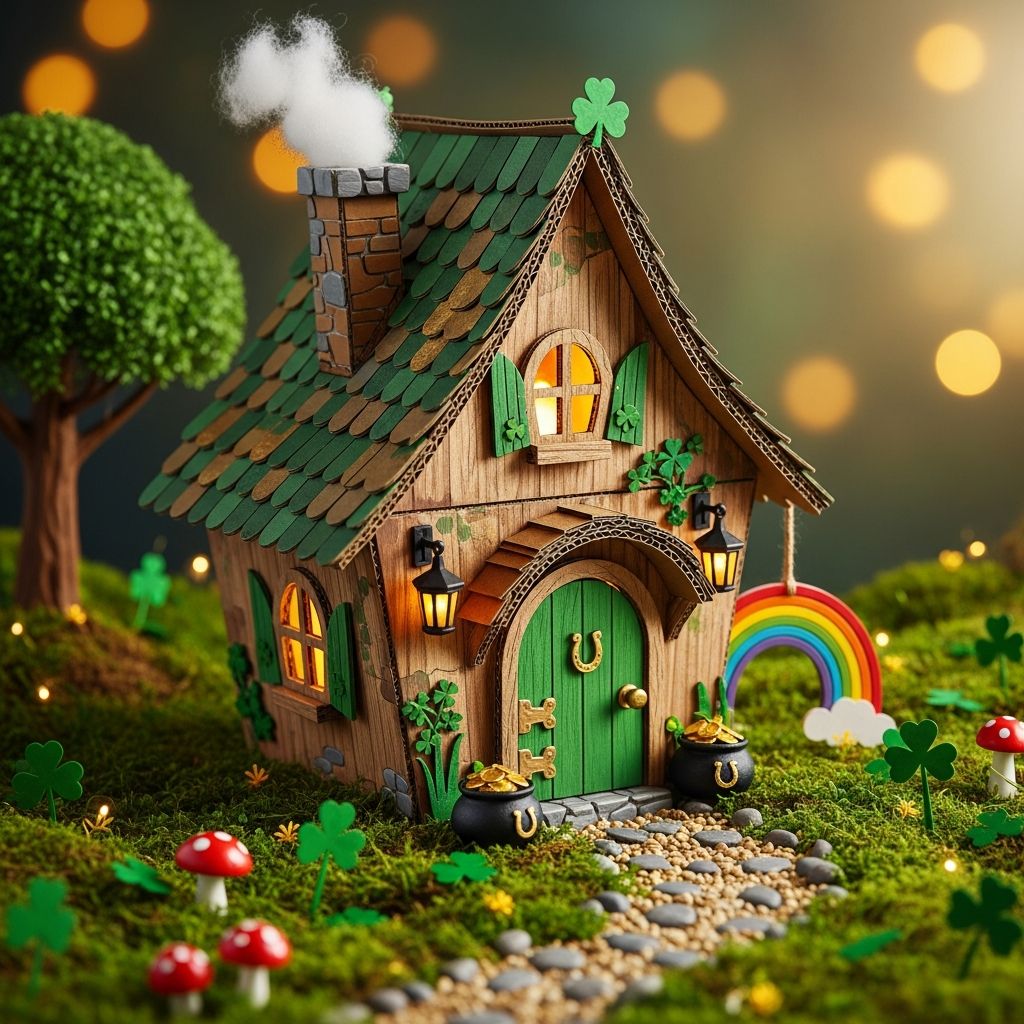
Turning a couple of cardboard boxes into a miniature leprechaun cottage is a simple way to celebrate St. Patrick’s Day while encouraging creativity, storytelling, and hands-on play. This guide walks through designing, building, and decorating an entirely original cardboard dwelling that feels worthy of a tiny visitor in a green coat and hat.
Everything here is designed to be flexible: use whatever boxes, art supplies, and embellishments you already have on hand, and let kids personalize the project with their own ideas. By the end, you will have a unique leprechaun cottage that doubles as a holiday centerpiece and a spark for imaginative games.
Why Make a Leprechaun Cottage?
A leprechaun cottage is more than a seasonal decoration; it is an invitation to tell stories and explore folklore in a hands-on way. Children can act out tales of hidden gold, tricky visitors, and magical rainbows, all centered around a house they built themselves.
Because the cottage is made primarily from recycled cardboard, it is a low-cost, low-waste project that encourages resourcefulness. Families can use this craft as a gentle introduction to upcycling and thinking creatively about everyday materials.
Gathering Your Materials
Before you start cutting and gluing, take a few minutes to collect your supplies and place them on a table or tray. This keeps the project flowing smoothly and minimizes frustration for younger helpers.
- Cardboard bases: A medium shipping box for the main cottage and a smaller box or tube for an optional tower or chimney.
- Cutting tools: Scissors for kids, a craft knife for adults (used away from little hands).
- Adhesives: School glue, glue stick, or low-temperature glue gun for quicker assembly.
- Covering materials: Construction paper, tissue paper, wrapping paper, or leftover gift bags in greens and metallics.
- Decorative details: Markers, crayons, paint, stickers, paper shamrocks, buttons, and bits of ribbon.
- Optional extras: Battery tea lights, small pebbles, faux moss, craft foam, or glitter for extra sparkle.
Planning the Cottage Layout
Instead of diving straight into gluing, sketch a quick layout of what you want the cottage to look like. Decide whether you prefer a simple rectangular house, a cottage with a side porch, or a multi-level structure created by stacking boxes.
Talk with kids about features leprechauns might love: perhaps a hidden side door, a rainbow walkway, or a clover-shaped window. This planning step makes children feel like co-designers and gives them ownership over the finished project.
Basic Structure: Turning Boxes into a Cottage
The main box becomes the body of the cottage, while flaps and extra pieces can be trimmed to form roofs and porches. Begin by taping the base box closed if it is still flattened or open, then decide which side will face forward as the front of the house.
- Mark the front door with a pencil before cutting so that the opening is the right size for any small figurines you plan to use.
- Reserve at least one side or the top as a hinged or removable panel, so kids can reach inside to arrange furniture or small decorations.
Roof and Porch Ideas
Roofs can be as simple or elaborate as you like. A single folded piece of cardboard can create a classic peaked roof, while overlapping strips can mimic shingles. Corrugated edges look surprisingly charming when left visible along the roofline.
To make a porch, cut a shallow rectangle from an extra flap and glue it just below the doorway. Add columns made from rolled paper or short cardboard tubes, then decorate with tiny bunting or a paper welcome mat.
Doorways, Windows, and Secret Entrances
Cutting out doorways and windows brings the cottage to life and makes it function like a real miniature building. Keep hardware simple: score gently with a craft knife to create a door that swings, or remove a section entirely for an open, arched doorway.
- Main door: Cut a rectangle or rounded arch and either swing it inward like a hinge or remove it completely.
- Windows: Try square, round, or shamrock-shaped openings. Back them with colored tissue paper for a stained-glass effect.
- Secret entrance: Add a small door on the side or in the roof for extra mystery and pretend play.
Covering the Box: From Brown Cardboard to Fairy Cottage
Once the structure is cut, cover the raw cardboard with paper or paint to give the cottage its main color. Younger children may find it easier to glue on pieces of construction paper than to paint, while older kids might enjoy mixing different shades of green.
Use small, overlapping pieces to wrap around corners and edges. The slight irregularity adds charm, suggesting stone walls, thick vines, or weathered wood, depending on your color choices.
Irish-Inspired Color Palettes
A leprechaun cottage almost begs for greens and golds, but you can make the palette as subtle or bold as you like. Classic combinations include deep forest green with gold accents or a white base with bright green trim and rainbow details.
| Theme | Main Colors | Accent Ideas |
|---|---|---|
| Traditional Irish Cottage | White walls, green roof | Gold door knob, stone-look base, tiny paper chimney |
| Forest Hideaway | Dark green, brown, mossy tones | Faux moss, twig fence, pebble path |
| Rainbow Treasure Hut | Neutral walls, multicolor roof | Paper rainbow arch, metallic paper “gold” tiles |
| Gilded Goldkeeper’s Home | Rich green walls, black trim | Gold foil coins, shiny door frame, sparkly window sills |
Details That Make It Magical
Small details transform a plain cardboard box into something that feels truly enchanted. Think in layers: first the structure, then the base color, and finally the finishing embellishments that tell the story of who lives inside.
- Draw or glue on tiny clovers creeping up the walls.
- Add a hand-lettered sign above the door, such as “Cottage of Good Fortune” or any name kids invent.
- Place a miniature paper mailbox or lantern beside the door for extra character.
Creating a Yard and Pathway
Mounting the cottage on a flat piece of cardboard creates room for a yard, a path, and any props kids dream up. Cover the base with green paper, felt, or paint to represent grass, and then layer on details like pathways and tiny plants.
- Arrange pebbles to form a winding path from the edge of the base to the front door.
- Cut simple flower shapes from paper and glue them along the sides for a cottage-garden look.
- Use cotton balls or tissue paper to build miniature shrubs or cloudlike bushes.
Lighting Up the Cottage
Soft lighting instantly makes the cottage feel magical at night. Slip a battery-operated tea light or a short string of cool-temperature LEDs inside, ensuring there are plenty of ventilation openings and that wires cannot tangle easily around small hands.
If you add translucent tissue paper over windows, the light will glow through in a gentle, colorful way. Children will love turning off the room lights to see the cottage shining like a tiny, enchanted home in the dark.
Kid-Friendly Variations
Adjust the complexity of the project based on the ages and interests of participating children. Very young kids can focus on painting and sticking on pre-cut shapes, while older children can help with planning the layout and cutting simple openings.
- Toddler version: Pre-assemble the house and offer chunky stickers, foam shamrocks, and wide paintbrushes.
- Grade-school version: Let kids draw the window and door shapes, choose colors, and design the yard.
- Tween version: Challenge older kids to build multi-level cottages with balconies, towers, and more architectural detail.
Weaving in Irish Folklore and Storytelling
As you build, talk about legends of leprechauns, pots of gold, and sneaky visitors who play tricks when nobody is watching. Invite children to imagine what the resident leprechaun enjoys: favorite foods, hobbies, or special treasures that might be hidden around the house.
When the cottage is complete, use it as a storytelling prompt. Children can move small figurines in and out, inventing adventures about midnight visitors, lost coins, and clever humans who almost—but not quite—catch the elusive homeowner.
Safe Building Tips for Adults
Adults should handle any cutting that requires sharp tools and supervise glues that become hot, keeping them out of reach when not in use. Plan short crafting sessions with breaks for drying and cleaning so that children stay engaged rather than overwhelmed.
If multiple children are working on the cottage, divide responsibilities: one in charge of the yard, another decorating the front façade, and another working on the roof. This structure keeps the activity cooperative rather than competitive.
Optional: Turning the Cottage into a Game
Once the cottage is finished, extend the fun by turning it into the centerpiece of a St. Patrick’s Day game. Hide small paper coins or shamrocks around the house and invite children to search for them, returning each one to a “treasure jar”.
- Create simple clue cards that point toward the cottage, such as hints about something green, tiny, or glowing.
- Encourage kids to leave notes or little drawings for the leprechaun, and secretly respond after they go to bed.
FAQ: Cardboard Leprechaun Cottage
How long does this project usually take?
For most families, building and decorating a basic cottage can be completed in one afternoon, especially if adults pre-cut the main pieces. More elaborate versions with multiple levels, painted details, and lighting may work better as a weekend project broken into shorter sessions.
What if I do not have the right size box?
You can tape two smaller boxes together to create a single structure or stack one on top of another for a multi-story cottage. The beauty of cardboard is that it can be trimmed, folded, and layered until it suits the design you have in mind.
Can the cottage be stored and reused next year?
If you build on a sturdy base and let all glue or paint dry fully, the cottage can be packed in a large bag or box and saved for another holiday season. To protect delicate details, stuff the interior with tissue paper and avoid placing heavy items on top when storing.
Is this project suitable for classrooms or groups?
Yes, this craft works well in group settings when you divide tasks—one team on the exterior, another on the yard, and a third on interior details. Using one large shared cottage encourages collaboration, while small teams can each create their own cottage for a mini village display.
How can I adapt the cottage for other holidays?
The basic cardboard structure can be repainted and re-decorated for other celebrations, such as turning it into a gingerbread-style house for winter or a fairy cottage for spring. By swapping shamrocks and gold coins for different symbols, the same basic design can serve as a backdrop for multiple imaginative worlds.
With a bit of cardboard, some craft supplies, and plenty of imagination, a leprechaun cottage can become the heart of your St. Patrick’s Day celebration. Each decision—from the shape of the windows to the color of the roof—lets children express their creativity while building a keepsake that feels distinctly their own.