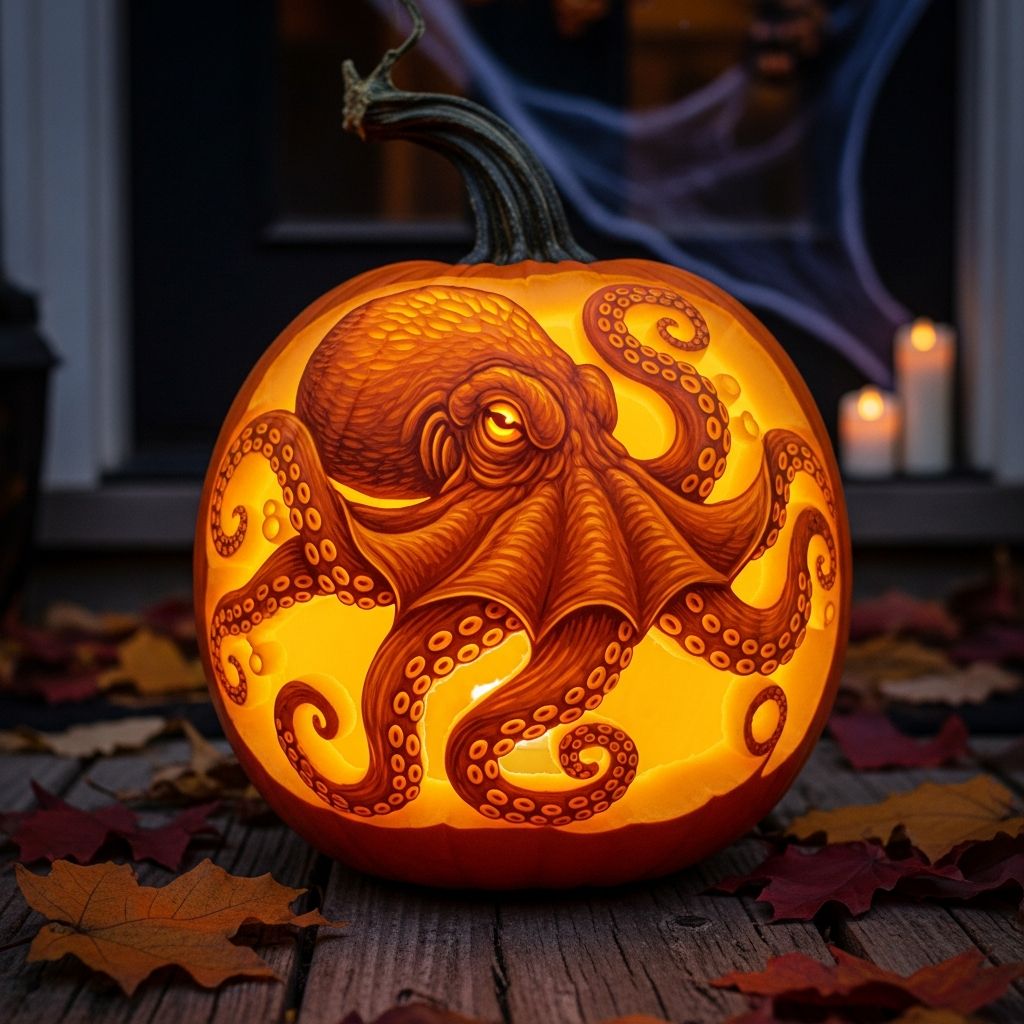
Forget the usual triangle eyes and toothy grins. This year, turn your porch into an undersea lair by sculpting a 3D octopus pumpkin that looks like it is crawling right out of the deep.
Why an Octopus Pumpkin Steals the Show
A 3D octopus pumpkin is more than a decoration; it is a full-blown scene. The rounded pumpkin becomes a dramatic head, while curling tentacles wrap around steps, railings, or table edges to create motion and personality.
This project is perfect for anyone who wants something more creative than a standard jack-o-lantern, but still wants a design that is approachable for patient beginners and fun for experienced carvers.
- Unique: Almost no one else on your street will have an octopus jack-o-lantern.
- Customizable: Adjust the number and position of tentacles to fit your display space.
- Family-friendly: Adults can handle sharp tools while kids help with painting, planning, and safe decorating.
Supplies and Tools You Will Need
Gather everything before you start. Working with pumpkins is messy, and it is much easier when you have your tools laid out on a covered table.
Core Materials
- 1 large, round pumpkin for the octopus head
- 1–2 additional long or medium pumpkins, gourds, or foam tubes for tentacles
- 2 small white spheres for eyes (ping pong balls, craft foam balls, or bottle caps)
- Battery-powered tea lights or LED string lights (avoid open flames)
- Toothpicks, bamboo skewers, or wooden dowels for connecting pieces
- Optional: clay or air-dry putty to attach and shape eye details
Carving and Sculpting Tools
- Sharp kitchen knife or pumpkin carving knife for cutting tops and large shapes
- Small serrated carving saw for fine cuts
- Metal spoon or pumpkin scoop for removing seeds and pulp
- Peeler or sculpting tools for shaving and shaping the pumpkin surface
- Marker or wax pencil to sketch features and tentacle placements
- Cutting board or stable work surface covered with newspaper or a plastic tablecloth
- Protective gloves, especially for younger helpers or anyone new to carving
Decorative Extras
- Acrylic paints in sea-inspired colors: teal, purple, deep blue, or neon accents
- Glitter, glow-in-the-dark paint, or metallic markers for highlights
- Small shells, plastic sea creatures, or faux seaweed for a themed display
- Spray sealant or petroleum jelly to slow down pumpkin drying
| Item | Purpose | Kid-Friendly? |
|---|---|---|
| Large pumpkin | Forms the main octopus head | Yes, for cleaning and drawing |
| Skewers or dowels | Attach and support tentacles | With adult supervision |
| Carving knife | Cut openings and shape features | No, adults only |
| Battery tea lights | Safe internal lighting | Yes |
Planning Your Undersea Creature
Before you cut into any pumpkin, take a few minutes to plan how your octopus will look. The final effect is much better when you think about pose and personality first.
Decide on a Personality
Ask yourself what kind of expression you want. Is your octopus spooky, sleepy, curious, or silly? The shape of the eyes and mouth will dramatically change the vibe.
- Spooky: Narrowed eyes, angular lids, and a tight, sharp mouth opening.
- Playful: Wide circular eyes and a rounded, open mouth that looks like a surprised “O”.
- Mysterious: Half-lidded eyes, a subtle, sideways mouth, and darker paint colors.
Map Out Tentacle Placement
Octopuses have eight arms, but you do not have to show them all. In a 3D pumpkin scene, a few well-placed, dramatic tentacles suggest the rest are hidden behind the pumpkin.
- Use a washable marker to sketch where tentacles will exit the pumpkin.
- Plan at least one tentacle curling toward the viewer for depth.
- If you are working on stairs or a table edge, design tentacles to drape over the edge.
Step 1: Prepare and Clean the Pumpkins
Preparation is the not-so-glamorous part, but it sets you up for a successful build. Work in a space where mess is welcome: outdoors, over a tarp, or near a sink.
- Cut an access opening. Decide whether to cut from the top, bottom, or back. For a clean look, many carvers prefer a back opening so the stem remains intact.
- Remove seeds and pulp. Use a large spoon to scrape all loose material from the inside so the walls are about 2–3 cm thick. Thinner walls are easier to carve and light up better.
- Dry the interior. Pat with paper towels so battery lights stay dry and safe.
- Repeat for tentacle pumpkins or gourds. If you are using real pumpkins for tentacles, remove seeds as needed, but you can leave some intact if they will not be lit.
Step 2: Shape and Attach the Tentacles
The tentacles are what turn a basic pumpkin into a dynamic octopus. You can keep them simple or sculpt them with more advanced techniques.
Creating Tentacles
Choose the style that matches your tools, skill level, and time.
- Simple gourd tentacles: Use long, curved gourds as readymade tentacles. Trim the ends at an angle so they sit snugly against the main pumpkin.
- Carved tentacles: Slice long strips from a spare pumpkin, then carve rounded edges and shallow grooves to suggest suction cup rows.
- Foam or pool noodle tentacles: For a longer-lasting decoration, cut and bend foam tubes, then paint them in ocean colors.
Attaching Tentacles Securely
Stability is essential, especially if the display will be outdoors or around excited trick-or-treaters.
- Pre-poke attachment holes in the main pumpkin where each tentacle will connect.
- Insert skewers or dowels halfway into the body pumpkin, leaving enough length exposed to pierce the tentacle base.
- Press each tentacle onto the skewers, adjusting angles so they appear to curl naturally.
- If needed, wedge small bits of pumpkin or foam between joints to keep them snug.
Step 3: Carve the Face and Details
Once the pose is set, it is time to give your sea creature a face. This is where the personality you planned earlier comes to life.
Designing the Eyes
The eyes are the focal point of almost any creature design. Using separate spheres makes them pop out in a three-dimensional way.
- Hold each ping pong ball or craft sphere against the pumpkin to find the best placement.
- Lightly trace around each sphere with a marker so you know where to carve the sockets.
- Carve shallow, rounded recesses just large enough for the spheres to sit securely.
- Attach the spheres with toothpicks or a bit of clay, then paint pupils and colored irises once they are in place.
Shaping the Mouth and Expression
The mouth can be a full cut-out, a shallow relief, or a combination of both.
- For a glowing mouth, cut through the pumpkin wall completely to create an opening.
- For a subtle effect, shave only the outer rind and thin the interior so light glows through without a full cutout.
- Combine angles and curves: a curved lower lip with slightly angled corners adds a mischievous smirk.
Adding Surface Texture
Real octopuses have smooth yet textured skin, and you can hint at this with extra carving and paint.
- Use a peeler to remove patches of orange skin and reveal the lighter flesh underneath.
- Carve shallow circles or ovals along tentacles to suggest suction cups.
- Etch small lines or spots around the eyes to frame the face and increase depth.
Step 4: Paint, Light, and Stage Your Scene
With the structure complete, the finishing touches will determine whether your octopus looks flat or truly otherworldly. Color, light, and staging bring it all together.
Painting for an Underwater Look
Acrylics work well on pumpkin skin and allow for layering and blending.
- Start with a base coat in a rich ocean color like teal, deep purple, or cobalt blue.
- Dry-brush lighter shades on raised areas such as the top of the head and tentacle ridges to mimic light from above.
- Add small dots of bright color (lime, pink, or neon orange) to hint at bioluminescent spots.
Choosing Safe and Effective Lighting
Battery-powered lights keep both your pumpkin and visitors safe.
- Place tea lights or LED pucks inside the pumpkin through the back or bottom access opening.
- Use a cool-white light for a ghostly, deep-sea feel or warm-white for a cozy glow.
- If possible, run a short LED string light out through the mouth, so it looks like eerie light is spilling into the water.
Staging the Display
A thoughtful setting transforms your octopus into a complete Halloween scene.
- Place the pumpkin near a railing, step, or table edge so tentacles can spill over the side.
- Scatter blue or green fabric underneath to suggest waves or sea floor.
- Add shells, sand, fish toys, or faux coral for a fully immersive undersea theme.
Keeping Your Octopus Pumpkin Fresh Longer
All carved pumpkins eventually break down, but a few habits will extend your octopus’s life through Halloween night and possibly beyond.
- Store your pumpkin in a cool, shaded area during the day and bring it out at night.
- Lightly coat carved edges with petroleum jelly to slow moisture loss.
- Mist the inside with a mixture of water and a small amount of vinegar to discourage mold.
- If one tentacle deteriorates early, swap it out with a fresh gourd and reattach it with skewers.
Safety Tips for Families
Because this project involves multiple pieces and some advanced carving, it is important to keep safety at the center of the process, especially with children helping.
- Assign adults to jobs that involve knives, saws, or power tools.
- Give kids age-appropriate tasks such as scooping seeds, painting surfaces, or placing battery lights.
- Work on a solid, non-slippery surface and keep handles dry to prevent tools from slipping.
- Do not use real candles inside an elaborate multi-pumpkin structure; choose LEDs instead.
Fun Variations to Try
Once you master the basic 3D octopus structure, you can adapt the concept to match different themes, ages, and party styles.
- Pirate octopus: Add a painted eye patch, a tiny paper pirate hat, and a treasure chest prop filled with candy.
- Glow-in-the-dark octopus: Use phosphorescent paint on the eyes and suction cups so they shine under blacklight.
- Cartoon style: Simplify the features, using big round eyes and soft pastel colors for a kid-friendly look.
- Deep-sea horror: Carve extra mouths or rows of teeth and use red or purple lights for a creepier vibe.
Frequently Asked Questions
How long does a 3D octopus pumpkin take to make?
Plan for at least 2–4 hours from start to finish, depending on how elaborate your tentacles, painting, and detailing are. First-time builders may want to split the project over two evenings, doing carving one night and painting and assembly the next.
Can this be done with artificial pumpkins?
Yes. Foam craft pumpkins or carved foam tubes can be used for the head and tentacles. They are harder to carve but will last for many seasons, making them ideal if you want to reuse your octopus each year.
What if I do not have extra pumpkins for tentacles?
You can still create the illusion of multiple arms by carving tentacle shapes directly onto the main pumpkin’s surface. Add painted shadows and highlights to make them appear to wrap around the pumpkin in three dimensions.
How do I keep the eyes from falling out?
Carve the sockets slightly smaller than the eye pieces so they fit snugly, then secure them with toothpicks inserted from the back. A small amount of air-dry clay around the sockets can also help hold everything in place and create natural-looking lids.
Is this project suitable for younger kids?
Young children should not handle sharp carving tools, but they can join in by choosing colors, painting the tentacles, helping scoop seeds, and adding decorations around the finished octopus. Treat it as a team effort where adults handle the structural work.
Creating a 3D octopus pumpkin is an imaginative way to push your Halloween decorating skills while giving your family a memorable project to share. With a little planning, some basic tools, and a sense of adventure, your porch can become the home of a glowing creature from the deep.