Natural-looking blonde highlights do not have to be a salon-only luxury. With careful planning, the right tools, and realistic expectations, you can gently brighten your hair at home and create a soft, sun-kissed look that flatters your skin tone and lifestyle.
This guide walks through everything from preparation and strand tests to placement patterns, home-safe lightening options, aftercare, and common troubleshooting questions. It is written for beginners and for those who have had a less-than-perfect highlighting experience and want a more thoughtful, controlled approach next time.
Understanding What “Natural” Blonde Highlights Really Mean
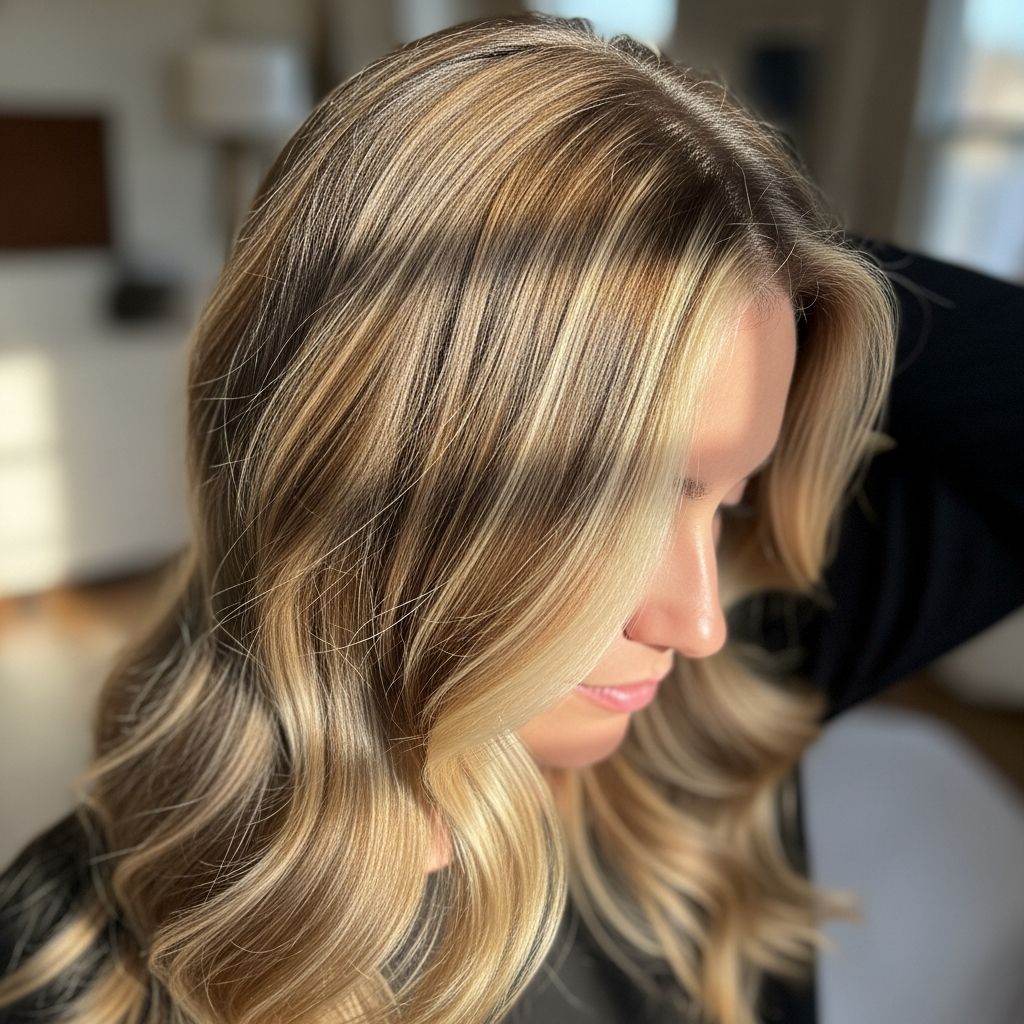
Before opening any bottle or mixing any powder, it helps to define what a natural highlight actually looks like on real hair. Natural blonde accents mimic what the sun would do gradually: lighter pieces where light naturally hits, softer brightness around the face, and slightly darker depth underneath.
- Color variation should be subtle, with more than one shade of blonde rather than a single flat tone.
- Roots usually remain slightly deeper than the mid-lengths and ends, so there is no harsh line of demarcation.
- Highlighted strands should blend into the base color; the eye should see brightness, not stripes.
Keeping this picture in mind will help you choose techniques, products, and placement that enhance your hair rather than transform it into something unrecognizable.
Step Zero: Is Your Hair Ready to Be Lightened?
Healthy hair is less likely to break or turn dull and frizzy when lightened. If your strands are already brittle, extremely dry, or snapping when you brush, address the health of your hair before attempting highlights at home.
- Run a strand between your fingers and gently stretch it: healthy hair has some elasticity and bounces back; severely compromised hair feels stiff and may break easily.
- Look at the ends closely under good light; if they are translucent, rough, or split, plan a trim before a lightening session.
- Consider doing several weeks of moisturizing and bond-building masks to strengthen your hair’s internal structure.
If your hair is very dark, previously colored with box dye, or heavily processed (for example, straightened and colored), understand that achieving pale blonde in a single at-home session is both unrealistic and unsafe. In these cases, aim for soft caramel or honey highlights rather than an extreme lift.
Gathering Your Home Highlighting Toolkit
A successful, low-stress highlighting session starts with the right supplies laid out and ready to go. Even if you purchase a complete highlighting kit, a few extra tools can make application smoother and more precise.
Essential Supplies
- Plastic mixing bowl and color brush (metal can react with some products).
- High-quality gloves and an old towel or cape to protect clothing.
- Sectioning clips to divide hair into neat, manageable areas.
- Fine-tooth comb for parting and for creating delicate highlight strands.
- Timer or phone alarm to track processing time accurately.
Product Choices
You have several options for actually lightening the hair, ranging from very gentle and gradual to more powerful professional-style formulas.
| Type | Best For | Intensity | Notes |
|---|---|---|---|
| Chamomile tea, lemon, or honey rinses | Very subtle, gradual brightening | Mild | Work slowly over multiple uses; ideal for first-timers or those nervous about damage. |
| Sun-activated lightening sprays | Light to medium hair wanting a beachy effect | Light to moderate | Usually heat-activated; can be drying if overused, so pair with deep conditioner. |
| Box highlight or balayage kits | Moderate lift with guided instructions | Moderate | Great balance of predictability and brightness when directions are followed closely. |
| Professional lightener (bleach) and developer | Darker bases or larger color changes | Strong | Requires extra care, strand tests, and precise timing; best if you already have some color experience. |
Select the category that best fits your starting color, comfort level, and goals. Natural methods and sprays suit those seeking the softest, most gradual changes, while full highlight kits suit those ready for a visible, but still controlled, shift.
Preparation: Strand Test, Allergy Test, and Plan
Skipping tests to “save time” often leads to uneven color or irritation. A 24–48 hour delay is minor compared with weeks of living with an unwanted result.
How to Do a Strand Test
- Snip or isolate a small, hidden section of hair from underneath near the nape.
- Mix a tiny amount of your chosen lightening product according to the instructions.
- Apply to the test strand, note the start time, and check the color every 5–10 minutes.
- Rinse when the strand reaches a shade you like, then dry fully to see the final result.
Use the strand test to decide whether you need a shorter or longer processing time on the rest of your hair and whether the shade leans too warm, cool, or light for your liking.
Allergy / Sensitivity Check
- Apply a small dot of mixed product behind your ear or on the inside of your elbow.
- Leave it in place for the time recommended by the product instructions, then rinse.
- Monitor the area for at least a full day for itching, burning, or rash.
Any strong reaction is a sign to stop and avoid that formula entirely. Safety always outranks the desire for blonder hair.
Creating Your Highlight Map: Where to Place the Brightness
Strategic placement is what separates natural, flattering highlights from obvious, streaky color. Take a few minutes to examine how your hair behaves and where the light hits it.
- Stand near a window and observe which sections naturally look lighter; these are your best starting points.
- Decide how bold you want the effect: a halo of brightness around the face, scattered pieces throughout, or a more focused lightening on the top layer only.
- Think in terms of ribbons of color that follow the direction of your hair growth and movement rather than perfectly straight lines.
Drawing a quick sketch of your head and marking where you plan to place highlights can be surprisingly helpful, especially if you are nervous or working on longer hair.
Simple Highlighting Techniques for a Natural Look
You do not need professional foiling skills to get believable blonde. Start with one of these simpler approaches, and resist the urge to over-apply product; a few well-placed pieces can transform your look more than heavy coverage can.
Face-Framing Veil
This technique focuses brightness around the front hairline, mimicking how the sun lightens bangs and shorter pieces most quickly.
- Create a center or off-center part where you normally wear your hair.
- From each side of the part, take very thin, delicate strands along the hairline.
- Apply lightener slightly away from the root for a softer, grown-in effect, concentrating more on the mid-lengths and ends.
- Leave some hair untouched between each brightened section to maintain depth.
This minimalist approach is especially flattering for beginners, busy schedules, or anyone nervous about a large color change.
Surface “Sun-Kiss” Highlights
Surface highlighting imitates the way sunlight touches only the outermost layers of hair. It creates brightness when hair is down without drastically altering the overall shade.
- Section hair into four quadrants (front left, front right, back left, back right) and clip each area.
- Working from the back toward the front, unclip one quadrant at a time.
- Take thin, irregular sections from the outer surface layer only, avoiding the hair underneath.
- Lightly paint lightener onto these pieces, blending downward so the brightest area sits around the middle of the strand, softening toward the ends.
This approach keeps the underlayers slightly darker, creating a dimensional, low-maintenance finish that grows out more softly.
Soft Balayage-Inspired Sweeps
Balayage is a freehand painting method that creates a gradient effect from deeper roots to lighter ends. You can adapt a simplified version at home without needing salon-level skill.
- Work on small sections, painting V-shaped patterns: less product near the scalp, more product through the mid-lengths.
- Feather the brush or use your gloved fingers to blur the top edge of the product line, avoiding a harsh horizontal band.
- Focus more pieces around the front and crown, with fewer painted sections underneath.
The key is restraint: leave natural hair between each painted section so that the final result has depth and movement instead of looking like a solid block of color.
Timing, Rinsing, and Toning: Locking In the Right Shade
Once the product is on the hair, timing becomes crucial. Over-processing can compromise the structure of the hair, while rinsing too early may leave you with an orange or brassy tone.
- Always follow the maximum processing time provided by the product instructions; never exceed it.
- Check a test strand every 5–10 minutes by gently wiping product away to view the actual color underneath.
- Remember that wet hair looks darker, so aim for a slightly lighter shade than your target while the product is still on.
After rinsing thoroughly with lukewarm water, some people choose to use a toner or purple-based product to refine the shade. Toners help mute orange or yellow tones and can shift the blonde from warm honey to cooler beige or ash, depending on the formula.
Caring for Freshly Lightened Hair
Highlighting, even when done carefully, slightly roughens the hair cuticle. Thoughtful aftercare helps keep your new blonde shiny, soft, and resilient.
Post-Highlight Essentials
- Use a sulfate-free shampoo formulated for color-treated or blonde hair to minimize fading and dryness.
- Introduce a weekly deep-conditioning or bond-repair mask to restore moisture and internal strength.
- Finish showers with a brief cool rinse to help flatten the cuticle and add shine.
- Limit heat styling, or always apply a heat protectant before blow-drying, curling, or straightening.
Small changes in your routine—washing a bit less frequently, using a microfiber towel instead of rough terry cloth, or sleeping on a silk pillowcase—can collectively preserve the health of highlighted hair.
Low-Maintenance Tips: Making Your Highlights Last Longer
If you prefer not to color your hair every month, design your highlights with longevity in mind. The goal is an easy grow-out that still looks intentional as your natural color reappears.
- Keep the very root area slightly darker so that regrowth blends with the rest of your hair instead of forming a sharp line.
- Opt for shades that are within two or three levels of your base color for a subtle, believable contrast.
- Refresh only the face-framing pieces or upper surface every few months instead of re-lightening the entire head.
When you plan placement thoughtfully, you can often stretch highlight touch-ups to several months, especially if you like a more lived-in, beachy finish.
Common Mistakes and How to Fix Them
Mistakes happen, even with careful preparation. Most issues can be softened or improved without drastic measures if approached calmly and patiently.
If the Color Is Too Dark or Subtle
- Wait at least a week before re-lightening the same sections to avoid over-processing.
- In the meantime, use clarifying or deep-cleansing shampoos once a week to remove product buildup and reveal the true shade.
- Next time, either increase the processing time slightly (within the safe limit) or choose a stronger but still appropriate formula.
If the Color Is Too Light or Patchy
- Use a semi-permanent gloss or tinted conditioner close to your base color to gently darken overly bright pieces and improve blend.
- Add a few lowlights (darker strands) instead of trying to fix everything by lightening more sections.
- Focus conditioning and repair treatments on the driest areas while you allow the hair to recover before any further lightening.
When in doubt, consult a professional for corrective color—especially if your hair feels very fragile, looks unevenly bleached, or has an unwanted color cast that simple toning cannot address.
Frequently Asked Questions
Can very dark hair get natural-looking blonde highlights at home?
Very dark hair can be lightened, but it often passes through red and orange stages before reaching blonde. For a natural look, aim first for caramel or honey tones and accept that several gradual sessions may be needed for a lighter result. Pushing extremely dark hair to pale blonde in one at-home session is risky and usually leads to damage or uneven color.
Is lemon juice safe for lightening hair?
Lemon juice in sunlight can lighten hair slightly, but it is very drying, and the results are difficult to control. If you use lemon-based methods, always pair them with deep conditioning and limit use to occasional brightening, not frequent repeated sessions. Gentler options like chamomile tea or dedicated lightening sprays typically offer better balance between brightness and hair health.
How often can I refresh my highlights?
In most cases, re-lightening the same strands more often than every 8–12 weeks risks excessive dryness and breakage, especially on fine or previously colored hair. Instead of overlapping product on already-lightened sections, focus on new growth or alternate between adding a few new highlights and refreshing tone with glosses or purple shampoos.
Do I need toner every time I highlight?
Not always. If your hair lifts to a shade you like and complements your skin tone, you can skip toner and simply maintain with color-safe products. If you see obvious brassiness or want to fine-tune the warmth or coolness of your blonde, a toner or purple-toned product becomes a useful tool rather than a strict requirement.
What if my highlights look striped or chunky?
Striped or chunky highlights usually come from taking sections that are too wide or placing color in rigid patterns. To soften the look, add a few fine lowlights that are close to your natural color, and curl or wave your hair while it grows out. For your next session, switch to thinner, more irregular sections and leave more natural hair in between each highlighted piece.
Final Thoughts: Gentle Confidence Over Perfection
At-home blonde highlights are most successful when the goal is enhancement rather than perfection. Working slowly, choosing conservative placement, and prioritizing hair health will yield a flattering, natural-looking result that evolves gracefully over time.
Think of each highlighting session as one step in an ongoing relationship with your hair: learn from the strand test, adjust your technique, and be kind to your hair between color services. With patience and a light hand, you can enjoy luminous, sunlit strands that still feel authentically like you.