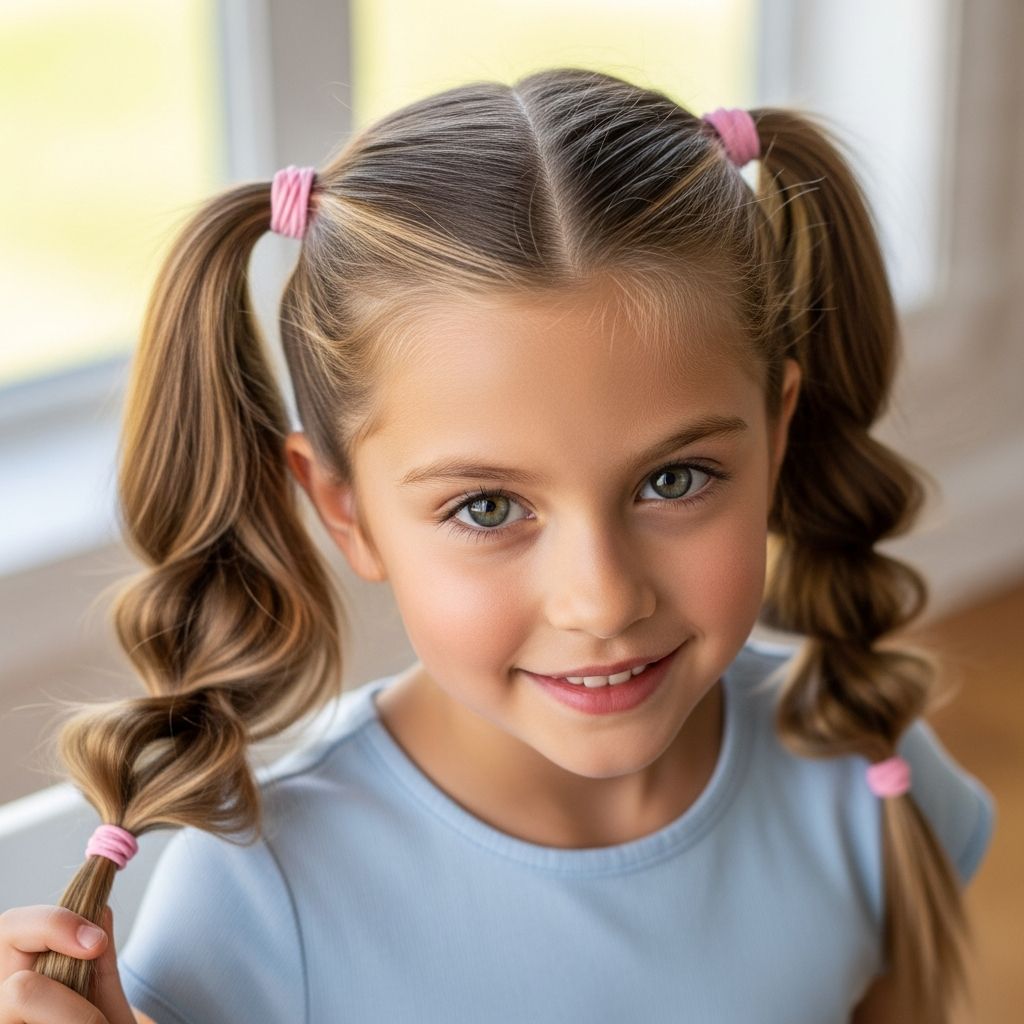
Pull-through pigtails are a fun, modern twist on traditional pigtails that look like intricate braids without requiring any actual braiding. This style uses small elastics and simple sectioning to create a full, bubble-like effect that works on kids, teens, and adults. It is ideal for school days, sports, playdates, or any time you want a polished yet easy hairstyle.
What Are Pull-Through Pigtails?
Pull-through pigtails mimic the look of chunky braids, but instead of weaving strands over and under, you connect a series of ponytails. Each ponytail is split and wrapped around the next, creating a chain of sections that looks detailed and stylish while still being beginner-friendly.
This technique is especially popular among parents and busy moms because it stays put, controls flyaways, and looks more advanced than it really is. The style also works on a wide range of hair textures and lengths, making it highly versatile.
Why This Style Is So Popular
- It looks like a complex braid, but uses only elastics and simple parting.
- It keeps hair secure and out of the face for school, sports, or activities.
- It photographs beautifully for family photos, holidays, or social media posts.
- It can be dressed up with bows, ribbons, or accessories, or kept casual and simple.
Tools and Products You Will Need
Before starting, gather a few basic tools so you do not have to stop halfway through the style. Having everything within reach makes the process smoother, especially if you are styling a child who may not sit still for long.
- Comb or tail comb for creating clean parts
- Hairbrush for detangling
- Small clear or matching hair elastics (you will need several)
- Water spray bottle or light leave-in conditioner for slip
- Styling product such as gel, mousse, or smoothing cream for control
- Hair clips to section and hold hair out of the way
- Optional: bows, ribbons, or decorative clips to finish the pigtails
Preparing the Hair
Good prep makes the finished pull-through pigtails look cleaner and last longer. You can start on freshly washed hair or day-two hair, as long as it is free of major tangles. Slightly damp or product-prepped hair is easiest to control, especially for children with flyaways or baby hairs.
- Gently brush through the hair from ends to roots until smooth.
- Lightly mist with water or apply a small amount of leave-in product.
- Comb the hair back and create a straight center part from the forehead to the nape.
- Clip one side out of the way while you work on the other.
Basic Structure of Pull-Through Pigtails
The style is built from a series of stacked ponytails on each side of the head. You create the ponytails in a line down the side, then “pull through” by splitting one ponytail and wrapping the sections around the next. Repeating this down each side gives the appearance of a braid while relying only on elastics.
| Step | Action | Goal |
|---|---|---|
| 1 | Create multiple small ponytails down each side. | Build the base structure of the style. |
| 2 | Split the top ponytail in half. | Prepare to wrap it around the next ponytail. |
| 3 | Pull the second ponytail through the split first ponytail. | Form the “pull-through” effect. |
| 4 | Reconnect the split sections to the next ponytail down. | Continue the chain and secure the style. |
| 5 | Repeat until you reach the ends and then secure. | Finish the pigtail and lock everything in place. |
Step-by-Step Pull-Through Pigtail Tutorial
Step 1: Part and Section the Hair
Start with the center part you created earlier. Clip one side away so it does not interfere with your work. On the loose side, use your comb to take a small horizontal section from the hairline back a couple of inches, then secure it with a small elastic at about mid-height on the side of the head.
This first small ponytail will be the top of your pull-through pigtail. The placement can be adjusted depending on whether you want low, mid, or higher pigtails, but keeping both sides symmetrical helps the style look balanced.
Step 2: Add More Ponytails Down the Side
Directly behind the first ponytail, create another similar-sized horizontal section and secure it with an elastic at the same height. This second ponytail should sit right behind the first, following the line of the part.
Continue this pattern down the side of the head, forming a row of small ponytails from the front to just above the nape of the neck. The number of ponytails you create will depend on the length and thickness of the hair, but you want enough to give the pull-through effect some dimension.
Step 3: Begin the Pull-Through Effect
With your row of ponytails in place, focus on the top two. Carefully split the first ponytail into two equal sections, one in front and one in back. Hold them apart with your fingers or a clip so there is a clear gap in the middle.
Lift the second ponytail up and pass it through the gap between the split sections of the first ponytail. Drop the second ponytail forward or temporarily clip it out of the way, keeping the split sections of the first ponytail separated.
Step 4: Connect to the Next Ponytail
Gather the two split sections from the first ponytail, plus some hair from around them if needed, and join them to the third ponytail section below. Secure all of that hair together with a new elastic, forming a fresh combined ponytail beneath the second one.
Gently pull and fan out the sides of the newly formed section (often called “pancaking”) to create volume and a fuller braid-like effect. A light touch here can make the finished pigtail look much thicker and more dramatic.
Step 5: Repeat the Pattern Down the Side
Repeat the same sequence down the row: split the upper ponytail, pull the next ponytail through, then connect the split sections to the ponytail below. Each time you create a new section, lightly pancake it to keep the style soft and voluminous.
Work slowly and keep your elastics snug but not too tight for comfort. The repeated pattern becomes easier as you move down the head, and you will quickly see the pull-through design forming.
Step 6: Finish the First Pigtail
Once you run out of anchored ponytails, continue the pull-through pattern on the remaining length of hair. Instead of connecting to a new base ponytail, you simply secure each new section to itself as you move toward the ends.
At the end of the pigtail, secure with a final elastic. You can keep the last few inches straight, curl them with a heat tool (if appropriate), or tuck them into a small loop for a more polished finish.
Step 7: Repeat on the Other Side
Release the clipped side and repeat the entire process: create a row of ponytails, split the top ponytail, pull the second through, and connect the sections downward. Taking your time to match the height and spacing of the elastics will help both pigtails look symmetrical.
Once finished, compare both sides in a mirror. Adjust the volume of each pull-through section by gently pulling at the edges so they match. Add any bows, ribbons, or clips you like at the base of each pigtail or near the ends.
Tips for Best Results
- Use small, snag-free elastics to minimize breakage when removing the style.
- For very silky hair, add a bit of texture spray or mousse before starting.
- For thick or curly hair, work in smaller sections and ensure each ponytail is fully secured.
- To keep the style comfortable, avoid pulling too tightly at the hairline.
- If creating this look on a child, allow short breaks if needed so the process stays pleasant.
Style Variations You Can Try
Once you are comfortable with basic pull-through pigtails, there are many fun variations to experiment with. These can change the vibe from casual and playful to more polished and dressy with just a few tweaks.
- Low pull-through pigtails: Start the first ponytails near the nape for a relaxed, grown-up look.
- High pull-through pigtails: Place the first ponytails near the crown for a bouncy, youthful style.
- Ribbon-wrapped elastics: Hide elastics by tying small ribbons around each section for a festive touch.
- Half-up pull-through: Only style the top half of the hair and leave the rest down for a softer look.
- Accent pigtails: Use smaller pull-throughs at the front and blend them into regular pigtails at the back.
Pull-Through Pigtails vs. Traditional Braids
| Feature | Pull-Through Pigtails | Braided Pigtails |
|---|---|---|
| Skill Level | Beginner-friendly, no braiding required | Requires basic to intermediate braiding skills |
| Appearance | Chunky, bubble-like, high volume | Sleek or textured depending on technique |
| Time to Create | Moderate, mostly sectioning and securing elastics | Can be quick once braiding skills are mastered |
| Hold and Security | Very secure due to multiple elastics | Secure, but may loosen if braid unravels |
| Comfort | Comfortable when elastics are not too tight | Comfortable when tension is well controlled |
Maintenance and How Long It Lasts
Pull-through pigtails can last all day and may even hold overnight if the elastics are secure and the hair is prepped well. For school or activities, this style typically holds up to movement, play, and even hats or helmets.
To refresh the look, you can lightly mist the hair with water and smooth any flyaways with a tiny bit of product. If the ends become tangled, gently detangle them without disturbing the main sections of the pigtails.
Removing the Style Safely
When it is time to take the pull-through pigtails out, avoid yanking on the elastics. Instead, carefully snip the elastics with small scissors away from the hair or stretch them until they slide off. Work from the ends upward so the hair does not knot around the bands.
After all elastics are removed, finger-comb the hair first and then follow with a brush. A small amount of leave-in conditioner or detangling spray can help if any sections feel dry or snagged.
Frequently Asked Questions (FAQs)
1. What hair length works best for pull-through pigtails?
Pull-through pigtails work best on hair that is at least shoulder length, but you can adapt the style for slightly shorter hair by using fewer sections. Longer hair will naturally produce a more dramatic, full effect along the length of each pigtail.
2. Can beginners or non-braiders do this style?
Yes. This hairstyle is ideal for people who struggle with traditional braiding because it relies only on forming ponytails and splitting sections. As long as you can use elastics and part the hair, you can learn the pull-through technique.
3. Is this style comfortable for kids to wear all day?
When the elastics are not pulled too tight and the hairline is not under heavy tension, pull-through pigtails are comfortable for all-day wear. They keep hair contained, which is especially helpful for school, sports, or active play.
4. How can I make the style look fuller on thin hair?
To add volume on fine or thin hair, focus on pancaking each section by gently pulling the sides out after securing the elastics. Using a volumizing mousse or texturizing spray beforehand can also help the style appear thicker.
5. Are heat tools necessary for this look?
Heat tools are not required to create pull-through pigtails. You can leave the ends straight, naturally wavy, or air-dried. If you want a dressier look, you can curl the loose ends at the bottom of the pigtails, but this is completely optional.
6. How can I adapt this for special occasions?
For events such as birthdays, holidays, or family photos, you can elevate the style by adding matching ribbons, decorative elastics, flower clips, or small bows at the base and ends of each pigtail. Slightly loosening the sections for a softer, more romantic look also works beautifully for special occasions.
With a bit of practice, pull-through pigtails become a quick, go-to hairstyle that looks far more complicated than it is. Once the basic pattern is familiar, you can personalize the look with different placements, accessories, and finishes to suit any outfit or occasion.