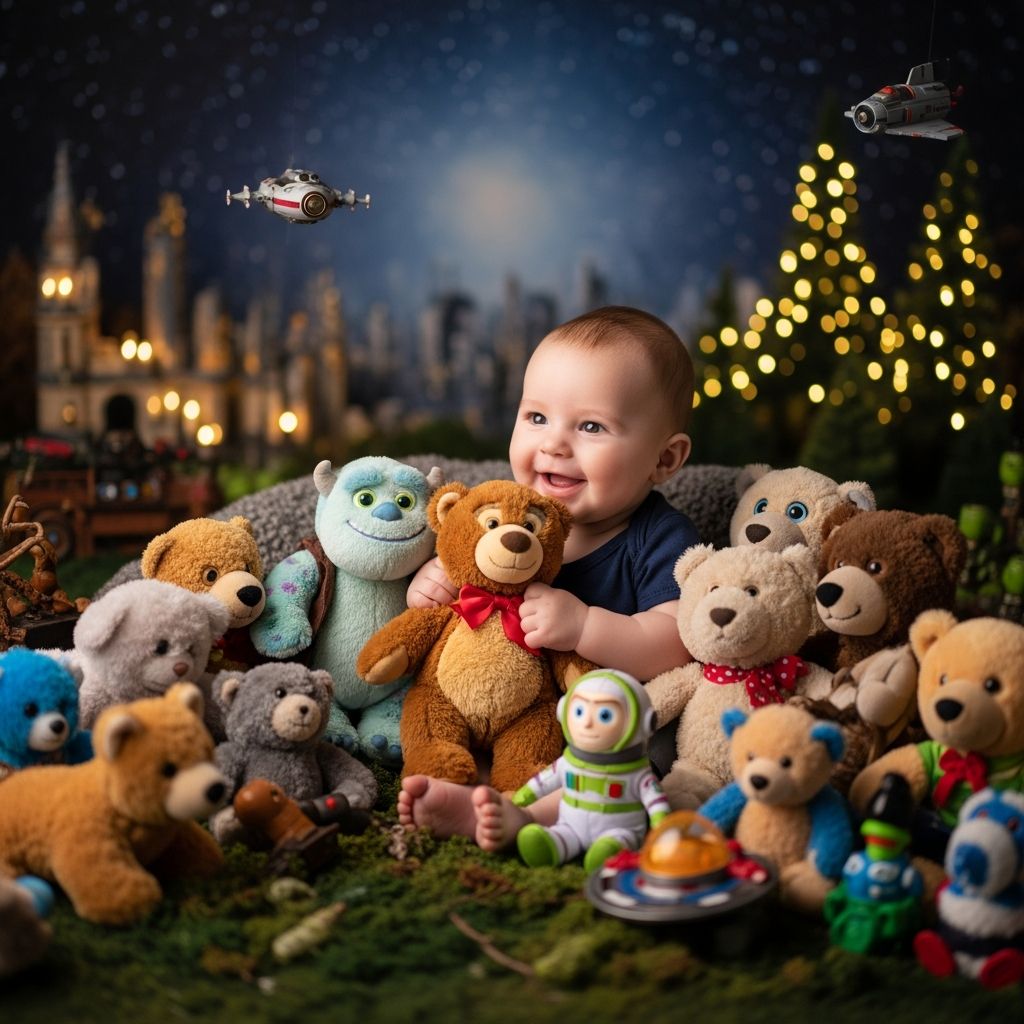
Parents often look for creative ways to capture their baby’s personality without hiring a professional photographer. A movie-inspired stuffed animal scene is a simple, cozy, and hilarious way to do just that—using toys you already own and a bit of imagination.
This guide walks you through planning, styling, and photographing an iconic-looking stuffed animal setup featuring your baby in the middle of the action, while keeping safety and comfort front and center.
Why Stuffed Animal Scenes Work So Well
Stuffed animal photo scenes are popular because they combine familiarity and fantasy. Your baby is surrounded by their favorite soft toys, which makes them feel secure, while the styling hints at a cinematic or storybook moment that adults instantly recognize.
- The toys create an instant backdrop and setting, so you do not need elaborate decorations.
- The concept is flexible: you can nod to a specific movie, a genre (like sci-fi or fantasy), or simply create a whimsical world of plush friends.
- Photos feel special and “big budget,” even though they are done right in your living room.
Planning Your Scene Concept
Before grabbing your camera, decide what kind of story you want the photo to tell. You do not need to copy any one film; instead, think of an overall vibe, like “mysterious adventure,” “cozy alien visitor,” or “toy-filled hideout.”
- Choose a theme: classic sci-fi, magical forest, bedtime adventure, or retro kids’ movie.
- Pick a color palette: warm browns and reds for a nostalgic feel, cool blues and purples for a spacey look, or neutrals for a timeless photo.
- Decide the focal point: in most cases, this is your baby’s face and eyes, surrounded by a ring of stuffed animals.
Gathering Props and Supplies
You do not need a studio full of equipment to make this work. Start with items you already have and add a few inexpensive touches if you like.
- Soft stuffed animals in varying sizes and colors
- A simple backdrop such as a couch, armchair, bed, or floor blanket
- One or two lamps or string lights for cozy, movie-like lighting
- A baby-safe outfit or onesie that matches your chosen color palette
- A smartphone or camera with a portrait mode or wide aperture setting
Choosing the Perfect Location at Home
Your location affects comfort, safety, and the overall look of the photo. Pick a spot where your baby feels relaxed and supported, and where you have control over clutter and light.
- Couch or armchair: Great for propped-up babies; the back of the chair can be a simple, clean background.
- Bed: Comfortable and forgiving if your baby wobbles; neutral bedding acts as a soft backdrop.
- Floor setup: Ideal for tummy time or sitting independently; use a large blanket or rug to define the space.
Baby Safety and Comfort First
Cute photos are never worth risking your baby’s safety. Before arranging toys, think through how your baby moves, rolls, and reaches, and remove anything that could topple or block airflow.
- Always stay within arm’s reach; a helper is even better for spotting and entertaining.
- Avoid stacking heavy toys near your baby’s face or head.
- Skip props with loose parts, hard edges, or choking hazards.
- Keep the area at a comfortable temperature, especially if you are using blankets and costumes.
Designing the Stuffed Animal “Crowd”
The hallmark of this type of scene is the amusing contrast between a small baby and an impressive gathering of plush creatures. Think of your baby as the main character on a stage, with the animals serving as both set and audience.
- Place the largest stuffed animals at the back or sides to create a frame.
- Use medium and small toys closer to your baby to add layers and variety.
- Angle a few toys so they “look” toward your baby or the camera, as if reacting to the scene.
- Leave a clear visual path to your baby’s face so it does not get lost in the crowd.
Positioning Your Baby Safely in the Scene
How you position your baby affects both safety and the final image. Choose a pose that suits your baby’s current stage—newborn, supported sitter, or confident crawler.
- Newborn or very young baby: Lay your baby on their back in the center of a plush-covered surface, with toys arranged around but not leaning on them.
- Supported sitter: Seat your baby in a corner of the couch or against a firm pillow; place toys around the sides like a protective wall.
- Independent sitter or crawler: Let your baby sit amid the toys on the floor; focus on candid reactions and exploration.
Lighting for a Cinematic Feel
Lighting is what makes your photo feel like a scene from a film instead of a random snapshot. You do not need professional gear; a window and a lamp can be enough if used thoughtfully.
- Turn off harsh overhead lights; aim for one main light source, such as a large window or floor lamp.
- Place the light at an angle (not directly behind your baby) so their face is softly illuminated.
- String lights or a small lamp behind the stuffed animals can create a gentle glow, enhancing the dreamy movie atmosphere.
Camera and Phone Settings Made Simple
You can use a DSLR, mirrorless camera, or smartphone for this shoot. The goal is to keep your baby sharp while letting the background and edges of the toys blur slightly for depth.
- Use portrait mode or a wide aperture (a small f-number) to softly blur the background.
- Focus on your baby’s eyes whenever possible.
- Take several shots in quick succession, since babies change expression in an instant.
- Turn off loud shutter sounds or flash if they startle your baby.
Helpful Composition Tips
Thoughtful composition can turn a cute setup into a frame-worthy image. A few small adjustments in how you frame the shot can make a big difference.
- Try placing your baby slightly off-center following the “rule of thirds” for a more cinematic feel.
- Shoot from your baby’s eye level instead of looking down sharply from above.
- Leave a bit of empty space above your baby’s head—this can be useful for adding text later if you make cards or invitations.
Sample Layout Ideas
The following table offers a few example layouts you can try, depending on the size of your space and how many toys you have.
| Layout Name | Baby Position | Stuffed Animal Arrangement | Best For |
|---|---|---|---|
| Plush Tunnel | Baby on back or sitting in the center of a narrow strip of blanket | Toys lined up on both sides like walls, slightly leaning outward | Small spaces and a “journey” or “adventure” theme |
| Storytime Circle | Baby sitting or lying in the middle of the floor | Toys arranged in a circle, all facing inward toward your baby | Group shots, siblings reading to baby, cozy bedtime themes |
| Couch Crowd | Baby supported in the corner or center of the couch | Large toys on either side, smaller toys around the lap and feet | Quick setups and easy cleanup using existing living room furniture |
| Blanket Hideout | Baby lying under or partially under a light blanket | Only toy faces and ears peeking out around the edges of the blanket | Peekaboo or “hidden visitor” themes with a cozy feel |
Adding Movie-Inspired Details (Without Copying)
You can evoke the feeling of classic movies without duplicating specific shots or copyrighted images. Focus on small visual hints rather than exact replicas.
- Use color cues: for example, a red hoodie, a basket-like prop, or a starry blanket can hint at familiar stories.
- Add simple props such as a toy bike, a flashlight, or a children’s book about space or friendship.
- Play with shadows and silhouettes by placing a soft light behind the couch or chair.
Keeping Your Baby Happy During the Shoot
Even the most creative concept will fall flat if your baby is tired or upset. Plan the session around your baby’s natural rhythms and keep things flexible.
- Schedule the shoot after a nap and feeding when your baby is usually most content.
- Have a familiar adult nearby making gentle sounds, singing, or playing peekaboo behind the camera.
- Pause if your baby shows signs of discomfort; you can always try again another day.
Quick Editing Tips for a Cinematic Finish
A little editing can bring out the mood you were aiming for. You do not need advanced software; many phones include basic tools or free apps.
- Slightly increase brightness and contrast to make your baby stand out.
- Warm up the color temperature for a cozy, nostalgic feel, or cool it down for a dreamy sci-fi look.
- Use a gentle vignette (darkening at the edges) to further highlight your baby in the center.
Creative Variations to Try Next Time
Once you have mastered one stuffed animal scene, it is easy to adapt the idea for holidays, milestones, or just-for-fun themed sessions. The basic formula—baby plus plush characters plus storytelling—works in many ways.
- Seasonal scenes: winter wonderland with polar bears and snowmen, spring garden with bunnies and flowers, or summer beach with plush sea creatures.
- Character mashups: mix different animal types to make a “council of creatures” reacting to your baby.
- Growth series: repeat the same general setup every few months to document how your baby changes among the same toys.
Frequently Asked Questions
Do I need professional lighting or a fancy camera?
No. A smartphone with portrait mode and a bright window is enough for a charming, movie-inspired scene. Focus on good natural light, safety, and composition rather than equipment.
How many stuffed animals should I use?
Use enough toys to create a sense of abundance without overwhelming your baby. For small spaces, 6–10 well-placed toys usually look better than a huge pile that hides your little one.
Can newborns safely participate in this kind of setup?
Yes, but only with careful positioning and constant supervision. Lay newborns on a flat, firm surface, keep toys away from their face, and use them primarily as background décor rather than physical support.
How long should the photoshoot last?
Plan for 10–20 minutes of active shooting, with breaks as needed. Babies tire quickly, so a short, relaxed session often yields better expressions than a long, staged one.
What should my baby wear?
Choose a simple outfit that coordinates with your chosen color palette and does not clash with the stuffed animals. Solid colors or minimal patterns keep the focus on your baby’s face and the overall scene.
Turning Your Photos Into Keepsakes
Once you have captured your favorite shot—or a whole series—you can turn these images into lasting mementos. Consider printing them as framed art for the nursery, using them in birthday invitations, or compiling them into a yearly photo book that tracks your baby’s adventures with their plush co-stars.
With a bit of planning and creativity, this movie-inspired stuffed animal scene becomes more than a one-time project; it can grow into a playful family tradition and a unique way to document your child’s early years.