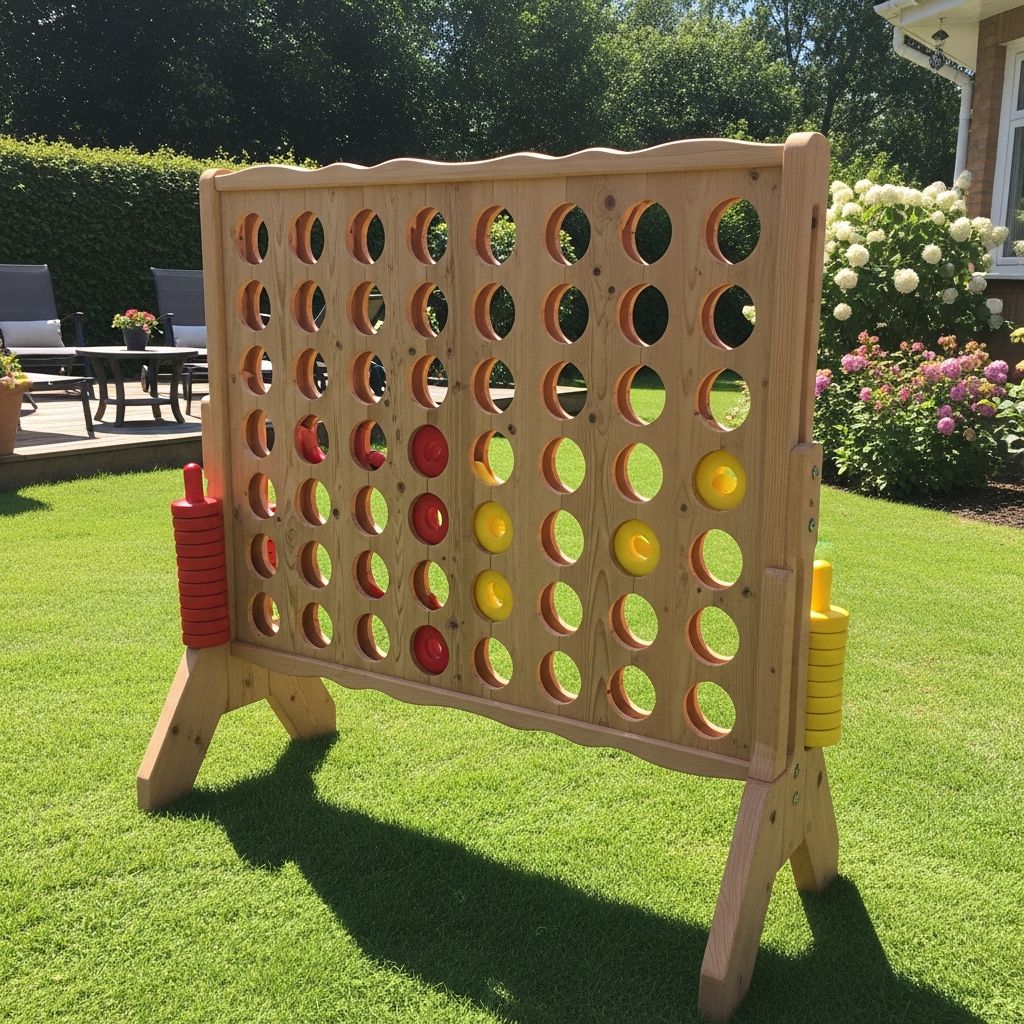
Supersizing a classic Connect Four game into a backyard centerpiece is a practical weekend project that combines basic woodworking, creative design, and family fun. This guide walks you through planning, building, and protecting a large-scale wooden game that can live on your patio, deck, or lawn.
You do not need a professional workshop to complete this project. With careful measuring, basic tools, and a focus on safety, you can create a durable, weather-resistant game that becomes a go-to activity for cookouts, birthdays, and casual evenings outside.
Why a Giant Connect Four Belongs in Your Yard
Before picking up a saw, it helps to understand what makes this project appealing compared to buying a ready-made game.
- Outdoor-friendly entertainment: Giant games encourage kids and adults to move around, stand, bend, and reach instead of sitting indoors.
- Skill-building for kids: Connect Four-style games support pattern recognition, planning several moves ahead, and basic probability.
- Customizable design: You control the colors, finishes, and size, so the game can match your patio furniture, favorite team, or party theme.
- Reusable for gatherings: Unlike single-use party decor, a sturdy wooden game can be used season after season with minimal upkeep.
Outdoor play is associated with improved physical activity, social interaction, and reduced sedentary time in children, making durable yard games a useful tool for families trying to get kids outside more often.
Planning the Game: Size, Layout, and Location
The original tabletop Connect Four has a 7-column by 6-row grid. You can keep that configuration while dramatically increasing the physical size of the frame and discs.
Choosing Overall Dimensions
For most backyards, a game board that is about chest-height on an adult is large enough to feel impressive without being hard to move or store. A common target is roughly 3–4 feet tall and 4–5 feet wide for the playing area, plus legs that raise it off the ground.
| Component | Typical Range | Notes |
|---|---|---|
| Board width | 48–60 in (122–152 cm) | Spans 7 columns with generous hole spacing. |
| Board height | 32–40 in (81–101 cm) | Maintains 6 rows without making discs overly heavy. |
| Leg height | 30–40 in (76–101 cm) | Adjust based on player height and whether game sits on ground or a table. |
| Disc diameter | 4–5 in (10–13 cm) | Large enough for kids to handle easily, small enough to drop smoothly. |
Where the Game Will Live
Your storage and setup options should influence your dimensions and materials:
- Permanent patio fixture: Heavier lumber and a wider base are helpful for wind resistance.
- Portable for parks and parties: Consider slightly thinner panels, detachable legs, or a carry handle.
- Garage or shed storage: Measure door openings and shelf heights before finalizing total height and width.
Choosing rot-resistant or treated materials is particularly important if your game will be stored outdoors or in damp conditions, since moisture accelerates wood decay and hardware corrosion.
Recommended Materials and Tools
You can adapt this project to use off-the-shelf boards and basic hardware. The list below focuses on availability and durability rather than specialized components.
Core Materials
- Sheet material for the board: Exterior-grade plywood or medium-density overlay (MDO), about 1/2–3/4 inch thick, for the front and back panels.
- Spacers or grid structure: Narrow strips of plywood or solid wood to create the internal channels that guide the discs.
- Legs and feet: Dimensional lumber (for example, 2×4 or 1×4 boards) to hold the playing field upright.
- Trap door piece: A straight board that spans the bottom opening and can pivot to release discs after each game.
- Hardware: Wood screws, small hinges for the trap door, and a latch, hook, or magnetic catch to keep it closed during play.
- Discs: Round wooden blanks, plywood cutouts, or plastic discs in two distinct colors.
- Finish: Exterior paint or a clear outdoor finish rated for UV and moisture exposure.
Suggested Tools
- Measuring tape, square, and pencil for accurate layout.
- Circular saw, jigsaw, or table saw for straight cuts in sheet goods.
- Hole saw or router with circle-cutting jig to create the playing holes and discs.
- Drill/driver with wood bits for pilot holes and fastening screws.
- Sander or sanding block to soften edges and prevent splinters.
- Clamps to hold pieces while fastening and gluing.
Always follow manufacturer instructions and safety guidance for power tools, including eye and hearing protection, and keep children away from work zones while cutting and drilling.
Designing the Grid and Hole Layout
The most important part of the build is the alignment of the disc holes. Accuracy here ensures smooth gameplay and prevents discs from binding or falling through unexpectedly.
Marking the Hole Pattern
- Determine disc size: Choose or cut test discs first. The hole centers and spacing depend on their diameter and thickness.
- Set horizontal spacing: Plan for at least 1/4–1/2 inch of wood between adjacent holes so the board remains strong.
- Set vertical spacing: Leave enough room for discs to stack without rubbing excessively on the top of the hole above.
- Draw a full grid: Use light pencil lines to create a 7×6 grid on the panel, then mark the center of each hole at the intersections.
Double-check measurements from the edges and between centers so columns and rows line up consistently. Small layout errors can compound and become obvious once the holes are cut.
Cutting the Holes
- Clamp both panels together: If using a front and back sheet, you can cut through both at once for perfect alignment.
- Drill pilot holes: For a hole saw or jigsaw, start with a small pilot hole at each marked center.
- Cut slowly: Allow the tool to do the work to avoid tear-out and reduce the risk of kickback.
- Sand the openings: Smooth all edges thoroughly to protect children’s hands and prevent discs from catching.
Round-over bits in a router, or careful hand sanding, can ease sharp corners, improving both safety and the feel of dropping discs into place.
Building the Frame and Legs
With the panels prepared, you can create a rigid frame and sturdy support structure. Stability matters more here than fine joinery; simple, strong connections are sufficient.
Assembling the Main Board
- Add internal spacers: Attach narrow strips between the front and back panels to form vertical channels for each column. These also stiffen the board.
- Secure with glue and screws: Apply wood glue at each contact surface and drive screws from the outside into the spacers, keeping everything flush.
- Leave an opening at the bottom: The lowest edge of the grid should remain open so discs can fall into the trap door area.
Creating Stable Legs and a Base
There are many leg designs that work; the priorities are a wide stance and secure connections to prevent tipping during play.
- Side-mounted legs: Attach vertical legs to each side of the board with screws going into the internal spacers or frame.
- Feet for support: Add horizontal foot pieces at the bottom of each leg, extending both forward and backward for balance.
- Optional cross brace: If the board is very wide, a low cross brace between the legs can reduce wobble.
Check that the game stands level on a flat surface and does not rock when bumped. If it tips easily, widen the feet or add ballast at the base.
Adding the Trap Door and Release Mechanism
One of the most satisfying parts of a giant Connect Four game is opening a door at the bottom and watching all the discs spill out at once.
Building the Release Door
- Cut the door board: Size it to cover the bottom opening with a slight overlap on each side.
- Install hinges: Attach two small hinges along one long edge so the door can swing open and closed.
- Add a latch: Use a simple hook-and-eye latch or surface-mounted catch to hold the door shut during play.
- Test the release: Load a few discs and confirm they all fall freely when the latch is opened.
When building for children, choose hardware with minimal pinch points and rounded edges, and teach kids to keep fingers clear of the opening when the door swings down.
Making and Finishing the Discs
The discs are the most handled part of the game, so comfort and visibility are important. Each player needs the same number of pieces, typically at least 21 per color to allow for full boards.
Cutting the Discs
- Use a hole saw of the chosen size on plywood or solid wood.
- Label or sort discs as you cut to ensure equal numbers in each color later.
- Sand both faces and edges to remove splinters and rough fibers.
Color and Finish Choices
Pick high-contrast colors so players can quickly recognize patterns on the board. Consider:
- Classic red vs. yellow: Easy to distinguish at a distance.
- Team or school colors: Great for parties and game-day gatherings.
- Pastels or neutral tones: If you want a more subdued or decor-friendly look.
Use exterior-grade paints or clear finishes labeled for outdoor use, and follow curing times before exposing the discs to moisture.
Weatherproofing and Long-Term Care
Because this is an outdoor game, durability matters. Sunlight, rain, and temperature swings can damage unprotected wood and finishes over time.
Protective Finishes
- Primer and paint: Applying an exterior primer under paint improves adhesion and moisture resistance.
- Clear sealers: Exterior polyurethane, spar varnish, or similar products help protect natural wood tones from water and UV exposure.
- Edge sealing: Pay extra attention to end grain and exposed plywood edges, where water tends to soak in.
Storage and Maintenance
- Store the game under cover when not in use, such as in a garage, shed, or under a waterproof cover.
- Inspect annually for loose screws, flaking finish, or splinters, especially on surfaces children touch.
- Recoat as needed depending on your climate and the level of sun and rain the game receives.
Regular inspection and maintenance of outdoor wooden structures extend their lifespan and help reduce injury risks due to degradation.
Safety Considerations for Family Play
Giant yard games are generally low-risk, but careful design and supervision keep them safe even with young children around.
- Weight management: Avoid making discs so thick or large that they become heavy projectiles if thrown.
- Smooth edges: Thorough sanding of all corners, holes, and disc edges reduces the likelihood of cuts or splinters.
- Stable placement: Use the game on flat, level ground away from steep slopes or steps.
- Supervision: Very young children require close supervision when playing around large wooden structures, consistent with general playground safety guidance.
Gameplay Ideas and Variations
Once your giant Connect Four game is built, there are many ways to keep it interesting for players of different ages and skill levels.
Game Variants
- Timed rounds: Use a timer and require each move to be played within a few seconds to speed up play.
- Cooperative play: Adults can play “open hand,” explaining strategy aloud to help children learn about blocking and planning ahead.
- Tournament ladder: At parties, create a simple bracket so winners advance and new challengers rotate in.
Educational Twists
- Have kids call out coordinates (column and row) to reinforce basic graph concepts.
- Ask younger children to count how many discs are needed to complete four in a row to practice simple arithmetic.
Structured but playful activities like these can support early math and problem-solving skills, especially in informal learning environments.
Frequently Asked Questions (FAQs)
What type of wood is best for an outdoor Connect Four game?
Exterior-grade plywood, cedar, redwood, or treated softwoods are common choices because they resist moisture and decay better than standard interior lumber when properly finished.
How many discs do I need for a 7×6 grid?
Plan for at least 21 discs per color, which is enough to fill more than half of the 42 total spaces and covers typical gameplay without running out.
Can I build this game without advanced woodworking skills?
Yes. The project relies mainly on straight cuts, careful measuring, and simple screwed joints. Taking your time with layout and using basic safety gear is more important than complex joinery.
How do I keep the game from tipping over?
Use wide feet at the base of each leg, ensure the game sits on level ground, and avoid making the board so tall and narrow that its center of gravity is high. Adding a cross brace or small weights at the bottom can increase stability.
Is it safe for very young children?
With smooth edges, stable legs, and supervision, older toddlers and preschoolers can enjoy dropping discs. However, adults should manage set-up, handle the trap door, and make sure kids do not climb or hang on the frame.
References
- Outdoor play and sedentary time in children — ParticipACTION / Healthy Active Living and Obesity Research Group. 2018-06-01. https://csepguidelines.ca/guidelines/children-youth-5-17/
- Playground Safety — Centers for Disease Control and Prevention. 2019-04-19. https://www.cdc.gov/safechild/playground/index.html
- Guidelines for Exterior Wood Finishes — U.S. Forest Products Laboratory, USDA Forest Service. 2010-01-01. https://www.fs.usda.gov/research/treesearch/35384
- Safety and Health Topics: Woodworking — Occupational Safety and Health Administration (OSHA). 2020-02-10. https://www.osha.gov/woodworking
- Finishing of Wood — Wood Handbook, Forest Products Laboratory, USDA Forest Service. 2010-01-01. https://www.fpl.fs.usda.gov/documnts/fplgtr/fplgtr190/chapter16.pdf