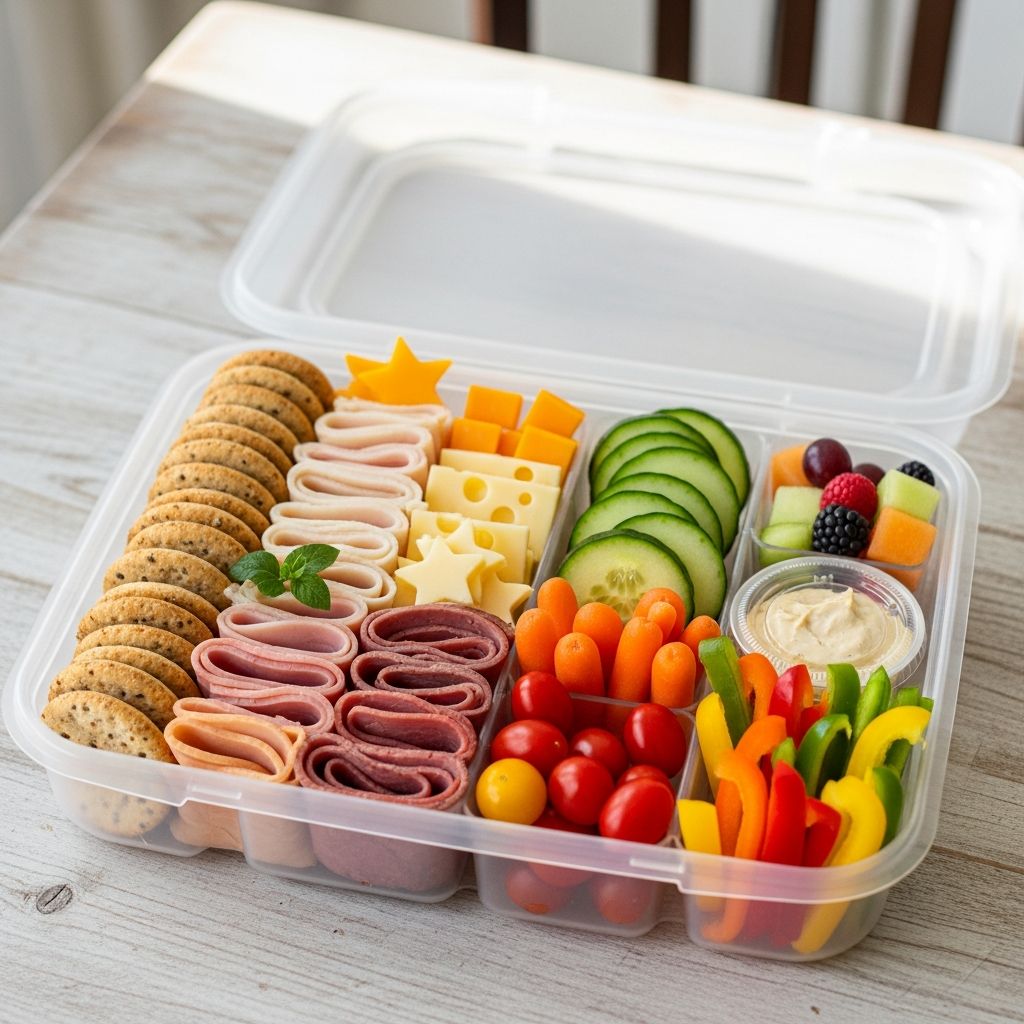
Pre-packed snack trays are convenient, but they can be expensive, light on real nutrition, and surprisingly limiting in flavor and creativity. Homemade lunch kits give you the same fun, “build-it-yourself” experience kids love, while letting you control ingredients, portions, and cost.
Why Make Your Own Lunch Kits?
Think of homemade lunch kits as tiny, kid-sized snack boards packed into a reusable container. Instead of buying the same two or three flavors, you can mix and match ingredients your child already enjoys, adjust for allergies, and sneak in a few more whole foods along the way.
- More control over ingredients, including sodium, added sugar, and preservatives.
- Better value for your money compared with individual pre-packaged trays.
- Flexible for picky eaters, adventurous kids, and adults who want snack-style lunches.
- Less packaging waste when you use reusable containers and fewer single-serve items.
The Basic Lunch Kit Formula
Rather than following rigid recipes, use a simple formula to assemble nearly endless combinations. The idea is to pick at least one item from each category so that the meal feels balanced and filling.
The Four-Part Framework
- Protein: Keeps kids full and steady between meals.
- Carb: Provides energy and makes the meal feel substantial.
- Fruit or Vegetable: Adds color, texture, and nutrients.
- Fun Extra: A small treat or flavorful dip so the lunch still feels like a treat.
| Protein Ideas | Carb Ideas | Fruit & Veg Ideas | Fun Extras |
|---|---|---|---|
| Turkey or chicken slices, cheese cubes, hard-boiled eggs | Whole-grain crackers, mini pitas, tortilla wedges | Grape tomatoes, cucumber coins, carrot sticks | Hummus, ranch dip, small cookie, dark chocolate square |
| Ham strips, pepperoni, tofu cubes, hummus | Pretzels, mini bagels, pasta salad, brown rice cakes | Apple slices, grapes, berries, melon cubes | Yogurt tube, trail mix, guacamole, salsa |
| Tuna salad, chicken salad, beans, edamame | Flatbread pieces, naan, cornbread bites | Bell pepper strips, snap peas, steamed broccoli florets | Granola cluster, fruit leather, cheese spread |
Tools and Containers That Make It Easy
The right containers make homemade lunch kits feel like the real thing. Divided boxes keep foods from touching, which is key for many kids, and sealable compartments help dips and sauces stay where they belong.
- Divided lunch boxes: Choose BPA-free containers with two to four sections.
- Mini cups or silicone liners: Great for sauces, nuts, or small treats.
- Small cutters: Use cookie or veggie cutters to make fun shapes from cheese or cucumbers.
- Insulated lunch bag and ice pack: Essential for keeping protein and dairy items at safe temperatures.
Step-by-Step: How to Assemble a Lunch Kit
Once you have containers and a few basic ingredients, assembly becomes a quick routine. Consider setting aside 20–30 minutes once or twice a week to prep several kits at once.
- Plan 2–3 combinations. Choose different flavor themes so kids do not get bored during the week.
- Prep protein. Slice deli meats, cube cheese, or portion out dips and salads into small cups.
- Wash and cut produce. Rinse fruits and vegetables, dry them well, and cut them into bite-sized pieces.
- Portion carbs. Count out crackers or cut bread and pitas into small wedges.
- Add a small treat. One or two bite-sized sweets or a fun dip keeps the meal feeling special.
- Seal and chill. Close containers tightly and refrigerate until packing time, adding an ice pack if needed.
Kid Classics: Familiar, Easy-to-Eat Combos
Start with familiar flavors to build confidence, especially for younger kids or picky eaters. These combinations mimic store-bought trays but with fresher ingredients and more generous portions of real food.
- Mini Cracker Stackers: Sliced turkey or ham, mild cheese squares, whole-grain crackers, cucumber coins, and a small cookie.
- Snack-Board Style: Cheese cubes, pepperoni rounds, pretzels, baby carrots, grapes, and ranch for dipping.
- Pita Pocket Kit: Small pita halves, chicken strips, shredded lettuce, sliced bell pepper, and a cup of yogurt-based dressing.
Beyond the Basics: Creative Themes
Once the basics are working well, introduce themed kits to keep lunches fun. Rotating themes also helps you use up leftovers in a way that feels intentional, not repetitive.
- “Mini Pizza” Kit: Whole-wheat crackers or mini flatbreads, a small cup of pizza sauce, shredded mozzarella, mini pepperoni, and a side of fruit.
- Taco Dipper Box: Tortilla chips or soft tortilla wedges, seasoned beans or shredded chicken, cheese, salsa, and corn or cherry tomatoes.
- Mediterranean Sampler: Hummus, cucumber slices, pita triangles, olives (if age-appropriate), cherry tomatoes, and a small square of dark chocolate.
- Breakfast-for-Lunch Tray: Mini pancakes or waffles, a hard-boiled egg or yogurt, berries, and a small container of nut or seed butter for dipping.
Picky Eaters: Gentle Ways to Expand Their Comfort Zone
For selective eaters, homemade lunch kits can double as a low-pressure way to explore new foods. The small compartments make it easy to offer tiny tastes alongside reliable favorites without overwhelming the child.
- Keep two or three “safe” foods in the box so lunch still feels familiar.
- Introduce new foods in very small portions, such as one or two slices of a new fruit.
- Use fun shapes, skewers, or small toothpick-style picks (for older children) to make foods more appealing.
- Invite kids to choose one new item to add when helping assemble their own trays.
Making Kits More Nutritious Without a Fight
You do not need to overhaul everything overnight to make lunch kits more nourishing. Small upgrades can gradually improve the overall balance while keeping flavors and textures kid-friendly.
- Swap some refined crackers for whole-grain versions once your child accepts the format.
- Offer colorful veggies with a favorite dip so they feel like part of the fun, not an obligation.
- Replace sugary drinks with water bottles and include juicy fruits like oranges or melon for sweetness.
- Choose leaner proteins or add plant-based options like beans or hummus a few days a week.
Time-Saving Prep Strategies
With a bit of planning, homemade lunch kits can be even faster than last-minute sandwich making. Batch preparation and smart storage are the biggest helpers here.
- Cut vegetables in larger batches and store them in airtight containers so they are ready to grab.
- Boil several eggs at once and use them over two to three days in lunches and snacks.
- Buy cheese in blocks and cube or slice several servings at a time to save money and packaging.
- Designate a small section of your fridge for pre-assembled kits and grab-and-go extras.
Food Safety and Storage Tips
Because lunch kits often include meat, cheese, and dips, keeping them cold is important. A little attention to temperature helps keep food fresh and reduces waste.
- Use an insulated lunch bag plus at least one ice pack when sending dairy or meat.
- Pack perishable items straight from the refrigerator in the morning so they start out cold.
- Aim to keep high-risk foods (meats, eggs, dairy) chilled until lunchtime whenever possible.
- When in doubt, skip mayonnaise-heavy salads on very hot days unless you are sure they stay cold.
Budget Tips: Keeping Costs Down
One of the biggest advantages of homemade lunch kits is cost. With a bit of strategy, you can bring the price per tray well below the store-bought version, even when using higher-quality ingredients.
- Buy larger blocks of cheese and whole packages of deli meat rather than pre-sliced snack packs.
- Use seasonal produce, which is usually less expensive and tastes better.
- Incorporate leftovers like roast chicken, cooked pasta, or roasted vegetables into future lunch kits.
- Limit individually wrapped snacks and instead portion bulk items into small reusable containers.
Involving Kids: Turn Packing into a Routine
When children help choose and pack their meals, they are more likely to eat them. Treat lunch assembly as a short weekly routine rather than a daily scramble.
- Offer a small selection in each category (protein, carb, fruit/veg, fun extra) and let kids pick one from each.
- Use visual prompts, such as a simple chart on the fridge, to help them remember the formula.
- Let older kids handle safe tasks like portioning crackers or washing berries.
- Celebrate new combinations they create, even if they seem unusual at first.
Sample Weekly Lunch Kit Plan
To show how flexible this system can be, here is an example of five different lunch kits using mostly overlapping ingredients. Adjust portions based on age and appetite.
| Day | Protein | Carb | Fruit / Veg | Fun Extra |
|---|---|---|---|---|
| Monday | Turkey slices, cheese cubes | Whole-grain crackers | Grape tomatoes, grapes | Small cookie |
| Tuesday | Hummus | Pita triangles | Cucumber slices, carrot sticks | Fruit leather |
| Wednesday | Hard-boiled egg, cheese stick | Pretzels | Apple slices (tossed with lemon to reduce browning) | Yogurt tube |
| Thursday | Seasoned beans or chicken | Tortilla chips | Corn, cherry tomatoes | Salsa for dipping |
| Friday | Leftover roast chicken | Mini flatbreads | Bell pepper strips, berries | Dark chocolate square |
Frequently Asked Questions
How far in advance can homemade lunch kits be prepared?
For most combinations, you can safely prepare kits two to three days in advance if they are kept well chilled. Foods with more moisture, like cut apples or cucumbers, keep better when stored separately and added closer to the day of eating.
How do I keep cut fruit from browning?
Firm fruits such as apples and pears can be tossed lightly in lemon or orange juice before packing. You can also choose fruits that naturally hold up well, like grapes, berries, and melon, if you want to avoid extra steps.
Are homemade lunch kits suitable for adults?
Absolutely. Adults often appreciate the same graze-style eating format and can simply scale up portions or choose more robust flavors, such as stronger cheeses, olives, or spicy dips. Packing two smaller containers can also make it easy to spread the meal across a long workday.
What if my child dislikes mixed foods or dipping?
Stick to simple, clearly separated components and avoid sauces if they tend to cause stress. The divided format still offers variety, and you can always add dips on the side later if their preferences change.
Can these kits be made allergy-friendly?
Yes, the flexible formula works well for nut-free, gluten-free, or dairy-free needs. Focus on whole ingredients that fit your child’s requirements and always double-check labels on packaged items like crackers or treats.
Bringing It All Together
Homemade lunch kits turn the appeal of store-bought snack trays into a customizable system that works for your family’s tastes, budget, and schedule. With a simple formula, a few reusable containers, and some weekly prep time, you can send kids to school with lunches they are excited to eat and that you feel good about packing.