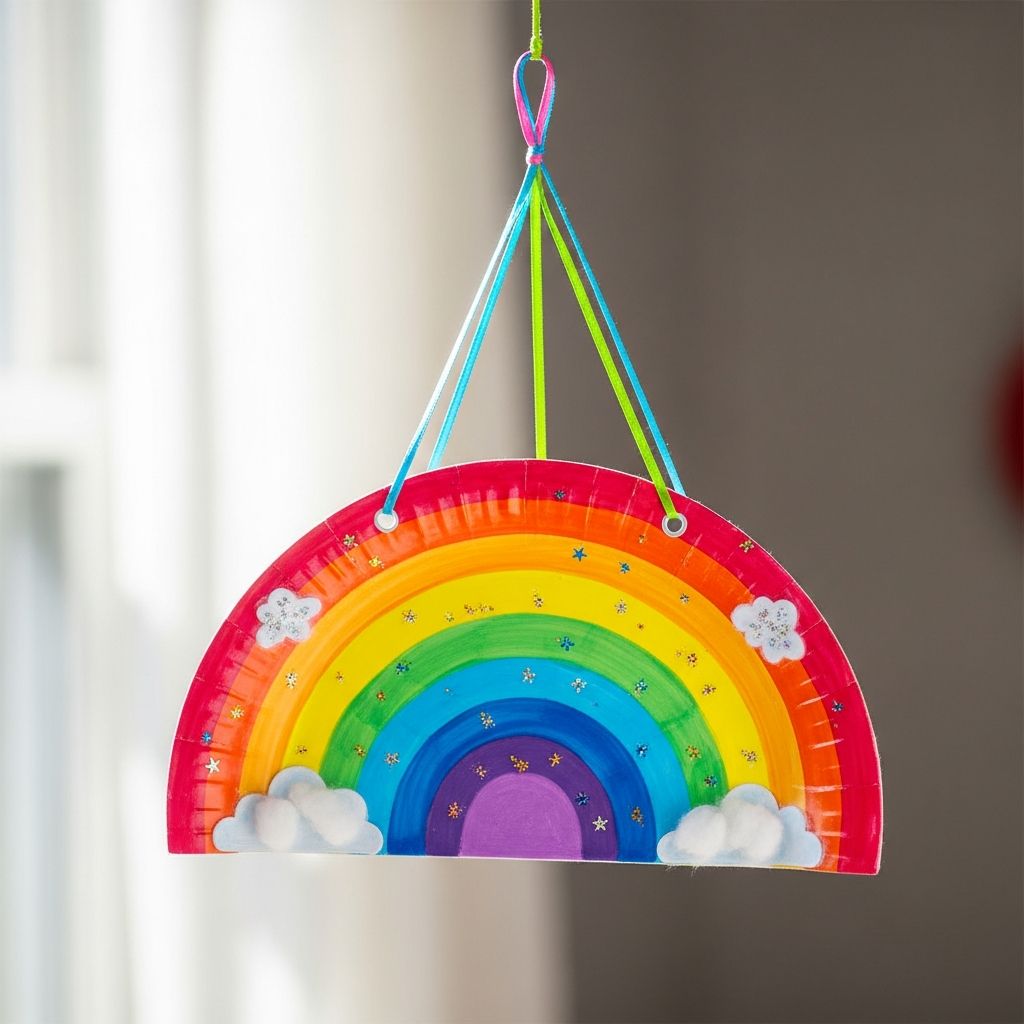
Transform an ordinary paper plate into a cheerful hanging rainbow that brightens any room, classroom corner, or play space. This project is simple enough for young children, but flexible enough to let older kids experiment with color, texture, and design.
Why This Rainbow Craft Is Worth Doing
This hanging rainbow plate craft is more than just a cute decoration. It gives kids a chance to practice fine motor skills, experiment with colors, and express their creativity while working with everyday supplies you may already have at home.
- Encourages creativity through color choices and decoration.
- Supports fine motor skills with cutting, gluing, and threading.
- Creates a finished piece children can proudly hang and display.
Materials and Tools You Will Need
You can adapt this craft to whatever you have on hand, but the list below provides a solid starting point. Feel free to substitute or add items to match your child’s age and interests.
- 1 sturdy paper plate (plain white works best)
- Washable paints or markers in rainbow colors (red, orange, yellow, green, blue, indigo, violet)
- Paintbrushes or foam brushes (if using paint)
- Colored paper or tissue paper (optional for extra details)
- String, yarn, or ribbon for hanging
- Cotton balls, pom-poms, or white tissue paper for clouds
- Glue stick and/or liquid craft glue
- Child-safe scissors
- Hole punch (for hanging and optional dangling pieces)
- Table covering or old newspaper to protect your workspace
- Apron or old T-shirt to protect clothing
Project Snapshot
| Aspect | Details |
|---|---|
| Approximate time | 30–45 minutes (plus drying time if using paint) |
| Recommended ages | 3–10 years (with age-appropriate adult help) |
| Mess level | Low to moderate, depending on paint or markers |
| Difficulty | Beginner-friendly |
Preparing Your Craft Space
Before getting started, set up a kid-friendly workspace so the focus stays on creativity rather than clean-up. A calm, organized area helps younger children follow directions and stay engaged.
- Cover the table with an old tablecloth, craft mat, or recycled newspaper.
- Lay out all materials within easy reach so kids can see options and choose.
- Keep a damp cloth or wipes nearby for quick clean-up of glue and paint.
Step-by-Step Instructions: Hanging Rainbow Plate
Step 1: Shape the Rainbow Base
The paper plate will become the arch of your rainbow. Shaping it first gives kids a clear canvas to decorate and turns the plate into a natural hanging piece.
- Fold the paper plate gently in half to mark the center, then unfold.
- Cut straight across the center crease so you have two half-circle pieces.
- Choose one half to use for your rainbow; save the other for a second craft.
Step 2: Draw the Color Bands
Light pencil lines help children understand where to place each color. This step is especially helpful for younger kids who are still learning about rainbow order.
- With the curved edge facing up, lightly draw several curved lines following the edge of the plate to form bands.
- Make each band wide enough to fit a paintbrush or marker comfortably.
- Talk about the color order you plan to use: classic rainbow, pastel shades, or a custom palette.
Step 3: Add Rainbow Colors
This is where the plate comes to life. Kids can follow traditional color order or make up their own pattern. For younger crafters, prepare small paint puddles in a tray to keep things organized.
- Starting with the outermost band, color the first arc (often red, but any color is fine).
- Work inward, filling each band with a different color until the plate is striped like a rainbow.
- Encourage kids to blend colors slightly where they meet if they like softer transitions.
- Allow the plate to dry completely if you used paint before moving on.
- Tip: Markers or crayons are great for quick projects or group settings.
- Tip: For a shimmery effect, brush a thin layer of glitter glue over the dry colors.
Step 4: Create Soft, Fluffy Clouds
Adding clouds gives the craft dimension and makes the rainbow feel more complete. Children love the texture of cotton balls or crumpled tissue paper.
- Decide whether you want clouds only at the ends or across the bottom of the rainbow.
- For cotton balls: stretch each one slightly to create fluffier shapes.
- Spread glue along the flat edge or lower corners of the plate.
- Press cotton balls, pom-poms, or wads of white tissue paper into the glue.
- Let everything dry so the clouds stay firmly attached.
Step 5: Add Hanging Details (Optional)
Dangling details turn a flat craft into a mobile-style decoration. This step can also reinforce themes like weather, seasons, or emotions.
- Use a hole punch to make 3–5 holes along the flat edge of the plate, behind or below the cloud area.
- Cut pieces of yarn or ribbon in equal lengths (about the length of your hand or slightly longer).
- Thread each piece through a hole and tie a simple knot to secure.
- Attach decorations to the ends, such as:
- Paper raindrops cut from blue paper.
- Little paper hearts or stars.
- Small cardboard shapes kids color themselves.
Step 6: Attach a Hanger
A secure hanger lets you display the finished rainbow on walls, doorknobs, or classroom boards. This final step gives kids a sense of completion and pride.
- Punch a single hole near the top of the curved edge of the paper plate.
- Cut a length of yarn or ribbon long enough to hang.
- Thread it through the hole and tie the ends together firmly.
- Test the knot and adjust the length if needed so the rainbow hangs straight.
Variations for Different Ages and Themes
This project adapts easily to various settings and age groups. You can change the look or focus to match seasons, holidays, or learning goals.
- Toddler version: Use large bands, chunky markers, and pre-cut cloud pieces so little hands can simply color, glue, and pat.
- School-age version: Add more detailed patterns, metallic accents, or words written on the bands (such as kind, brave, curious).
- Seasonal twist: For spring, add flower shapes; for St. Patrick’s Day, add a paper “pot of gold” at one end.
- Weather unit: Attach sun, rain, and lightning shapes to the bottom to discuss different types of weather.
Learning Benefits of a Rainbow Plate Craft
While children see a fun art activity, caregivers and teachers can appreciate the many skills being practiced. This simple project naturally supports early learning in several areas.
| Skill Area | How the Craft Helps |
|---|---|
| Fine motor skills | Cutting, holding brushes, squeezing glue, and placing small items strengthen hand muscles and coordination. |
| Color recognition | Kids practice naming colors and arranging them in order. |
| Creativity | Children make choices about patterns, decorations, and extra details. |
| Following directions | Working through steps in order helps kids listen, focus, and complete a project. |
| Emotional expression | Rainbows feel cheerful, giving kids a positive outlet and a project they can feel proud of. |
Safety Tips for Adult Helpers
Adult supervision keeps this craft fun and safe for young children. Many steps are simple, but a watchful eye is still important, especially when scissors and small pieces are involved.
- Use child-safe scissors and handle any tricky cutting yourself for younger kids.
- Keep small items like pom-poms and beads away from children who still explore with their mouths.
- Choose non-toxic, washable paints and glues designed for children.
- Allow time for everything to dry so pieces do not fall off when hanging.
Simple Cleanup and Storage Ideas
After the creative fun, a quick cleanup routine teaches responsibility and keeps your space ready for the next project. Storing finished rainbows safely preserves them for future display or classroom use.
- Have kids help gather scraps of paper and place them in a recycling bin if possible.
- Rinse paintbrushes right away or place them in water until you can wash them properly.
- Hang finished rainbows in a dry spot where they will not be crushed or splattered.
- For classrooms, write names on the back of each plate and store them flat in a box until display time.
Ideas for Displaying Your Hanging Rainbow
Once the craft is complete, the rainbow deserves a special place. Displaying children’s art shows that their effort matters and encourages them to create more.
- Hang on a bedroom wall or door as a cheerful welcome sign.
- Display several rainbows together on a classroom bulletin board to form a “sky wall.”
- Hang them in front of a window so light shines through any tissue paper or translucent parts.
- Create a mobile by hanging multiple rainbow plates from a circular hoop or branch.
Frequently Asked Questions (FAQs)
Can this craft be done without paint?
Yes. Markers, crayons, or colored pencils work well if you prefer a less messy option. You can also glue on strips of colored paper or tissue paper instead of drawing the bands.
How long does the project take from start to finish?
The hands-on part usually takes about 30–45 minutes, depending on your child’s age and attention span. If you use paint, plan for extra drying time before adding clouds, hanging pieces, and the top loop.
What if I do not have a hole punch?
You can carefully use the tip of a pencil or a craft stick to poke small holes, but adults should handle this step. Another option is to tape the hanging string directly to the back of the plate instead of making a hole.
Is this project suitable for a group activity?
Absolutely. This craft works well in classrooms, playgroups, and parties. Prepare materials in advance, give a quick demonstration, and consider labeling each plate with a child’s name to avoid mix-ups.
How can I make the craft more challenging for older kids?
Invite older children to design patterns within each color band, add shading, or include meaningful words or affirmations on the stripes. They can also experiment with mixed media, such as combining paint, collage, and drawing in one project.
Making the Rainbow Uniquely Yours
The most enjoyable part of this hanging rainbow plate craft is how personal each creation can be. Even when children start with the same basic instructions and supplies, no two finished rainbows will look exactly alike.
Encourage kids to choose their favorite colors, decide how many bands to include, and experiment with extra details like glitter, stickers, or drawn faces on the clouds. The result is a colorful decoration and a meaningful memory of time spent creating together.