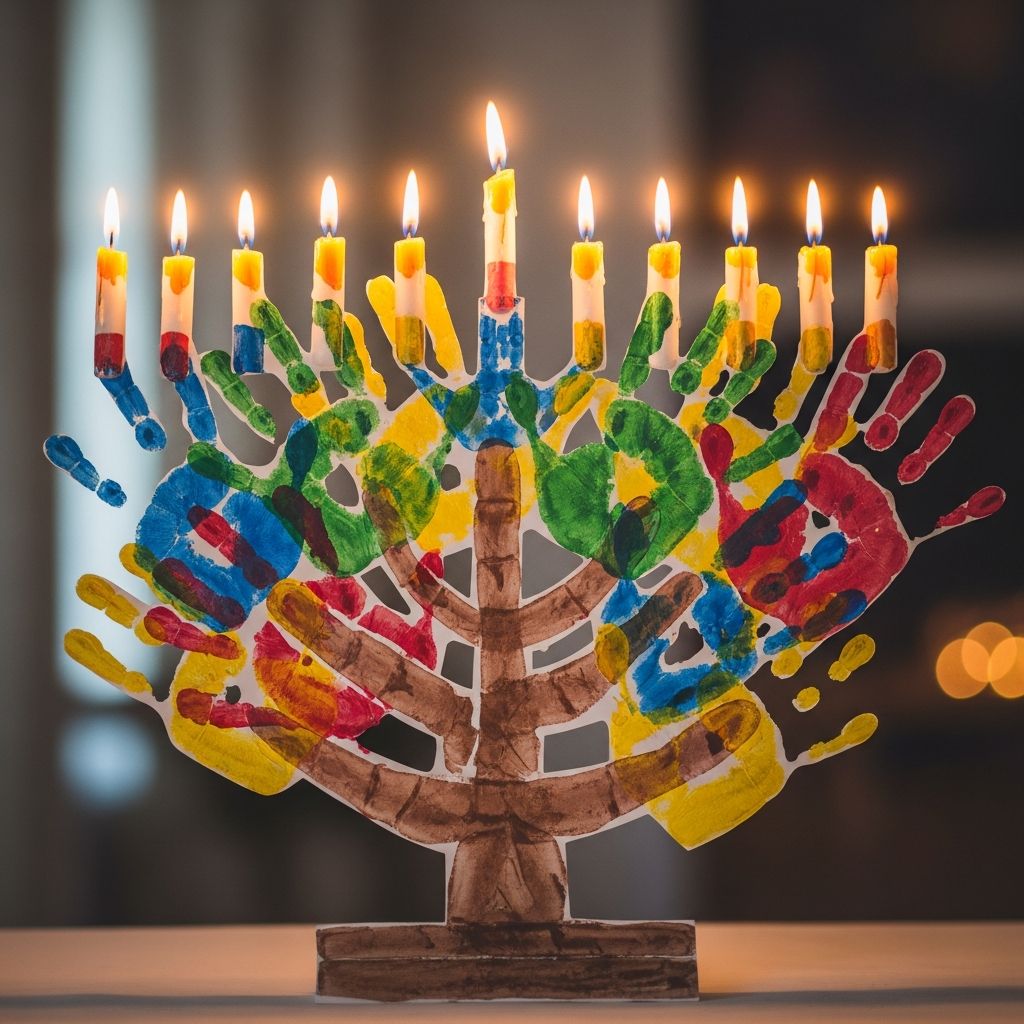
Turning little handprints into a glowing menorah is a simple way to bring Hanukkah stories to life, create lasting memories, and decorate your home with something genuinely personal. This guide walks you through every step so families of all crafting levels can enjoy the project together.
Why a Handprint Menorah Is So Special
A handprint menorah is more than a cute art project; it captures a moment in your child’s life that you can return to year after year. As kids grow, comparing their old handprints to their current hands can spark conversation about traditions, growth, and the meaning of Hanukkah.
Because this craft centers on hands and light, it naturally leads to age-appropriate talk about helping others, bringing light into the world, and the values your family wants to highlight during the eight nights of Hanukkah.
Supplies You Will Need
You can complete this project with basic art materials, and many can be substituted with what you already have at home. The list below assumes you are making a flat art piece for the wall, not a functional candleholder.
- Thick white or light-colored paper (watercolor or cardstock works best)
- Washable tempera or finger paints in blue, gold, yellow, and any accent colors you like
- Paintbrushes in several sizes (small for details, medium for filling in shapes)
- Pencil and eraser for light sketching (optional but helpful)
- Disposable plate or palette for paint
- Cup of water and paper towels for quick clean-up
- Black marker or paint pen for outlines and details
- Smock or old T-shirt to protect clothing
- Optional extras: glitter glue, sequins, foam stickers, metallic markers, self-adhesive gems
If crafting with a group of children, consider preparing separate paint palettes and cloths for each child to reduce mess and waiting time.
Planning Your Menorah Design
Before any paint touches paper, spend a minute deciding how your menorah will look. This keeps kids focused and gives them a sense of ownership over the process. You can aim for a simple, graphic style or add more detailed decorations.
- Orientation: Decide whether the paper will be horizontal (landscape) or vertical (portrait). Landscape usually gives more room for candles.
- Color scheme: Traditional Hanukkah colors include blue, white, silver, and gold, but kids can add pinks, greens, or purples for a playful look.
- Background: Younger kids may prefer a plain background, while older kids can paint stars, dreidels, or geometric patterns behind the menorah.
Step-by-Step Instructions for the Handprint Menorah
The steps below assume one child’s hands are used for the entire menorah, but you can also combine several children’s handprints if you like. Read through once before starting so you know what to expect.
1. Prepare the Workspace
Cover the table with newspaper or a reusable plastic cloth and have a damp cloth nearby to wipe hands quickly. Make sure children are wearing smocks or old shirts and that sleeves are rolled up out of the way.
Pour small amounts of each paint color onto a plate or palette. Keep the paints spaced out so colors don’t blend before you want them to.
2. Create the Menorah Base and Stem
Use a pencil to lightly sketch a long horizontal bar near the middle of the page and a center stem that leads down to a base; this will be the structure that holds the handprint “candles.” The sketch does not need to be perfect because most of it will be covered by paint.
With a medium brush, paint the base and stem using blue, gold, or another color your child chooses. Let this layer dry for a few minutes while you talk about the significance of the menorah and its nine branches.
3. Paint the Hand for Printing
Select one hand to use for printing; many kids prefer their non-dominant hand so they can help position it with the other. Use a brush or fingers to coat the palm and fingers with paint, aiming for an even but not dripping layer.
You can paint the entire hand a single color or paint each finger a different shade to make the “candles” more playful. Encourage children to keep their fingers spread gently so the print transfers clearly.
4. Stamp the Handprints as Candle Branches
Carefully press the painted hand onto the paper so the fingertips point upward, placing the heel of the hand on the painted bar of the menorah. Gently press each finger and the palm so the paint transfers, then lift the hand straight up.
Repeat this process to create enough prints so that you have eight candle positions plus a central shamash (helper candle). Depending on your design, that may mean two overlapping handprints or more spread-out prints that form an arc of branches.
5. Add Candle Tops and Flames
Once the handprints are mostly dry, use a smaller brush to paint narrow rectangles above each fingertip to represent the candle tops. These rectangles can be white, blue, or another coordinating color.
Using yellow and orange paint, create small teardrop or flame shapes above each candle. Younger children can use fingerprints to tap flame shapes, while older kids can outline the flames with a darker color for extra detail.
6. Outline and Decorate
When everything is dry, use a black marker or paint pen to outline the menorah base, branches, and some of the handprint edges. This step makes the artwork pop and gives it a graphic, poster-like look.
Invite kids to embellish the scene with glitter glue, sequins, or stickers. They might add little stars, dreidels, or tiny hearts around the menorah, or write a short message such as “Happy Hanukkah” with metallic markers.
Adapting the Craft for Different Ages
The basic idea works for almost any age, from toddlers to tweens, but a few tweaks can make the experience smoother and more meaningful for each group. Think about attention span, fine motor skills, and how much independence each child wants.
| Age Group | Adult Involvement | Suggested Modifications |
|---|---|---|
| Toddlers (1–3) | High | Adult handles paint application and positioning of the hand; use fewer embellishments and focus on simple prints. |
| Preschool (3–5) | Moderate | Child chooses colors and helps press hand; add fingerprints for flames and simple stickers for decoration. |
| Early Elementary (6–8) | Guided | Child sketches base with a pencil, paints independently, and experiments with patterns on the candles. |
| Older Kids (9+) | Minimal | Encourage creative backgrounds, detailed outlining, and written reflections or quotes about light and courage. |
Safety and Clean-Up Tips
Any project involving young children and paint can get messy, but a few habits help keep the experience fun rather than stressful. Plan for the mess instead of trying to avoid it entirely.
- Choose washable, non-toxic paint labeled as safe for children.
- Keep a damp cloth or wipes at arm’s reach to clean hands quickly between prints.
- Encourage kids to stay seated while their hands are covered in paint to prevent accidental wall or furniture decorating.
- Lay artwork flat to dry completely before hanging to prevent drips and smears.
Display Ideas and Keepsake Options
Once the handprint menorah is dry, you can treat it as both holiday decor and a family keepsake. Involving children in how it is displayed helps them feel proud of their work and more connected to the celebration.
- Slide the artwork into a simple frame and place it near your real menorah or on a prominent wall.
- Laminating or covering it with clear contact paper will protect the surface and extend its life for future Hanukkah seasons.
- Scan or photograph the finished piece and save a digital copy; you can turn it into cards, gift tags, or a printed photo book page.
Conversation Starters While You Craft
Craft time is a natural moment to talk about the meaning and symbols of Hanukkah. Keep explanations simple and encouraging, especially for very young children, and focus on themes they can relate to in everyday life.
- Discuss how the menorah reminds people of a small amount of oil that lasted for many nights and what it means to make the most of what you have.
- Ask kids how they can “bring light” to others through kindness, sharing, or helping.
- Point out how each candle adds more light, just as each small good action makes the world a little brighter.
Fun Variations on the Handprint Menorah
Once your family has tried the basic version, you may want to experiment with different layouts and materials in future years. These variations can become new traditions that grow with your children.
- Family Menorah: Use each family member’s handprint as one or more branches so everyone is represented in the design.
- Footprint Shamash: For a silly twist, use one small footprint in the center as the helper candle while the hands form the other branches.
- Textured Flames: Glue tiny pieces of tissue paper or felt on top of the painted flames for a 3-D effect.
- Nightly Add-On: Start with the base and add one new painted flame each night of Hanukkah, taking a quick photo to record the progression.
Frequently Asked Questions About Handprint Menorahs
Can this project be done in a classroom?
Yes. For group settings, prepare labeled drying racks or tables so finished artwork has a safe place to rest. Using pre-poured paint trays and assigning specific hand-washing stations will help the activity run smoothly with multiple children.
What if my child is sensitive to paint on their hands?
Some children dislike the feeling of wet paint on their skin. In that case, trace their hand on paper with a pencil, cut it out, and let them paint the cut-out instead of pressing their hand directly into the paint.
Can we turn this into a gift?
Absolutely. Grandparents, godparents, and family friends often treasure handmade holiday art. Consider writing the year and your child’s age neatly at the bottom so the gift becomes a dated keepsake.
Does the menorah need to be “historically accurate”?
For young kids, the main goal is to introduce the concept of the menorah and the idea of adding light night after night. As children get older, you can gently adjust designs to show a clearer nine-branched shape while still allowing for creativity.
How long will the artwork last?
Artwork made with quality paper and stored flat in a dry place can last for many years. Protecting the surface with a frame or sleeve and keeping it away from direct sun will help preserve the colors.
Making the Handprint Menorah Part of Your Hanukkah Tradition
Repeating this craft each year can become as much a tradition as lighting candles or playing dreidel. Displaying older versions alongside the current year’s artwork creates a timeline of your child’s growth and your family’s celebrations.
Whether this is your first Hanukkah craft or one of many, a handprint menorah invites children to place their hands—literally and symbolically—into the heart of the holiday, lighting up your home with color, creativity, and connection.