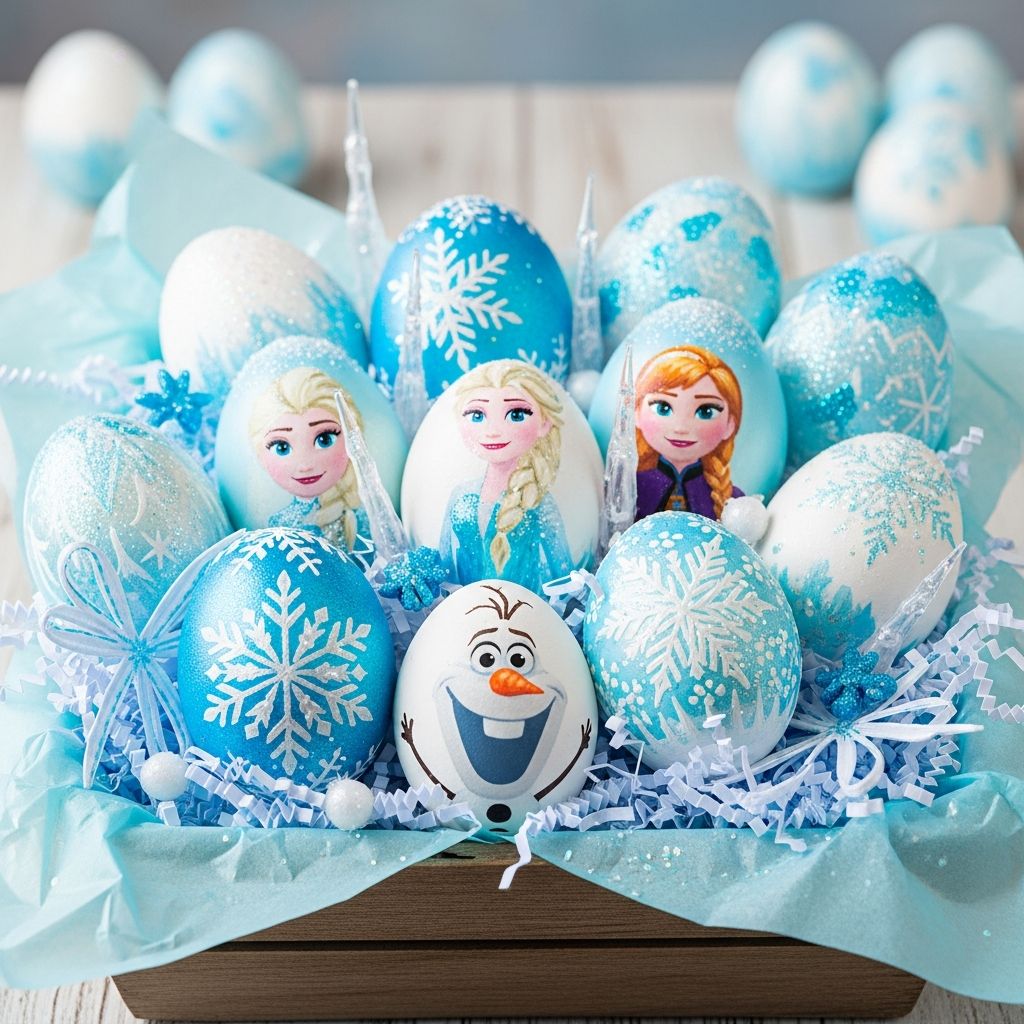
If your family still sings along to every song from the Frozen movies, turning Easter eggs into tiny works of Arendelle art is a perfect way to celebrate the season. This guide shows you how to create dazzling, Frozen-inspired Easter eggs using simple supplies, kid-friendly techniques, and plenty of sparkle.
Why Frozen-Themed Easter Eggs Are a Hit
Frozen-inspired eggs combine two kid favorites: a beloved story and hands-on crafting. Children love seeing familiar colors and characters appear on something as small and simple as a dyed egg, and adults appreciate that most designs can be made with basic household craft supplies.
These projects work well for Easter baskets, spring parties, movie marathons, or even birthday celebrations with a Frozen theme. You can customize the complexity to match the age of your crafters, from easy stickers-and-markers ideas to more detailed painted character designs.
Planning Your Frozen Craft Session
A little preparation turns decorating into a relaxed and memorable activity instead of a chaotic mess. Set up a dedicated surface, gather all materials before inviting kids to the table, and decide how many designs you want to attempt in one sitting.
- Cover the work area with a plastic tablecloth or parchment paper for easy cleanup.
- Use egg cartons as drying racks to keep finished designs safe while they set.
- Place cups of water, paper towels, and wipes within reach for quick cleanups and color changes.
Essential Supplies for Frozen-Inspired Eggs
Most Frozen-style designs rely on a cool color palette, shimmering accents, and simple drawing or painting tools. You can create a wide variety of looks without spending much by mixing and matching items you may already own.
| Type | Examples | Why It Helps |
|---|---|---|
| Eggs | Hard-boiled, blown-out, or wooden eggs | Provide the base for decorating; wooden or plastic options last beyond the season. |
| Coloring mediums | Food dye, acrylic paint, markers | Create the signature icy blues, purples, and whites seen in the Frozen movies. |
| Shimmer & sparkle | Glitter, iridescent nail polish, metallic pens | Add a frosty, magical finish that feels straight out of Elsa’s ice palace. |
| Adhesives | Craft glue, glue dots, double-sided tape | Secure rhinestones, sequins, paper cloaks, and other embellishments. |
| Decorative details | Stickers, rhinestones, sequins, snowflake confetti | Quickly transform simple eggs into intricate designs without advanced painting skills. |
Consider setting up separate trays or containers labeled by type (color, glitter, stickers) so children can easily find what they need without knocking over supplies.
Color Palette Ideas Inspired by Arendelle
Frozen’s visual style centers on cool tones and frosty accents, which translate beautifully to Easter egg designs. Using a consistent set of colors across your eggs makes the collection look intentional and cohesive even if the individual designs are quite different.
- Elsa palette: Ice blue, white, silver, and clear or iridescent glitter.
- Anna palette: Deep purple, raspberry pink, black, and touches of green or gold.
- Olaf palette: Bright white, orange for the nose, and black accents.
- Snowy landscape palette: Soft blue, pale lavender, white, and subtle sparkles.
Elsa-Inspired “Ice Magic” Eggs
Elsa-themed eggs are all about cool colors and glittery details that mimic ice and snow. The goal is to suggest swirling magic rather than recreate an exact costume, which keeps designs simple and adaptable for different ages.
Steps for a Shimmering Elsa Egg
- Dye or paint the egg a pale or medium blue and let it dry fully.
- Use a thin brush or paint pen to draw sweeping, curved lines to represent icy wind or magic.
- While the paint or glue is still tacky, sprinkle fine glitter or gently press on snowflake-shaped confetti.
- Optionally, add small rhinestones in a vertical line to echo the sparkle of Elsa’s gown.
For very young children, skip the detailed lines and simply let them roll lightly glue-coated eggs in glitter for a less precise but still magical result.
Anna-Inspired Cozy Spring Eggs
Anna’s style leans warmer and more rustic, which provides a nice contrast to icy designs. Her looks adapt well to floral and folk-art style decorations, making these eggs perfect for welcoming spring.
How to Make an Anna-Style Egg
- Color the egg deep purple or dark blue and allow it to dry.
- With paint pens or markers, add simple floral shapes such as tulips, stems, and dots in green, pink, and yellow.
- Draw a narrow band or “belt” around the center of the egg in black or gold to hint at the shapes of her outfit.
- Seal the designs with a thin layer of clear-drying glue or decoupage medium if you want added durability.
Encourage kids to choose their own flower patterns; they do not need to match anything from the film to feel like they belong in Anna’s bright, friendly world.
Olaf Snowman Eggs That Make Everyone Smile
Olaf is naturally suited to egg decorating because his round, snowball-like sections mirror the egg’s shape. You can attempt a full character face or keep it very minimal with just a carrot nose and expressive eyes.
Simple Olaf Face Egg
- Start with a white egg; if your eggs are brown, paint them with white acrylic paint and let them dry.
- Use a pencil to lightly sketch two large eyes, a wide smiling mouth, and the general placement of the nose.
- Fill in the eyes and mouth with a fine black marker or paint pen.
- Cut a tiny triangle from orange paper or foam and glue it on as the carrot nose.
- For fun, glue short pieces of brown paper or pipe cleaners to the top of the egg to mimic his twig hair.
If drawing faces feels intimidating, create a line of white eggs and simply add orange noses and stick-like hairs, calling them “Olaf’s snowball cousins.” Children will still recognize and enjoy the theme.
Snowflake & Ice Palace Pattern Eggs
Not every egg needs to look like a specific character. Abstract snowflakes, crystals, and icy patterns can be just as beautiful and much quicker to create in larger quantities.
- Use a white crayon to draw snowflakes on an egg before dipping it in blue dye; the wax will resist the color, leaving crisp designs.
- Draw vertical, angular lines in silver pen to suggest towering ice crystals from an enchanted palace.
- Layer two or three shades of blue paint with a sponge to produce a frosty ombré effect.
Mixing detailed snowflake eggs with character-inspired ones creates a balanced display that feels like an entire Frozen landscape in miniature.
Textured “Snow Dusted” Eggs
Texture makes eggs look more like they have been individually dusted with real snow. While glitter is the fastest option, other materials can add soft or crunchy effects that children love to touch.
Ideas for Adding Texture
- Brush a thin layer of glue on the lower half of the egg and roll it in coarse salt or sugar, then let it dry completely.
- Use white puffy paint to add small raised dots that look like falling snow.
- Press tiny pieces of tissue paper into wet glue for a soft, snowdrift-style effect.
Reserve heavily textured eggs for display only instead of hiding them in outdoor egg hunts, where the surfaces might be damaged.
Quick No-Paint Ideas for Young Crafters
When working with toddlers or young preschoolers, simple sticker-based or marker-based projects are safer and more manageable than complex painting techniques. The key is to provide large, easy-to-handle decorative elements.
- Wrap eggs with patterned washi tape in Frozen colors like blue, purple, and white.
- Use character stickers on plain or lightly dyed eggs, then add snowflake doodles with a metallic pen.
- Draw basic shapes such as hearts, stars, or swirls and let children add glitter glue on top.
Set expectations that these eggs may look more abstract and less like exact characters, emphasizing fun and creativity over precision.
Display Ideas for Your Frozen Egg Collection
Once your eggs are decorated, displaying them creatively helps showcase all the work that went into each design. Simple props and containers transform a regular table into an Arendelle-inspired scene.
- Arrange eggs in a white or silver basket with light blue tissue paper to mimic snowbanks.
- Use clear glass jars to layer eggs in different shades of blue and white, like icy towers.
- Place eggs on cupcake stands or mini pedestals and sprinkle fake snow or glitter around the base.
If you plan to keep certain eggs from year to year, consider using wooden or plastic eggs for those particular designs so they remain sturdy and safe to store.
Safety and Cleanup Tips for Families
Easter crafting is more enjoyable when everyone stays safe and the mess feels manageable. Simple rules and preparation keep the focus on creativity rather than stress.
- Keep very small items like rhinestones and sequins away from children who still put objects in their mouths.
- Use washable paints and markers when possible, especially with younger kids.
- Have a designated “drying zone” where eggs can rest undisturbed until fully set.
- Dispose of cracked eggs promptly if you plan to eat any of the hard-boiled versions later.
Involving kids in the cleanup process, such as gathering brushes and wiping the table, helps signal the end of craft time and makes future sessions easier to manage.
Frequently Asked Questions About Frozen-Inspired Easter Eggs
Can these decorated eggs be eaten safely?
Eggs that are dyed with food-safe coloring and kept refrigerated can usually be eaten if the shells are intact, but any eggs coated in craft paint, glue, glitter, or other non-food materials should be considered decorative only. To avoid confusion, keep edible and non-edible eggs in separate cartons or baskets and label them clearly.
How long will the decorated eggs last?
Hard-boiled eggs used for decoration should typically be discarded after several days, especially if they have been left unrefrigerated for more than a couple of hours. For keepsake designs that you want to display every year, use wooden, plastic, or blown-out eggs and store them gently in tissue-lined boxes.
What if I am not good at drawing characters?
You do not need to be an artist to create charming Frozen-inspired eggs. Focus on simple symbols like snowflakes, hearts, and icy swirls, and rely on stickers, tape, and pre-made embellishments instead of detailed portraits of characters.
Can I make these projects with a large group of kids?
These ideas adapt well to parties, classroom events, or community gatherings as long as the setup is organized. Prepare sample eggs in advance, pre-portion supplies in small containers, and choose two or three of the simpler designs so children are not overwhelmed by too many choices.
How can I reduce the mess from glitter and paint?
Glitter is easiest to manage when used over a tray or shallow box that catches stray sparkles. For paint, give each child a small palette or plate, limit the number of colors at one time, and have everyone wear old clothing or aprons that can handle a few splatters.
Bringing a Touch of Arendelle to Spring
Frozen-inspired Easter eggs allow your family to revisit favorite characters and scenes while experimenting with color, texture, and design. Whether you opt for polished character portraits or messy abstract snowstorm patterns, the experience of crafting together is what makes the project memorable.
By mixing simple techniques, accessible materials, and a little imagination, you can fill baskets with shimmering eggs that look like they tumbled straight out of a snowy kingdom and into your spring celebration.