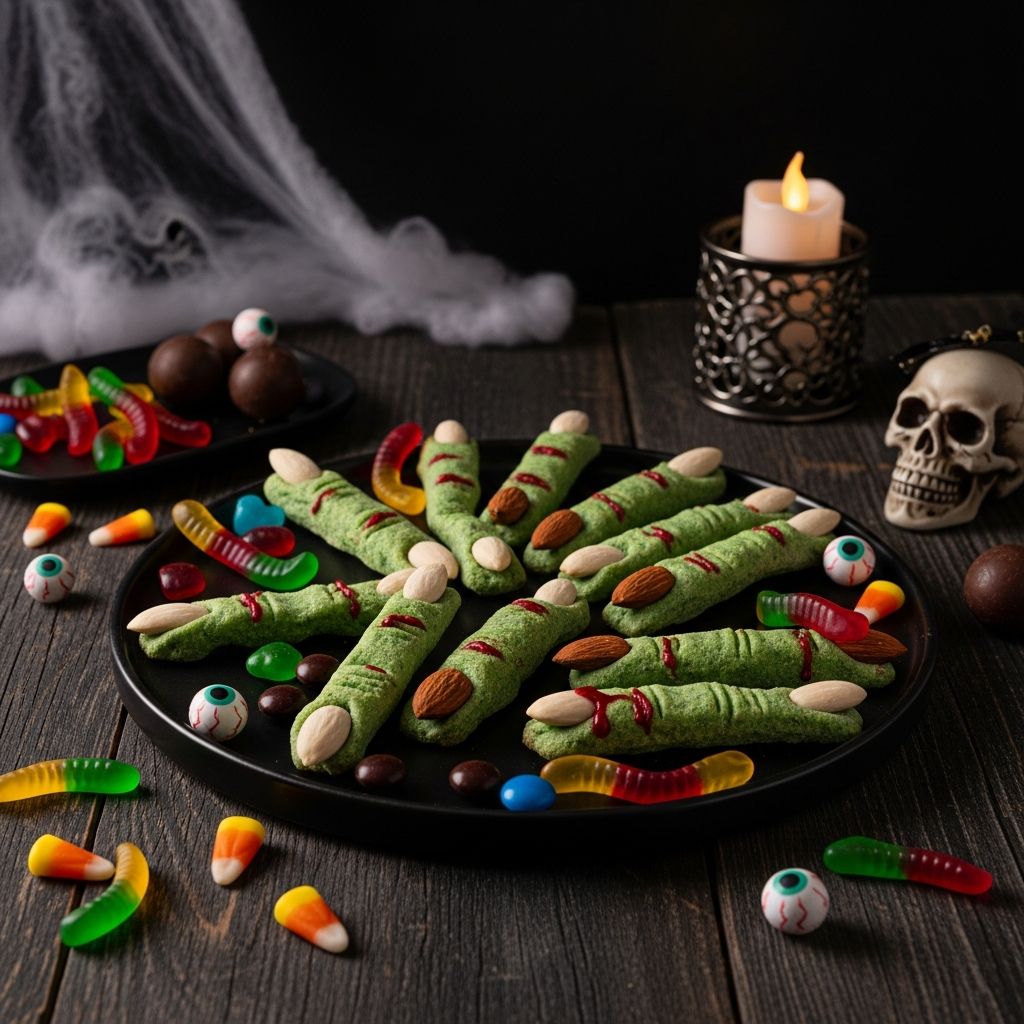
Frankenstein finger Halloween snacks are a fun, spooky, and surprisingly simple way to dress up your party table without spending hours in the kitchen. These creepy-cute treats look like little monster fingers but taste like sweet-and-salty party snacks that kids and adults both enjoy.
Why Frankenstein Finger Snacks Are Perfect for Halloween
Halloween parties often need treats that are playful, visually dramatic, and quick to prepare. Frankenstein fingers check all of those boxes while still using budget-friendly ingredients that are easy to find in any supermarket.
- Kid appeal: The fun monster look makes them instant favorites with children and teens.
- Flexible ingredients: You can make them with pretzel rods, cookies, or even savory options like wrapped pickles.
- Party-ready: They look great on a platter, beside cupcakes, punch, or other themed snacks.
Main Types of Frankenstein Finger Snacks
There are many ways to create Frankenstein-inspired fingers, so you can choose the version that best matches your time, skill level, and guests’ tastes. Below is an overview of the most popular styles you can use as a starting point.
| Type | Main Base | Texture | Difficulty |
|---|---|---|---|
| Pretzel Fingers | Pretzel rods | Crunchy, salty, sweet coating | Very easy |
| Cookie Fingers | Shortbread or sugar cookie dough | Soft, crumbly, buttery | Moderate |
| Pickle Fingers | Whole pickles wrapped in dough | Savory, chewy crust | Easy |
| Candy Bar Fingers | Fun-size chocolates or candy bars | Rich, sweet, dense | Easy |
You can mix and match these types on a single Halloween dessert table to provide variety in flavor and texture while keeping the spooky Frankenstein theme consistent.
Essential Ingredients for Frankenstein Fingers
Although there are several versions of Frankenstein fingers, most share a few core components: a finger-shaped base, a green coating or dough, and a nail-like decoration. Below is a general shopping list you can adapt to your preferred style.
Basic Shopping List
- Pretzel rods or cookie dough (shortbread or sugar cookie work best)
- White candy melts or white chocolate for coating
- Green gel or liquid food coloring
- Slivered or whole almonds for fingernails
- Dark icing gel, melted chocolate, or edible marker for knuckle lines
- Optional: red decorating gel or jam for a “bloody” effect at the base of the finger
If you are making a savory version, you can skip the chocolate and sweets and use whole pickles, pie crust or puff pastry, and hot sauce or ketchup as your decorative accents.
How to Make Pretzel Frankenstein Fingers
Pretzel-based Frankenstein fingers are one of the easiest options because they require no baking and very little prep time. They are ideal for last-minute party plans or for cooking with kids who want to help decorate.
Step-by-Step Instructions
- Prepare the coating: Melt white candy melts or white chocolate in a microwave-safe bowl, stirring every 20–30 seconds until smooth. Tint the melted mixture with green food coloring until you reach a Frankenstein-like shade.
- Thin if needed: If the coating is too thick, stir in a small amount of neutral oil (such as vegetable or canola oil) to make dipping easier while still giving good coverage.
- Dip the pretzels: Hold each pretzel rod by one end and dip it about halfway or two-thirds of the way into the green coating. Gently shake off excess coating and place the dipped rods on parchment paper or a silicone mat.
- Add the fingernails: While the coating is still wet, press a slivered or whole almond onto the tip of each dipped pretzel to act as a creepy nail. Angle it slightly for a more realistic look.
- Create knuckles: Use a toothpick, a small knife, or a dark icing gel to draw horizontal lines where a finger’s joints would be. Two or three shallow indentations or lines give a great effect.
- Let them set: Allow the coated pretzels to sit at room temperature or in the refrigerator until the green coating hardens completely.
Once set, arrange the pretzel fingers on a Halloween platter or tuck them into clear treat bags tied with ribbon for party favors and classroom treats.
How to Make Cookie-Based Frankenstein Fingers
Cookie fingers are a classic option if you enjoy baking and want a more substantial dessert. The dough is shaped into long, bony fingers before baking and then decorated with nails and optional “blood” details.
Shaping and Baking the Fingers
- Prepare the dough: Use your favorite shortbread or sugar cookie dough recipe or a store-bought dough. Tint the dough with green food coloring before chilling.
- Shape the fingers: Roll chilled dough into thin logs, about the width of a real finger, and slightly taper one end for the fingertip.
- Form knuckles: Gently pinch the dough in one or two spots along each log to create knuckle bulges. Use a knife to score small lines across each knuckle.
- Add nails: Press a whole almond into the tapered end of each finger to form a nail, making sure it is partly embedded so it sticks during baking.
- Bake: Arrange the shaped fingers on a lined baking sheet and bake according to your dough recipe time and temperature until the edges are just lightly golden.
- Finish the details: Once cooled, you can brush or pipe a little red gel or jam at the base of each finger for a gory effect, or leave them simple and green for a kid-friendlier version.
These cookies are perfect for dessert tables and can be stored in an airtight container for several days, making them easy to prepare ahead of your Halloween gathering.
Fun Decorating Ideas and Variations
One of the best parts of Frankenstein finger snacks is how easily you can customize them. Small changes in color, decorating style, or base ingredients can completely transform the final look.
- Different nail textures: Try pumpkin seeds, sunflower seeds, or cut pieces of licorice instead of almonds if you need a nut-free option.
- Glow-in-the-dark green: Use bright neon green gel color for a more cartoonish, kid-friendly Frankenstein vibe.
- Hairline cracks and scars: Draw thin zigzag scars or stitch marks with black or dark purple icing for extra monster detail.
- Bloody stumps: Dip the base of each finger in red candy melts, jam, or gel icing so it looks like the finger has been chopped off.
- Monster hands: Arrange five fingers around a round cookie or mini cupcake to resemble a whole monster hand reaching out of your serving dish.
Serving Suggestions for Parties and Classrooms
Once your Frankenstein fingers are ready, how you display them can make them even more memorable. Simple props and themed serving ideas can turn a basic snack into a centerpiece.
- Stand pretzel fingers upright in a jar filled with candy corn or jelly beans so it looks like a jar of monster fingers.
- Lay cookie fingers on a black tray lined with shredded green paper or edible moss for a graveyard effect.
- Serve savory pickle fingers with a side of “slime” dip, such as herbed cream cheese, guacamole, or spinach dip.
- Include small labels on toothpicks that say things like “Frankenstein’s Leftovers” or “Monster Digits” for a humorous touch.
Storage and Make-Ahead Tips
Planning ahead is essential for stress-free Halloween parties, and Frankenstein finger snacks are very forgiving when it comes to storage. Most versions can be made at least a day in advance, sometimes more.
- Pretzel fingers: Store at room temperature in an airtight container away from heat and humidity so the coating does not get sticky.
- Cookie fingers: Keep in a sealed container; add a sheet of parchment between layers to protect the decorations.
- Pickle fingers: Store covered in the refrigerator and reheat briefly in the oven if you want the pastry to crisp back up.
- Travel and gifting: Pack individual fingers in treat bags or boxes with padding so the nails do not break during transport.
Healthy and Allergen-Friendly Adjustments
If you are making Frankenstein fingers for a classroom, school event, or mixed group, it is smart to consider common dietary needs. You can adapt the basic idea to be friendlier for more guests without losing the spooky fun.
- Nut-free: Replace almond nails with pumpkin seeds, candy pieces, or small rectangles of fruit leather.
- Gluten-free: Use gluten-free pretzel rods or dough, and double-check candy melts or decorations for gluten-free labels.
- Lower sugar: Focus on savory versions with pickles and pastry, or use lightly sweetened cookie dough and minimal icing.
- Dairy-free: Choose dairy-free chocolate or candy coating, and avoid butter-based doughs if necessary.
Frequently Asked Questions (FAQs)
1. Can kids help make Frankenstein finger snacks?
Yes, these snacks are very kid-friendly to assemble. Adults can handle melting chocolate or baking, while children can dip, press on nails, and draw knuckles or scars with icing.
2. How far in advance can I prepare them?
Pretzel and cookie versions can usually be prepared one to three days before serving if stored properly in airtight containers. Add any delicate decorations, such as gel icing, on the day of the event for the best appearance.
3. Do Frankenstein fingers need to be refrigerated?
Cookie and pretzel fingers do not usually require refrigeration, as long as your kitchen is cool and dry, but savory versions with pickles and pastry should be kept chilled. Always follow safe food-handling guidelines for your specific ingredients.
4. What if I do not have candy melts?
You can substitute white chocolate chips or baking bars melted gently and tinted with green food coloring. Add a small amount of neutral oil if needed to reach a smooth, dippable consistency.
5. How can I make them look extra realistic?
Shape fingers thinner and more bony, add more detailed knuckle lines, and smudge a bit of cocoa powder or darker green coloring in the creases. A touch of red gel around the base of the finger also adds a gruesome but effective finishing touch.
Frankenstein finger Halloween snacks are a simple way to turn ordinary ingredients into a themed treat that earns plenty of attention on any spooky buffet. With just a little creativity in shaping and decorating, you can customize them for kids, adults, and every kind of Halloween celebration.