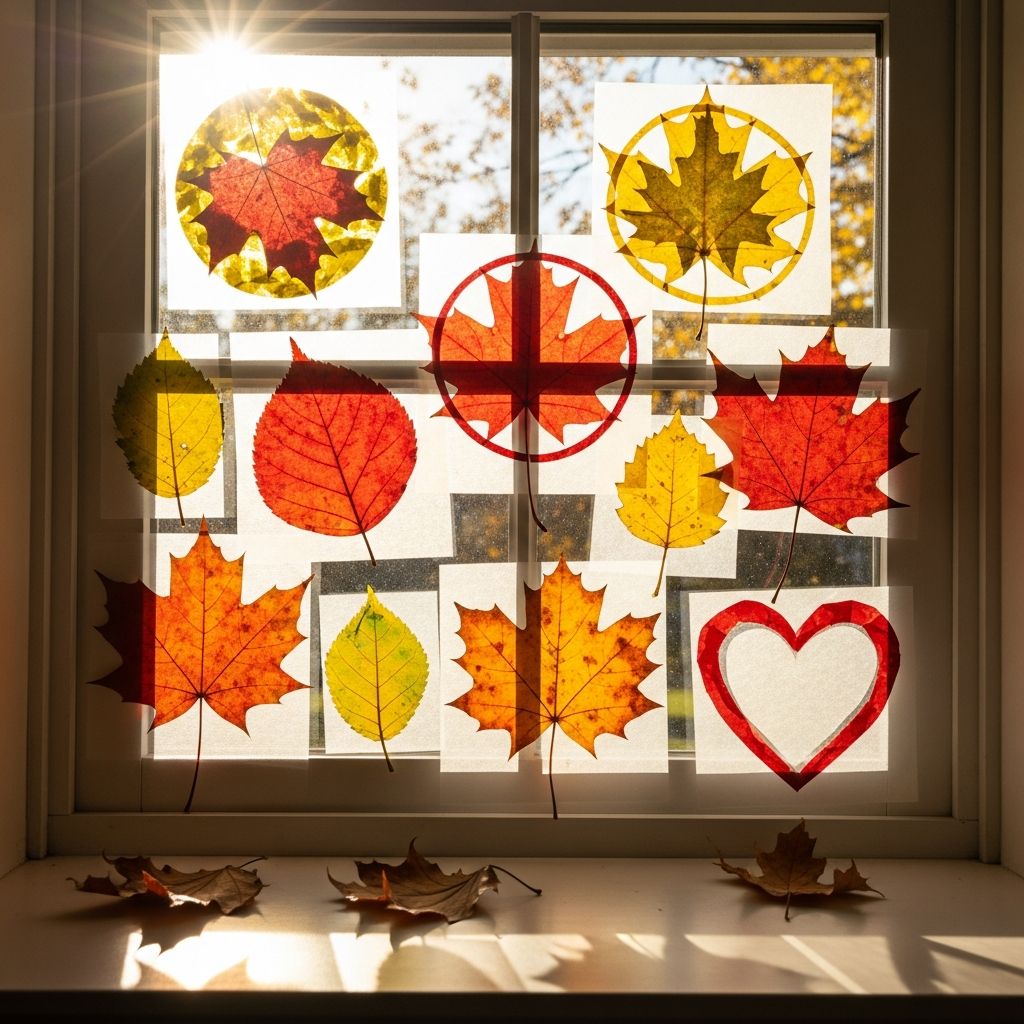
When autumn paints the trees in shades of gold, red, and orange, you can bring that color indoors with a simple, beautiful project: fall leaf suncatchers. This kid-friendly craft transforms real leaves into glowing window art using clear contact paper and a few basic supplies. It is low-mess, inexpensive, and easy to adapt for toddlers through school-age children.
Why Leaf Suncatchers Are a Perfect Fall Project
Leaf suncatchers sit at the intersection of art, science, and outdoor play. Children begin with a nature walk, collecting leaves, and end with a finished piece that changes throughout the day as the sun shifts behind it. At the same time, they are building motor skills, creativity, and an early appreciation for seasonal change.
Spending time outdoors and engaging with natural materials has been linked with better attention, social development, and reduced stress in children, especially when activities are unstructured and exploratory. Combining that outdoor time with hands-on art offers both sensory and emotional benefits.
Materials: What You Need to Get Started
You can make this craft with simple household supplies. Most items are reusable across many projects, so they are a good addition to a family craft bin.
- Fresh fall leaves (flat, dry, and colorful)
- Clear contact paper or transparent self-adhesive laminating sheets
- Cardstock or construction paper for optional frames
- Scissors (child-safe scissors for kids)
- String, ribbon, or yarn for hanging
- Hole punch (optional, for making hanging holes)
- Washable markers or crayons to decorate frames
- Clear tape if you prefer taping directly to a window instead of hanging
If you want a more durable project, you can gently press the leaves between sheets of paper and heavy books for a week so they dry flat before crafting. Pressing reduces curling and preserves color longer by removing moisture.
Step-by-Step: Making a Classic Leaf Suncatcher
The basic method is simple: leaves are sandwiched between two sticky layers of clear contact paper. The transparent layers act like a low-tech laminate, holding everything together while still letting light shine through.
1. Go on a Leaf Hunt
Turn collection into a mini adventure:
- Walk through your yard, park, or neighborhood and look for fallen leaves.
- Choose leaves that are dry to the touch but not yet brittle or crumbly.
- Look for a variety of sizes, colors, and shapes to add interest.
- Avoid leaves with mold, mud, or obvious insect damage.
This is a good moment to talk about why leaves change color and fall. As days shorten and temperatures drop, many trees break down chlorophyll (the green pigment) and reveal reds, oranges, and yellows that were previously masked.
2. Prepare the Sticky Base
- Cut a rectangle or circle of clear contact paper slightly larger than the area you want to fill with leaves.
- Peel the backing from one sheet and lay it sticky side up on a table.
- Use a bit of tape on the corners to keep it from shifting while kids work.
3. Arrange the Leaves
Encourage children to experiment with arrangement:
- Press leaves gently onto the sticky side, with the most colorful side facing up.
- Overlap some leaves for a layered, stained-glass effect.
- Leave narrow gaps between some leaves so light can shine through unblocked areas.
Older children can create patterns or radial designs, while younger kids simply cover the surface. The tactile sensation of pressing leaves and smoothing them helps build fine motor control.
4. Seal the Suncatcher
- Cut a second piece of contact paper the same size as the first.
- Starting from one edge, peel a small section of the backing and carefully align it with the base.
- Press down slowly, peeling away more backing bit by bit while smoothing with your hand or a soft cloth to push out air bubbles.
- When finished, the leaves should be fully enclosed between the two sticky layers.
5. Trim and Finish the Edges
- Use scissors to cut around the edge of the leaf-filled area, leaving a thin clear border to keep the seal intact.
- If you want a frame, glue or tape the suncatcher behind a cardstock shape (such as a big leaf outline, circle, or heart) and cut away any extra contact paper.
6. Hang in a Sunny Spot
- Punch a hole at the top of the frame or clear border.
- Thread yarn, string, or ribbon through the hole and tie a loop.
- Hang from a window latch, curtain rod, or small adhesive hook.
- Alternatively, skip the string and tape the suncatcher directly to a window.
Creative Variations to Try
Once you have tried the basic version, you can customize leaf suncatchers for different ages, holidays, or learning themes.
Shape-Themed Leaf Suncatchers
Instead of a plain rectangle, build suncatchers around recognizable shapes:
- Big leaf outlines: Trace large maple or oak shapes on construction paper, cut out the centers, and fill the window with leaves.
- Geometric designs: Use circles, triangles, or hexagons to sneak in early math vocabulary.
- Seasonal silhouettes: Pumpkins, apples, acorns, or even simple animals like owls or foxes.
Mixed-Media Autumn Windows
Blend natural materials with simple art supplies:
- Add tissue-paper squares in fall colors between leaves for more light diffusion.
- Include pressed flower petals or small fern fronds.
- Let kids draw veins, patterns, or words on the contact paper frame with permanent markers (adult supervision suggested).
Mandala-Style Circular Designs
Create a mandala by working from the center outward:
- Start with a small leaf or flower in the middle.
- Place leaves in concentric rings, alternating sizes or colors.
- Encourage children to repeat patterns: big leaf, small leaf, big leaf, small leaf.
Table: Simple Ways to Adapt by Age
| Age Group | Adult Preparation | Child Tasks |
|---|---|---|
| Toddlers (1.5–3) | Precut contact paper, tape it down, pre-collect leaves | Stick leaves anywhere, press with hands, explore textures |
| Preschoolers (3–5) | Assist with leaf hunting and peeling backing | Arrange leaves, help smooth top layer, choose hanging spot |
| Early Elementary (6–8) | Provide materials and safety tips | Cut simple frames, plan patterns, write names or fall words |
| Older Kids (9+) | Minimal prep beyond gathering supplies | Design complex layouts, experiment with symmetry, help younger siblings |
Learning Benefits Hidden Inside This Craft
Leaf suncatchers feel like pure fun, but they also support several important developmental areas.
Fine Motor Skills and Coordination
- Peeling contact paper backing challenges finger strength and dexterity.
- Placing and repositioning leaves builds hand–eye coordination.
- Cutting simple frames or trimming edges gives extra scissor practice for preschoolers and older kids.
Early Science and Observation
- Children notice differences in leaf shape, color, and texture.
- You can talk briefly about tree species and seasonal cycles.
- Watching colors fade over weeks provides a natural introduction to change over time.
Social & Emotional Benefits
- Shared nature walks and group crafting support family connection and cooperative skills.
- Displaying kids’ artwork in a window gives a sense of pride and ownership.
- Repetitive, hands-on tasks like sticking and smoothing can feel calming for many children.
Practical Tips for a Smooth Craft Session
A little planning can keep the process relaxed and enjoyable, especially with younger kids.
- Work on a washable surface such as a kitchen table or plastic mat.
- Keep contact paper stable by taping down corners so it does not fold onto itself.
- Offer choice: let children choose frame shapes, leaf combinations, or hanging locations.
- Limit perfectionism by focusing on process—exploring leaves and light—rather than making a flawless final product.
- Store extra leaves in a book or folder to use for additional crafts on another day.
Frequently Asked Questions (FAQs)
Do the leaves need to be pressed and dried before we start?A: You can use freshly fallen leaves as long as they are dry and not soggy. Pressed leaves will stay flatter and keep their color longer, but for a quick weekend project, unpressed leaves work well.
Q: How long will our leaf suncatchers last?
Expect the brightest colors during the first few weeks. Over time, sunlight and air will slowly fade and brown the leaves. If you want to save them, move finished suncatchers away from direct sun and store them in a cool, dry place.
Is clear contact paper safe for young children to use?
Clear contact paper is widely used for children’s crafts and classroom projects. Adults should cut sheets in advance and supervise toddlers closely, especially when scissors are involved. Always follow the safety guidance on the product’s packaging.
Can we make this craft in a classroom or group setting?
Yes. Prepare smaller contact paper sheets ahead of time, organize leaves by type or color in trays, and set up a rotating station so only a few children handle sticky surfaces at once. Older students can help younger ones arrange leaves or smooth the top layer.
What if we do not have many colorful trees nearby?
Use what you can find—green leaves, grasses, or small flat flowers—and combine them with tissue paper or colored cellophane pieces. The light shining through mixed materials still creates a beautiful effect and introduces kids to the idea of transparency and color mixing.
References
- Green Cities: Good Health – Children & Nature — University of Washington / USDA Forest Service. 2010-06-01. https://depts.washington.edu/hhwb/Thm_Child.html
- Green Environments and Cognitive Development in Primary Schoolchildren — Amoly et al., Proceedings of the National Academy of Sciences. 2014-06-24. https://www.pnas.org/doi/10.1073/pnas.1404529111
- Drying and Preserving Plant Materials for Decorative Uses — North Carolina State University Extension. 2015-03-01. https://content.ces.ncsu.edu/drying-and-preserving-plant-materials-for-decorative-uses
- Why Do Leaves Change Color in the Fall? — U.S. Forest Service. 2015-09-28. https://www.fs.usda.gov/inside-fs/out-and-about/why-do-leaves-change-color-fall
- Guide to Fine and Visual Motor Skills — American Occupational Therapy Association. 2021-04-01. https://www.aota.org/practice/children-youth/school-based/fine-motor-skills