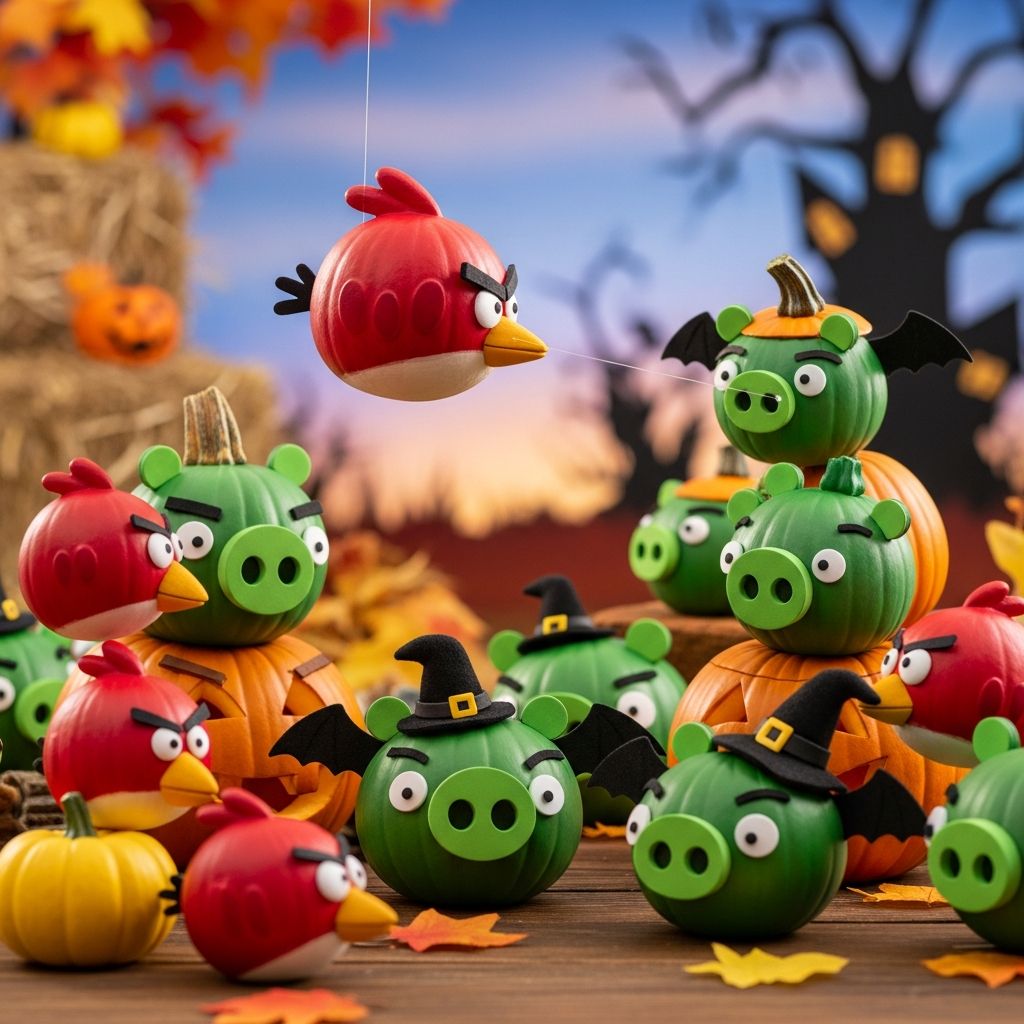
Decorating pumpkins does not have to involve sharp tools, complicated carving, or spooky faces. A playful twist is to turn your pumpkins into silly green pigs reminiscent of the pigs from the Angry Birds universe, using paint, paper, and a few easy embellishments. This guide walks you through everything you need to create a full “pig pen” of characters that kids and adults can design together.
Why Choose Pumpkin Pigs?
Pig-themed pumpkins are ideal for families who want a lighthearted, cartoon-style Halloween display instead of something scary. Because the design focuses on painting and gluing, it is accessible for younger children when supervised, and it avoids the mess and risk that come with traditional carving.
Decorated pumpkins also last longer than carved ones, especially if you keep them indoors or on a covered porch. A pig-themed set can double as party decor, a game prop, and a fun photo backdrop for trick-or-treaters.
Gathering Your Supplies
Before starting, decide how many pigs you want to make so you can buy enough pumpkins and green paint. You can scale this project from one centerpiece pumpkin to a whole group that looks like a stack of mischievous characters.
Core materials
- Small to medium pumpkins (real or artificial, one per pig)
- Acrylic craft paint in several shades of green (light, medium, dark)
- White, black, and pink acrylic paint for facial details
- Paintbrushes in assorted sizes (a wide brush for base coats, small brushes for details)
- Thick white cardstock or lightweight cardboard for ears, crowns, and other accessories
- Scissors
- Craft glue or a low-temperature glue gun
- Black marker or paint pen for outlining features
Optional embellishments
- Googly eyes for a cartoon look
- Foam sheets in green, yellow, black, and pink
- Glitter glue for crowns and special accents
- Pipe cleaners for eyebrows, mustaches, or spectacles
- Felt scraps for ears or noses if you prefer fabric to paper
- Clear spray sealer to help protect painted surfaces (for adults to apply)
Preparing Your Pumpkins
Good preparation makes decorating easier and helps the paint adhere properly. Plan to do this step slightly ahead of your craft session if you are working with a group of children.
Cleaning and drying
- Wipe each pumpkin with a damp cloth to remove dirt and dust.
- If there are stubborn spots, clean them gently with a bit of mild soap and water, then wipe again with a clean damp cloth.
- Allow pumpkins to dry completely so paint does not bubble or peel.
Optional priming
Acrylic paint usually covers pumpkins well, but a primer layer can provide a more even base color.
- For bright colors, apply a coat of white acrylic or gesso and let it dry.
- For a deeper, more saturated green, try a light grey or beige primer.
Painting the Pig Base Color
The base coat turns your pumpkin into a simple green sphere that can then receive personality through facial features and accessories. Varying the shades of green helps each pig look unique.
Choosing your greens
- Use a light, yellowish green for goofy or baby pigs.
- Choose a medium grass green for classic characters.
- Mix in a bit of blue for darker, more serious expressions.
Applying the base coat
- Place your pumpkin on scrap paper or an old tablecloth to protect the surface.
- Use a wide brush to paint the entire pumpkin in your chosen green, avoiding the stem if you want to keep it natural.
- Allow the first coat to dry, then apply a second layer for smooth coverage.
- For added dimension, lightly brush a slightly different green across ridges while the paint is still a bit tacky.
Designing Pig Faces
The face is where each pumpkin pig’s personality really shows. Think about mood before you start: silly, grumpy, sleepy, or regal. Light pencil guidelines on the pumpkin can help you plan placement before committing with paint or markers.
Key facial features
| Feature | How to Make It | Personality Tips |
|---|---|---|
| Eyes | Paint two white ovals or circles, then add black pupils. You may also glue on googly eyes. | Crossed pupils look silly; half-lidded eyes look bored or sleepy. |
| Snout | Paint a lighter green or oval of foam; add two dark nostrils near the top. | A larger snout feels more cartoonish and friendly. |
| Eyebrows | Use black paint, a marker, or thin foam strips above the eyes. | Angled downwards in the middle creates an angry or determined look. |
| Mouth | Draw a simple line or “U” shape; add teeth with white rectangles if desired. | A curved smile makes the pig look goofy rather than scary. |
Step-by-step facial details
- Lightly sketch the eye placement in pencil where the pumpkin is flattest.
- Paint the white parts of the eyes and let them dry.
- Add the snout below the eyes using a lighter green circle or oval.
- Paint or glue on nostrils, then add black pupils to the eyes.
- Draw eyebrows and a mouth with a fine brush or paint pen.
- Once everything is dry, outline major features with a black marker to make them pop.
Adding Ears, Crowns, and Accessories
Accessories distinguish one pig from another and can hint at specific character roles: a king, a guard, or a prankster. Paper and foam are easy to cut and attach, and they keep the project lightweight and safe for children.
Creating basic ears
- Draw two rounded triangular shapes on green cardstock or foam.
- Cut them out and leave a small rectangular tab at the bottom for gluing.
- Fold the tabs backward and glue them to the top of the pumpkin on either side of the stem.
- For floppy ears, bend the top corners slightly or add a crease halfway down.
Crafting character accessories
- Crown: Cut a yellow strip with points along one side, size it to the pumpkin’s curve, and decorate it with dots of paint or glitter glue as “jewels.” Glue it near the stem on a designated “king” pig.
- Helmet or hat: Use darker paper to create a band that circles the top of the pumpkin and add simple shapes for side flaps or a front emblem.
- Glasses or mustache: Shape pipe cleaners into frames or a curly mustache and attach them with small dabs of glue.
- Bandages or patches: Paint or paste on white rectangles or darker green spots to suggest a clumsy or battle-worn pig.
Variety: Building a Whole Pig Pen
Part of the fun is creating a group of pigs that each look different but clearly belong together. Think of your display as a little scene where each character has a role or personality.
Character ideas
- The King Pig: Largest pumpkin, bright yellow crown, confident smile, and slightly smug eyebrows.
- The Sidekick: Medium pumpkin with one eye a bit larger than the other and a goofy grin.
- The Guard: Darker green, helmet accessory, stern eyebrows, and straight mouth.
- The Baby Pig: Small pumpkin, soft pastel green, tiny snout, and big wide eyes.
Display suggestions
- Cluster pumpkins at different heights using crates, boxes, or inverted bowls under a tablecloth.
- Scatter a few plastic or paper “eggs” around them to hint at the story inspiration.
- Use a dark cloth or fake grass mat beneath to define the “pig pen” area on your porch or table.
Hosting a Pumpkin Pig Craft Party
These pumpkins make a perfect group activity for a small Halloween get-together, classroom event, or birthday party. Because the steps are modular, you can set up stations so kids move through them gradually and share supplies.
Recommended activity flow
- Base coat station: Adults or older kids handle painting pumpkins green and setting them aside to dry.
- Face design station: Participants choose eye, snout, and mouth shapes from printed templates or sketch their own.
- Accessory station: Guests cut and assemble ears, crowns, and hats, then glue them on with adult supervision.
- Photo corner: Once pumpkins are complete, set up a simple backdrop so everyone can take a picture with their creation.
Tips for success with kids
- Pre-paint pumpkins green before the event if you have limited time.
- Offer simple face templates for younger children and encourage older kids to improvise their own designs.
- Label each pumpkin on the bottom so they do not get mixed up while drying.
- Provide smocks or old T-shirts to protect clothing from paint.
Safety and Mess Management
Even though this is a no-carve project, it still involves paint, scissors, and potentially hot glue. Setting clear rules and preparing your workspace will keep things fun instead of chaotic.
Safety guidelines
- Assign an adult to handle hot glue and any cutting that requires precision.
- Use child-safe scissors for kids and provide pre-cut shapes when possible.
- Keep drinks and snacks away from the crafting area to avoid ingesting paint or glue residue.
Easy cleanup strategies
- Cover tables with disposable paper or plastic tablecloths that can be rolled up and thrown away afterward.
- Keep a damp cloth or baby wipes handy for quick paint spills.
- Use paper plates or palette sheets for paint so you can toss them when done.
Making Your Pumpkins Last Longer
With a few basic steps, your pumpkin pigs can stay bright and cheerful well past Halloween. This is especially useful if you have used artificial pumpkins that you want to store and display year after year.
Preservation tips
- For real pumpkins, keep them out of direct sun and rain to reduce rot and fading.
- Apply a clear acrylic sealer (spray or brush-on) to protect painted areas once they are fully dry.
- If using artificial pumpkins, store them in a cool, dry place, wrapped lightly in tissue paper or bubble wrap.
FAQ: Pumpkin Pigs and Angry Birds–Inspired Crafts
Do I need to be good at drawing to make these pumpkins?
No. Simple shapes like circles, ovals, and triangles are enough to create expressive faces. You can also trace around small objects, use stencils, or cut shapes from paper or foam instead of painting freehand details.
Can I adapt this project for a classroom or large group?
Yes. For groups, pre-cut ear and snout shapes, pre-paint the pumpkins green, and set up stations for eyes, accessories, and final assembly. This keeps the activity moving and ensures everyone has time to finish.
What if I cannot use real pumpkins?
Foam or plastic craft pumpkins work very well and allow you to reuse your pig characters in future years. The painting and decorating process is almost identical; just use glue suitable for foam if that is your base material.
How do I keep the paint from chipping?
Allow each layer to dry completely before adding another, avoid handling the pumpkins by their decorated areas, and finish with a thin coat of clear sealer. Indoors or sheltered outdoor locations also help reduce wear.
Can I mix these with traditional Halloween decorations?
Absolutely. Pumpkin pigs look great alongside standard carved pumpkins, spider webs, and lanterns, adding a humorous element. They are especially effective near the entrance to your home, where their bright colors and funny faces can greet visitors.
Bringing Your Pig Pen to Life
Transforming ordinary pumpkins into colorful green pigs is a playful way to celebrate Halloween, especially for families who enjoy games and cartoons more than jump scares. With a little paint, a few simple craft supplies, and some imagination, each pumpkin becomes a unique character that can spark stories and laughter.
Whether you create a single crowned king pig or an entire herd of goofy sidekicks, this project offers a satisfying balance of creativity and accessibility. Set aside an afternoon, gather your supplies, and let each person design the pig that best matches their own personality.