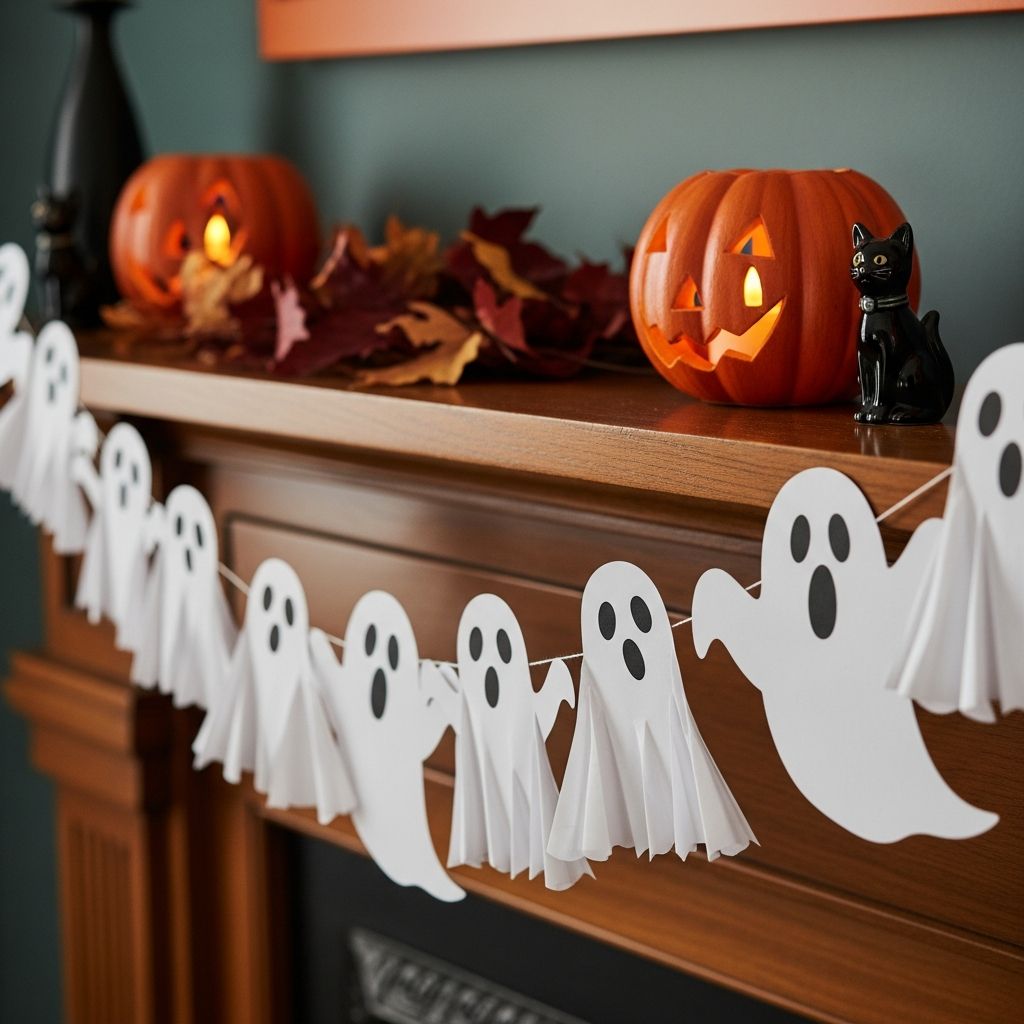
If you want Halloween decor that is inexpensive, lightweight, and fun to craft with kids, a paper ghost garland is one of the easiest projects you can make at home.
Why Paper Ghost Garlands Are Perfect for Halloween
Paper ghost garlands combine the charm of traditional Halloween decorations with the simplicity of basic crafting supplies. They can be customized to look cute, eerie, or downright silly, making them ideal for both young children and adults who love to decorate.
- They work in small spaces, hanging across shelves, windows, or doorways without adding clutter.
- They are budget friendly, using mostly materials you already have at home.
- They are easy to recycle or store flat after the season, which keeps cleanup simple.
Gathering Your Materials and Tools
This project is intentionally flexible: you can keep it minimal or add extra embellishments depending on the time and supplies you have. The list below covers the basics plus creative add-ons.
Essential Supplies
- White paper (printer paper, lightweight cardstock, or paper doilies)
- Black marker, pen, or crayon for faces
- String, baker’s twine, yarn, or thin ribbon
- Scissors suitable for paper
- Adhesive (tape, glue stick, or craft glue)
Optional Decorative Extras
- Colored pencils, crayons, or markers for rosy cheeks or details
- Glitter glue or metallic gel pens for magical effects
- Googly eyes, sequins, or tiny bows for added personality
- Hole punch and mini clothespins if you prefer to clip ghosts onto the string
Planning Your Garland: Style, Size, and Placement
Before cutting into your paper, think about how and where the garland will be displayed. A little planning helps you decide how many ghosts to make and what style suits your space best.
Consider These Design Choices
- Length: Measure the area you want to decorate, then plan to make enough ghosts to fill that distance without gaps that feel too large.
- Ghost size: Larger ghosts are great for mantels and walls, while smaller ghosts fit nicely on mirrors or shelves.
- Vibe: Choose between cute, cartoonish faces for a kid-friendly look or more dramatic, shadowy facial expressions for a spookier effect.
Deciding these elements upfront keeps the project focused and helps you prepare the right number of cutouts from the beginning.
Step-by-Step: Classic Paper Ghost Garland
This version uses individual paper ghosts attached to a single string. It is an excellent starting point for beginners and works well as a family craft session.
Step 1: Create a Simple Ghost Template
- Fold a small piece of scrap paper in half and sketch half of a ghost shape (rounded head on top, gently wavy bottom).
- Cut along your sketch and unfold to reveal a symmetrical ghost template.
- Adjust the shape until you are happy with the height, width, and curve of the tail.
Step 2: Trace and Cut Multiple Ghosts
- Place the template on your chosen paper and lightly trace around it as many times as needed.
- Stack two or three sheets of paper, if your scissors are sharp, to save cutting time.
- Cut out the ghost shapes carefully, paying attention to smooth curves at the head and wavy bottom.
Step 3: Add Faces and Details
- Use a black marker or pen to draw eyes and a mouth on each ghost.
- Experiment: mix surprised faces, sleepy faces, big smiles, or tiny O-shaped mouths for variety.
- Add extra decorations such as eyebrows, blush marks, tiny fangs, or little bow ties for personality.
Step 4: Prepare the Garland String
- Cut a length of string or ribbon that is slightly longer than your intended display space.
- Tie a small loop at each end of the string so the garland is easy to hang later.
- Laying the string on a table, mark rough placements for each ghost so spacing is even.
Step 5: Attach Ghosts to the String
- Place each ghost face down and lay the string across its upper portion, slightly below the head.
- Secure the string with a small piece of tape or a thin line of glue, pressing gently until it adheres.
- Continue attaching all ghosts, adjusting spacing as needed, then allow any glue to dry fully before hanging.
Alternative Version: Folded Paper Ghost Chains
If you love the look of classic paper doll chains, you can use the same technique to make a line of connected ghosts that unfold into a continuous strip.
How to Make a Ghost Chain
- Cut a long strip of paper approximately the height you want your ghosts to be.
- Fold the strip back and forth into equal sections, like an accordion.
- Draw a ghost shape on the top layer, making sure the sides of the ghost extend right to the folded edges.
- Cut around the outline, leaving the folds at the sides uncut so the ghosts stay connected.
- Carefully unfold the strip to reveal a chain of joined ghosts that you can tape or clip along a string.
This style is particularly effective for windows and door frames, since the repeated shape creates a playful, rhythmic pattern along the edge.
Creative Variations to Try
Once you have mastered the basic technique, you can easily adapt the project to match different themes, color schemes, or age groups. Mixing and matching variations adds depth to your Halloween decor without needing new tools.
Color and Texture Ideas
- Pastel ghosts: Use pale pink, mint, or lavender paper for a soft, whimsical look that works well in children’s rooms.
- Book-page ghosts: Cut ghosts from old book pages, sheet music, or printed scrapbook paper for a vintage feel.
- Glowing ghosts: Add glow-in-the-dark paint or stickers to details like eyes and mouths so the garland has a subtle shine when the lights are low.
Character Themes
- Monster mash: Turn some ghosts into other creatures by adding horns, fangs, or tiny drawn-on hats so each character is different.
- Storybook friends: Give ghosts names and distinct personalities, then invite kids to tell stories about them as they decorate.
- Emoji ghosts: Base the expressions on familiar emojis—winking, laughing, surprised—to make the craft relatable for older kids and teens.
Where and How to Hang Your Garland
The magic of a paper ghost garland is in how it moves gently with the air and frames existing furniture or architectural details. Placement can completely change the mood of a room, even if the garland itself is simple.
Popular Display Spots
- Draped across a mantel or shelf as a spooky focal point in the living room.
- Hung along the top edge of a window so ghosts appear to float in front of the glass.
- Stretched between two hooks on a wall behind a dessert table or snacks station at a Halloween party.
- Decorating the front of a teacher’s desk or a classroom whiteboard for a seasonal touch.
Simple Hanging Tips
- Use removable hooks or painter’s tape to avoid damaging walls and trim.
- For heavily used doorways, raise the garland slightly higher than head level so no one brushes against it.
- Layer the ghost garland with string lights or tulle if you want a more elaborate display for parties.
Family Crafting: Making It Kid-Friendly
Paper ghost garlands are ideal for group activities because you can divide tasks into small, manageable steps. This keeps children engaged and lets everyone contribute to the final result.
Age-Appropriate Roles
| Age Group | Suggested Tasks |
|---|---|
| Toddlers (with supervision) | Coloring on pre-cut ghosts, choosing where ghosts go on the string, handing tape pieces to adults. |
| Early elementary | Tracing templates, drawing faces, helping measure the string, arranging ghost order. |
| Older kids and tweens | Cutting shapes, designing variations, leading the attachment process, planning display locations. |
| Teens and adults | Using sharper scissors, managing hot glue (if used), handling hanging hardware and final placement. |
Safety and Cleanup Tips
- Keep sharper scissors, hot glue, and small embellishments out of reach of very young children.
- Cover the work surface with scrap paper or an old tablecloth to catch marker stains and bits of paper.
- Provide a small bin for offcuts so kids can help with cleanup as part of the activity.
Eco-Friendly and Storage Considerations
Because this project uses mostly paper, it can be surprisingly eco-conscious when you choose the right materials and plan for end-of-season handling. Thoughtful decisions made now can keep future Halloweens equally festive and low waste.
- Use recycled paper or scrap printer paper for test shapes and practice cuts.
- Select adhesives and embellishments sparingly so ghosts can be recycled more easily when you are ready to retire them.
- If you prefer to reuse your garland, store it in a large envelope or flat box, keeping the string gently coiled to avoid creases.
Common Mistakes and Simple Fixes
Even a beginner-friendly project can bring a few small challenges. Fortunately, most issues with paper ghost garlands are quick to solve with simple adjustments.
- Ghosts tilting forward or backward: Attach the string a little higher or lower on the back of each ghost until they hang straight.
- Paper tearing near the string: Reinforce the attachment point with a small scrap of paper or a bit of clear tape before reattaching.
- Uneven spacing: Lay the garland flat, slide ghosts gently along the string if taped on, or detach and reattach any pieces that look too crowded.
- Faces smudging: Allow markers to dry fully and consider switching to a quick-drying pen or fine-point permanent marker.
FAQs About Paper Ghost Garlands
How long does it take to make a ghost garland?
For a short garland with about ten ghosts, expect around 30 to 45 minutes, including time to cut shapes, draw faces, and attach them to the string. Longer or more detailed garlands can be spread out over several short sessions.
What type of paper works best?
Standard printer paper is easy to cut and hang, while lightweight cardstock provides more durability and a slightly more polished feel. Very thick paper can be harder for kids to cut, so reserve it for older crafters or smaller projects.
Can I make this project without glue?
Yes. You can skip glue by using tape on the back of each ghost or by punching small holes near the top and threading the string directly through. Mini clothespins clipped along a plain string are another no-glue option.
Is this suitable for classrooms or group events?
Paper ghost garlands are excellent for group settings because each participant can design one or two ghosts that join into a shared decoration. Pre-cutting templates and preparing strings in advance helps the activity run smoothly in larger groups.
How can I make the garland more durable?
For garlands you want to keep from year to year, use heavier paper, avoid overly small or delicate cutouts, and store the strand flat between sheets of cardboard. Handling the garland gently when putting it up and taking it down will also extend its life.
Final Touches for a Memorable Display
Once your ghosts are hanging in place, take a moment to step back and see how they interact with light, color, and movement in the room. Small adjustments in height or angle can dramatically change the overall effect.
Pair your paper ghost garland with pumpkins, candles in safe holders, or simple silhouettes on the walls, and you will have a Halloween setup that feels thoughtful, welcoming, and full of homemade charm.