Handmade cards have a quiet magic that store-bought greetings can never quite match. When every fold and line comes from your own hands, a simple sheet of paper turns into a personal message, especially for Father’s Day.
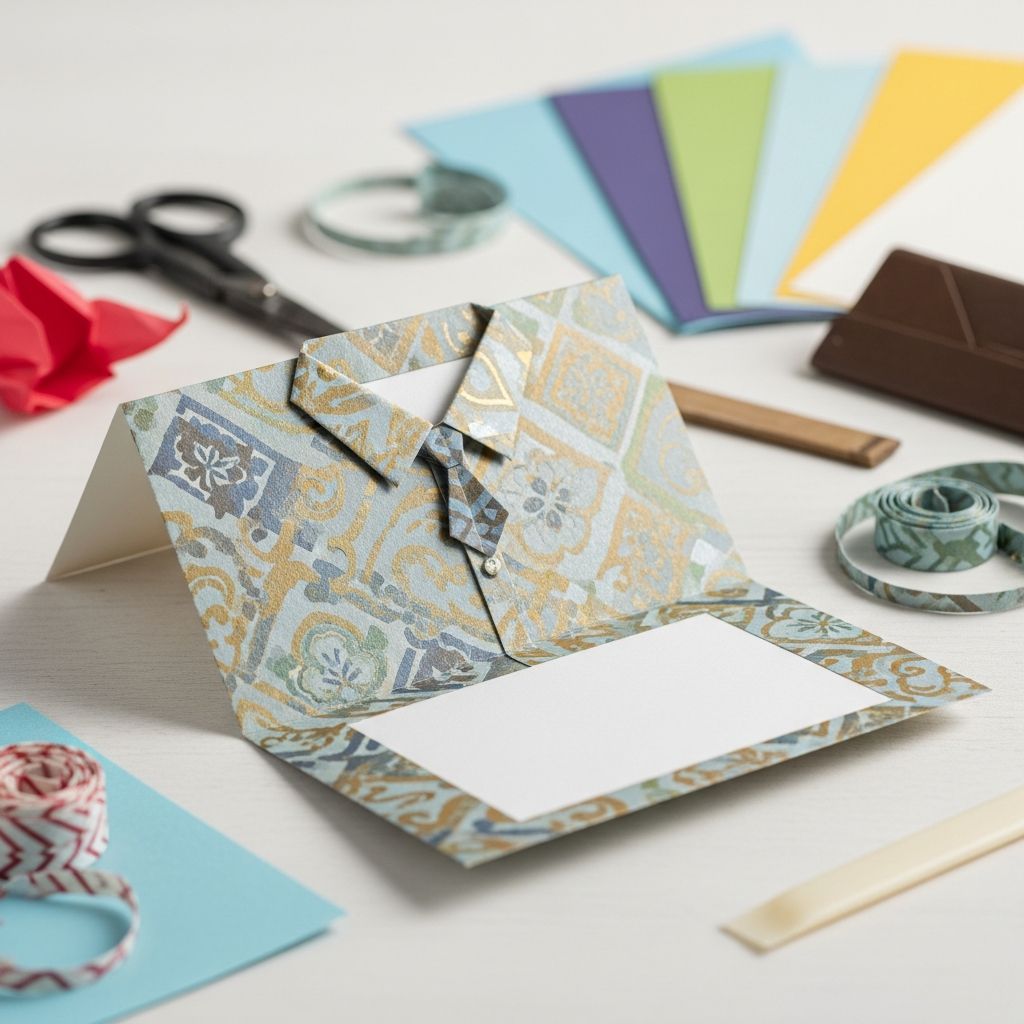
This guide walks you through designing and folding an origami Father’s Day card that is simple enough for beginners yet special enough to keep in a memory box for years. You will learn what supplies you need, how to fold a shirt-and-tie style card, and creative ways to customize it for your own family.
Why an Origami Card for Father’s Day?
Origami cards are perfect for Father’s Day because they are both a greeting and a small paper sculpture. Instead of just writing a message, you are building one. The folds, shapes, and little details all become part of the way you say “thank you” and “I love you.”
Unlike elaborate craft projects, this type of card uses everyday materials and requires only patience, not advanced art skills. That makes it a great project for children, co-parents, teachers, and anyone who wants a thoughtful gift without needing a full craft studio.
Materials and Tools You Will Need
Before you begin folding, gather the basic supplies. Most of these items are likely already in your home or classroom.
- Cardstock or thick paper for the card base
- Origami paper or any colorful lightweight paper
- Glue stick or double-sided tape
- Scissors or a paper trimmer
- Ruler and pencil for measuring
- Markers, pens, or colored pencils for messages
- Optional: stickers, washi tape, or small printed photos
Choose colors that remind you of your dad or the father figure you are honoring. For example, a blue shirt with a striped tie, a bright Hawaiian-style print, or neutral tones for a minimalist look.
Designing Your Origami Father’s Day Card
Before folding anything, decide on the overall look of your card. Thinking about design first helps you choose paper sizes and colors that work well together.
Card Style Options
- Classic Shirt Card: A folded shirt glued to the front of a folded card base with a separate origami tie on top.
- Pop-Up Inside: A flat front cover with a folded shirt or message that pops out when the card is opened.
- Mini Origami Gallery: Several small origami pieces (shirts, hearts, stars) arranged like a collage.
For this article, the main example will be a classic shirt-and-tie card mounted on the front of a folded cardstock base, with room inside for a personal note or drawing.
Suggested Card Dimensions
Use this table as a general guide. You do not need exact measurements, but proportions help the finished card look balanced.
| Component | Suggested Size | Notes |
|---|---|---|
| Card base (folded) | 10 cm × 15 cm (or 4 in × 6 in) | Start from a rectangle twice as wide, then fold in half. |
| Origami shirt | From a sheet about 9 cm × 15 cm | Adjust so the shirt fits comfortably centered on the card. |
| Origami tie | From a strip about 3 cm × 8 cm | Thinner paper folds more easily for the tie shape. |
Step-by-Step: Folding a Simple Shirt for the Front of the Card
This shirt design is compact and beginner-friendly. Read through the steps once before you start folding so you have a picture of what you are trying to create.
Preparing the Paper
- Cut a rectangle of decorative or colored paper. A long horizontal rectangle works best.
- Place the paper with the side you want as the “front of the shirt” facing down on your work surface.
Creating the Shirt Body
- Fold the left and right edges toward the center so they meet in the middle, creating two long flaps that close like a cupboard.
- Press the folds sharply with your fingers or a ruler edge so the shirt keeps its shape.
- Turn the paper so that one short end is facing you; this will become the bottom of the shirt.
- Fold a small portion of this bottom edge upward to form the shirt’s hem. This gives the shirt a finished look.
Shaping the Collar
- Rotate the paper so the opposite short end is closest to you. This will be where the collar forms.
- Gently unfold the top of each long flap just enough to create two small diagonal folds that angle inward toward the center. These form the collar points.
- Once you like the shape, press the diagonal folds firmly so the collar points are crisp and even.
Forming the Shoulder Line
- Holding the paper so the collar is at the top, fold the entire bottom portion upward, tucking the hem under the collar points.
- Slip the edge beneath the collar tips so the collar appears to sit on top of the shirt body.
- Flatten the whole shape gently. You should now see a recognizable shirt shape with a visible collar at the top.
At this stage, you can leave the shirt plain or add drawn details like buttons, a small pocket, or patterns such as stripes and dots.
Step-by-Step: Folding a Simple Tie
The tie adds personality to the shirt. A bright contrasting color works well and draws the eye toward the center of the card.
Folding the Tie Base
- Start with a narrow vertical strip of paper, with the side you want to show facing down.
- Fold the strip in half lengthwise, then unfold to mark the center line.
- Fold the top two corners diagonally toward the center line, forming a point like the tip of a long diamond.
Shaping the Knot and Tip
- Create a small triangle at the top by folding the pointed end back slightly; this becomes the knot of the tie.
- At the lower end, trim the tip into a shallow “V” shape if you want a more realistic look, or leave it pointed for a simple version.
- Run your fingers along the edges to sharpen the folds and give the tie a neat, structured appearance.
Test the tie on top of the collar of the origami shirt. If it feels too long, carefully trim the end so it sits just above the bottom of the shirt.
Assembling the Card
Once you have your shirt and tie ready, it is time to bring everything together on the card base. This is where spacing and alignment matter most.
Preparing the Card Base
- Cut a piece of cardstock into a rectangle and fold it in half to make a traditional side-fold or top-fold card.
- Run your finger or a ruler firmly along the fold so the card stays closed when you need it to.
Attaching the Shirt and Tie
- Place the origami shirt in the center of the card front without glue to check the positioning. Adjust until it looks balanced from all sides.
- Apply a thin layer of glue or strips of double-sided tape to the back of the shirt, then press it onto the card.
- Add a small amount of glue behind the tie and place it under the collar points on the shirt. Hold it briefly so it adheres firmly.
Allow the front of the card to dry flat before opening it fully. This helps prevent wrinkling or shifting of your folded pieces.
Adding a Personal Message and Decorations
Even though the folded shirt and tie are the main visual features, your written message is the heart of the card. Spend a few moments thinking about what you want to say.
Message Ideas
- Write a short thank-you note about a specific memory you share.
- List three or four qualities you admire about your dad.
- For younger children, draw a picture that shows a favorite activity done together.
Decorative Touches
- Use washi tape to create a frame around the shirt on the front of the card.
- Add tiny paper hearts, stars, or simple shapes along the corners.
- Include a small printed snapshot of a family moment on the inside or back.
Variations for Different Ages and Skill Levels
Not every crafter has the same level of confidence or dexterity. Adjusting the project to the person making it can turn a frustrating craft into a fun experience.
For Young Children
- Pre-cut the rectangles and strips so children only need to fold and glue.
- Simplify the shirt by using fewer steps and avoiding very small folds.
- Encourage drawing, stickers, and scribbles as decorations rather than precise patterns.
For Teens and Adults
- Experiment with patterned origami paper or recycled magazine pages for a unique texture.
- Add an inner pop-up element, such as a raised word or shape that appears when opened.
- Combine the card with a small envelope folded from coordinating paper.
Creative Themes to Match Your Dad’s Personality
One of the joys of making your own card is tailoring it to the person receiving it. You can use small changes in color and decoration to reflect who your dad is.
- Formal and Classic: White shirt, dark tie, minimal decorations, and a clean handwritten message.
- Sporty and Casual: Brightly colored “jersey” shirt, bold letters, and small doodles of sports gear.
- Funny and Playful: Loud patterns, mismatched tie colors, and humorous miniature drawings or captions.
- Outdoorsy: Earth-toned paper, small tree or mountain sketches, and natural textures like kraft paper.
Tips for a Neat, Professional Look
Even a very simple card can look polished with a few small habits. Neatness does not mean perfection; it means taking an extra moment for each step.
- Fold slowly and line up edges carefully before pressing down.
- Use a ruler or the back of a spoon to sharpen folds.
- Apply glue sparingly so it does not soak the paper or ooze out from under the shirt.
- Let everything dry flat under a light book to prevent warping.
Storing and Gifting Your Origami Father’s Day Card
Handmade cards can be keepsakes, so a little thought about how you give and store them can make a difference. Place the finished card in an envelope slightly larger than the folded size to avoid crushing the origami elements.
Encourage the recipient to display the card on a shelf or bulletin board for a while, then tuck it into a box or folder where it can be revisited in future years as a reminder of this particular Father’s Day.
Frequently Asked Questions (FAQs)
Do I need special origami paper?
No, you do not need official origami paper. Any lightweight paper that folds easily will work, including colored printer paper, pages from an old calendar, or gift wrap, as long as it is not too thick or glossy.
What if my folds are not perfectly straight?
Small imperfections rarely ruin the design. Most of the charm of a handmade card comes from the visible signs that it was created by a real person, not a machine. Focus on steady, deliberate folds rather than exact precision.
Can I add money, gift cards, or small notes to this card?
Yes. You can tuck a folded note behind the origami shirt, create a simple paper pocket inside the card, or attach a small envelope for a gift card. Just be sure the added weight does not tear the paper at the folds.
How long does this project usually take?
For a beginner, expect around 30–45 minutes from gathering materials to writing your final message. With practice, you can fold the shirt and tie much faster, leaving more time for thoughtful writing and decorating.
Is this project suitable for classrooms or group activities?
Yes. The design uses inexpensive materials, can be simplified or expanded depending on age, and offers plenty of room for individual creativity. It works well for schools, clubs, or community events where families want to create something personal for Father’s Day.