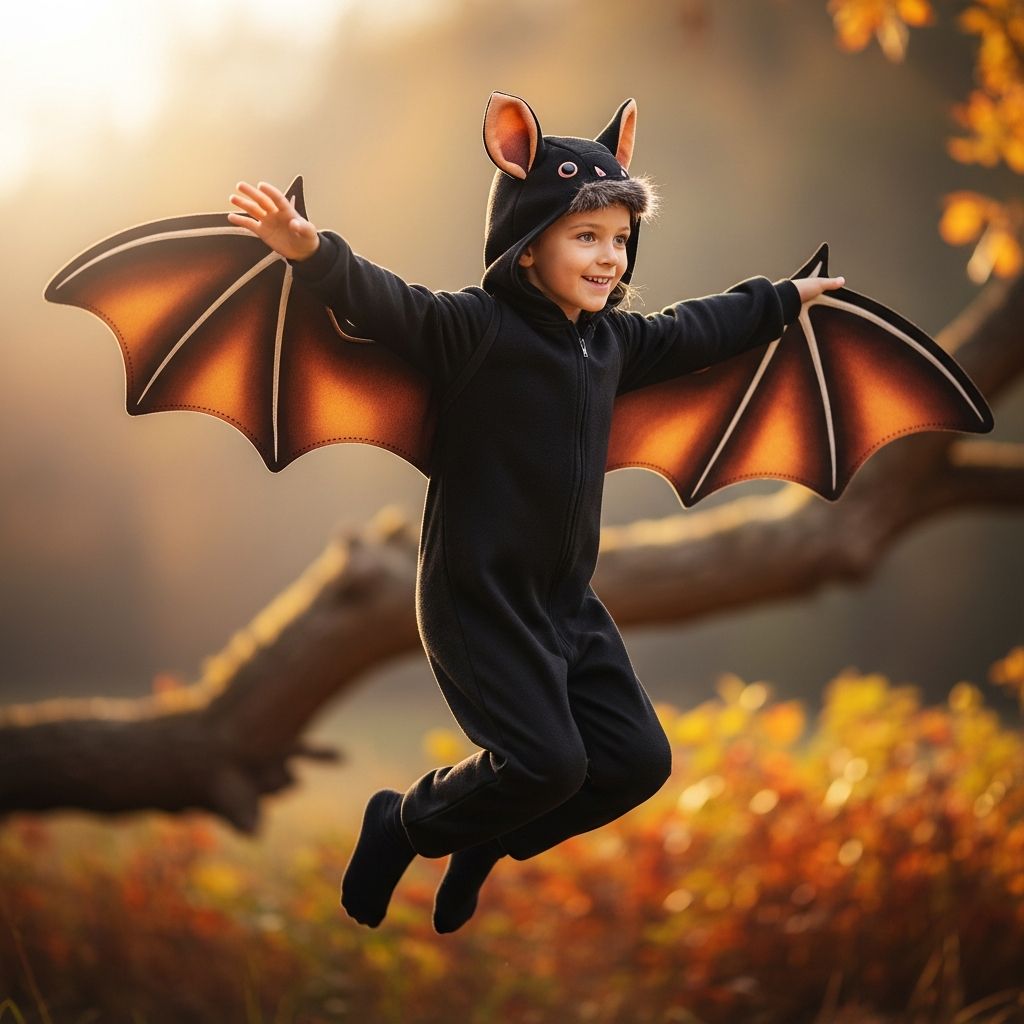
If your child wants a costume that feels more like cozy pajamas than a scratchy store-bought outfit, a handmade bat costume is the perfect solution. This guide shows you how to turn everyday clothes into soft bat wings and perky ears with simple sewing and easy-to-find materials, so kids can flap, run, and trick-or-treat in comfort.
Why Make Your Own Bat Costume?
Homemade costumes give you full control over comfort, fit, and durability, which matters when kids will be wearing them for hours of play, parties, or Halloween events. Instead of stiff plastic or itchy fabrics, this approach uses soft knits and felt, making the outfit feel like normal play clothes with a spooky twist.
- Custom fit: Adjust wing size, sleeve length, and headband comfort based on your child’s age and height.
- Budget-friendly: Build the costume from clothes you already own plus a few inexpensive craft supplies.
- Reusable: Design the wings so they can double as dress-up gear long after Halloween is over.
- Creative control: Choose colors, wing shapes, and details that match your child’s imagination.
Planning the Look: Cute, Spooky, or Sporty?
Before picking up scissors, decide what kind of bat your child wants to be. A costume built around a simple T-shirt and leggings can easily shift from cute and cartoonish to mysterious and nocturnal with a few small design decisions.
| Style | Color Palette | Wing Shape | Extra Details |
|---|---|---|---|
| Playful bat | Black with purple or teal accents | Softer scallops, rounded tips | Glitter fabric paint, friendly felt eyes on the shirt |
| Classic bat | All black or black and gray | Even scallops, medium wingspan | Simple felt ears, minimal decoration |
| Night sky bat | Black with silver or gold accents | Longer wings with sharper points | Star and moon shapes on the wings, metallic thread |
| Cartoon bat | Charcoal, navy, or deep purple | Shorter wings, exaggerated curves | Big felt eyes on the headband, bright contrast stitches |
Materials and Tools Checklist
This costume is designed around a long-sleeve knit shirt and leggings (or joggers) so the wings can either be attached or worn over the top like a lightweight cape. Using knits keeps everything stretchy, cozy, and easy to move in.
Core clothing pieces
- 1 long-sleeve shirt in black, charcoal, navy, or deep purple.
- 1 pair of leggings, joggers, or soft pants to match or coordinate with the shirt.
- Optional: a thin turtleneck or thermal base layer if your climate is chilly.
Wings and ears materials
- Black felt or lightweight knit fabric for wings (at least from wrist to wrist when your child’s arms are outstretched).
- Extra felt scraps for ear shapes.
- Soft elastic (narrow) for loops at wrists or shoulders if you want removable wings.
- A plain headband (fabric-covered or plastic) sized for your child.
Basic tools and supplies
- Fabric scissors that cut cleanly through knits and felt.
- Chalk or washable fabric pen for sketching wing shapes.
- Pins or clips to hold layers together before sewing.
- Sewing machine with a needle suitable for knit fabric, plus matching thread.
- Hand-sewing needle for simple finishing or attaching small details.
- Fabric-safe craft glue or hot glue gun for the headband and decorative accents.
- Large scrap paper or poster board to practice and refine your wing template.
Measuring Your Child for Custom Wings
Taking a few quick measurements allows you to scale the wings exactly to your child’s height and reach. This avoids wings that drag on the ground or feel too tiny to be fun.
- Arm span: Ask your child to stand tall with arms out like an airplane. Measure from one wrist across the back to the other wrist. This is your maximum wingspan.
- Back height: Measure from the base of the neck down to either mid-thigh or just above the knees, depending on how dramatic you want the wings to look.
- Wrist-to-waist curve: For a more tailored shape, measure from the wrist down to the side of the waist; this helps you draw a smooth diagonal line from wrist to body on your template.
- Headband fit: If using a firm headband, make sure it sits comfortably on your child’s head without pinching before you glue ears in place.
Designing a Wing Template on Paper
Instead of cutting directly into your fabric, sketch the first version of the wings on paper or poster board. This lets you experiment with the curve and scallops until you like the proportions.
- Draw a rectangle on paper using the arm span (or half-arm span if you prefer to work one side at a time) as the width and the back height as the length.
- Mark the top corner where the shoulder will sit and the opposite top corner where the wrist will attach.
- Sketch a smooth diagonal line from the wrist mark down to the lower center of the rectangle.
- Along the bottom edge of that diagonal, draw a series of bat-like scallops. You can use a bowl or small plate to create even curves if desired.
- Trim the paper wing and hold it up against your child’s back to check scale. Adjust the curve and scallops until you are happy with the shape.
Cutting the Bat Wings From Fabric
Once you like the paper pattern, you can transfer it to your fabric. Folding the fabric carefully will help you cut both sides of the wings symmetrically without extra measuring.
- Fold your fabric or felt in half with the right sides facing each other so the fold runs along where the center of the bat’s back will be.
- Place the straight edge of your paper wing pattern along this fold, then pin or clip securely.
- Trace around the pattern with chalk or a fabric pen, including the scallops at the bottom.
- Cut through both layers carefully along the outline, taking your time around curves so the scallops look smooth and even.
- Unfold the fabric to reveal a full set of wings that mirror each other on both sides.
Attaching Wings: Permanent vs. Removable Styles
You can attach the wings directly to the shirt or create a removable version that slips on over any top. Both approaches work well for active kids; choose based on how often you want the costume to be used after Halloween.
Option 1: Sewing wings to the shirt
- Lay the shirt flat with the back facing up and sleeves stretched straight out to each side.
- Place the wings on top, aligning the center fold with the center back of the shirt.
- Position the top edge of each wing so it runs from the wrist area of the sleeve to the lower side seam of the shirt.
- Pin the wings to the shirt along this line, keeping fabric smooth but not stretched.
- Using a narrow zigzag stitch, sew along the pinned line from wrist to body, then repeat on the other side. The zigzag allows the shirt to retain some stretch.
Option 2: Removable wings with elastic loops
- Cut two longer pieces of elastic for arm loops and two shorter pieces for thumb or wrist loops.
- Fold each elastic piece into a loop and pin the cut ends to the wrong side of the wings at the shoulder and wrist areas where you want your child’s arms to go through.
- Stitch the ends securely to the wing fabric, sewing small rectangles over each elastic attachment point for strength.
- Test the fit by having your child slip arms through the larger loops and thumbs or wrists through the small outer loops. Adjust placement if needed.
Making Simple Bat Ears
Bat ears turn a basic headband into an instant character piece. Felt works especially well because it keeps its shape without needing complicated finishing techniques.
- Cut two identical triangles from felt for the ears, slightly curved at the base so they sit naturally on the headband.
- To give each ear dimension, cut a small slit up the center of the base, overlap the two sides slightly, and glue or stitch them together. This makes the ear stand upright.
- Glue the bases of the ears to the headband, angling them outward slightly so they frame your child’s face.
- Hold the headband in place for a minute as the glue sets, then set aside to dry completely before your child wears it.
Optional Details to Personalize the Costume
Once the basic wings and ears are complete, you can leave the costume simple or layer in a few unique touches to match your child’s personality. A few details can transform the look from subtle to show-stopping without much extra work.
- Glow-in-the-dark outlines: Use fabric paint along the edges of the wings to create faint glowing curves that show up at night.
- Contrasting stitches: Sew decorative lines from the back to each scallop using lighter thread to mimic bone structures inside the wings.
- Friendly bat face: Cut circles and shapes from felt to create eyes, nose, and a smile on the front of the shirt for a cartoon look.
- Metallic accents: Add small star or moon appliqués to the wings for a celestial bat theme.
- Soft claws: Hand-stitch tiny felt triangles at sleeve cuffs to hint at claws without creating sharp or uncomfortable points.
Comfort and Safety Tips for Little Bats
Kids are likely to run, climb stairs, and navigate crowded sidewalks in this costume, so safety and comfort are just as important as appearance. A few simple checks help ensure that your child can flap and play safely.
- Keep wing length above the back of the knees so fabric does not drag or get caught under shoes.
- Avoid loose, dangling decorations that might snag on doorknobs or playground equipment.
- Choose soft elastic that does not dig into wrists or shoulders, and test fit over the clothing your child will wear underneath.
- Secure any glued pieces firmly and allow them to dry fully before your child runs around in the costume.
- If the costume will be worn at night, pair it with reflective tape or a light-colored treat bag for better visibility.
Styling Ideas to Complete the Look
With wings and ears ready, you can finish the costume using items already in your child’s closet. The goal is to keep everything soft, stretchable, and easy to layer for your local weather.
- Footwear: Black sneakers or boots blend into the outfit and make walking long distances comfortable.
- Layers: For cold weather, add thermal leggings and a long-sleeve undershirt in black so extra layers disappear under the costume.
- Face paint: A tiny black nose, a few whisker-like lines, or subtle gray shading around the eyes adds character without needing a mask.
- Accessories: A small crossbody bag or pouch shaped like a moon or star can double as a candy container.
Quick Troubleshooting Guide
Even simple sewing projects sometimes need small adjustments. Use this mini guide to tweak the costume if something does not feel quite right on the first try.
| Issue | Cause | Solution |
|---|---|---|
| Wings twist when child raises arms | Attachment line too short or placed at an angle | Extend the stitching or elastic further along the sleeve to stabilize the wing. |
| Wings feel too heavy | Fabric is thick or oversized | Trim the length by one scallop or switch to a lighter knit or thinner felt. |
| Headband slips off | Headband too smooth or slightly large | Wrap the ends with a bit of ribbon or add a small piece of felt to the inner band for grip. |
| Elastic leaves marks on skin | Elastic is too tight or narrow | Cut new, slightly longer loops or choose a wider, softer elastic and reattach. |
Frequently Asked Questions
How long does this costume take to make?
For most families, this project fits comfortably into an afternoon. Once the template is drawn and fabric is cut, sewing the wings and gluing the ears usually takes less than two hours, especially if you keep decorations simple.
Do I need advanced sewing skills?
This costume is designed with beginners in mind. The sewing lines are mostly straight, the fabric pieces are large, and felt does not fray, so you can focus on getting familiar with your machine instead of worrying about perfect hems.
Can I make this without a sewing machine?
Yes, it is possible to hand-sew the wings or rely on elastic loops and fabric glue, though it will take longer. Use smaller, closer stitches by hand for strength and choose lightweight fabric to keep the work manageable.
What ages is this costume best for?
The pattern can be scaled to fit toddlers through older elementary school children. For younger kids, shorten the wings and keep details like claws small and soft so nothing tangles or feels overwhelming.
How should I wash the costume?
If all components are sewn from washable fabrics, you can usually turn the shirt inside out and machine wash on gentle, then air dry. If you added glue-on decorations, spot-clean the decorated areas and line dry to preserve your hard work.
Can the wings be reused for other costumes?
Absolutely. With removable wings and neutral colors, you can repurpose them for fantasy creatures, nighttime animals, or dramatic dress-up capes long after Halloween has passed.