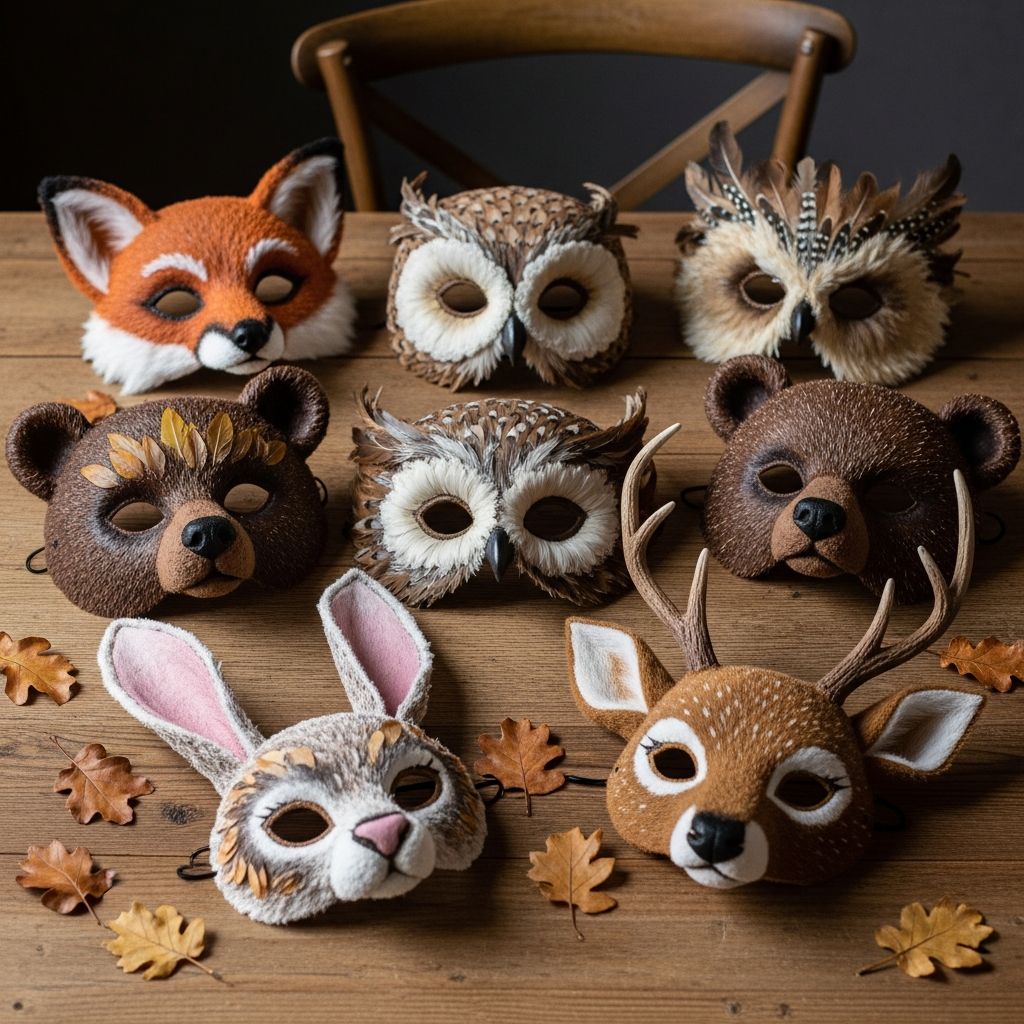
Woodland animal masks are a playful way to turn an ordinary afternoon into a magical forest adventure right in your living room. With a few basic supplies and a little imagination, children can become foxes, owls, deer, hedgehogs or any forest friend they dream up.
This in-depth guide walks you through everything needed to design and craft your own woodland masks, from planning and materials to step-by-step instructions, styling ideas and smart storage tips. It is written to be easy for busy families while still leaving plenty of room for creativity.
Why Woodland Masks Are Perfect for Families
Forest creature masks combine art, storytelling and pretend play in one simple project. They work just as well for a rainy day craft as they do for a birthday party, classroom activity or Halloween costume base.
- Flexible for all ages: Toddlers can help decorate, while older kids can design and cut their own shapes.
- Budget friendly: Most masks can be made from card stock, cardboard scraps, markers and glue you already have at home.
- Open-ended play: Once finished, masks invite hours of imaginative games, puppet shows and storytelling.
Choosing Your Woodland Creatures
Before gathering supplies, decide which woodland animals you want to include. Picking a small set of creatures with different shapes creates more visual interest and makes it easier for kids to choose a favorite character.
Popular Woodland Animal Ideas
- Fox: Pointed ears, narrow snout and bold orange or rust tones.
- Deer: Gentle eyes, rounded ears and stylized antlers.
- Owl: Large eyes, feathered cheeks and a small beak.
- Bear: Rounded ears, wide face and a friendly nose.
- Raccoon: Masked eye area and striped tail details if you extend past the mask.
- Hedgehog: Spiky outer edge and soft face in the center.
Matching Animals to Skill Levels
| Animal | Difficulty | Best For | Notable Features |
|---|---|---|---|
| Bear | Easy | Young children and beginners | Simple round ears, minimal layering |
| Fox | Easy–Medium | Elementary-age crafters | Triangular ears, two-tone face markings |
| Deer | Medium | Kids who enjoy detail work | Antlers, spots, gentle shading |
| Owl | Medium–Advanced | Older kids and adults | Feather layers, large eye circles, beak |
| Raccoon | Medium | Kids who like bold patterns | Eye band, contrasting cheeks, optional tail |
Gathering Materials and Tools
You can adapt this project to whatever supplies are on hand. Below is a flexible list that works for both quick paper masks and sturdier versions that can last all season.
Basic Materials
- Thick paper or light cardboard (cereal boxes, file folders or craft card stock).
- Pencils, erasers and a black pen or fine marker for outlines.
- Scissors sized appropriately for the crafter.
- Coloring tools: colored pencils, markers, crayons or watercolor paints.
- Elastic cord, ribbon or string for securing the mask.
- Glue stick or craft glue.
Optional Embellishments
- Felt scraps for ears, noses and layered fur or feathers.
- Colored paper for contrast patches or spots.
- Fabric trim, ribbon or lace for decorative crowns or collars.
- Artificial leaves, paper flowers or dried foliage for a forest crown look.
- Biodegradable glitter for special accents (avoid around eye openings).
- Hole punch to create neat holes for string or ribbon.
Tool Safety Tips
- Offer blunt-tip scissors for younger children and supervise all cutting.
- If using a craft knife for eye holes, have an adult perform this step on a cutting mat.
- Choose non-toxic, washable supplies whenever possible, especially for face-adjacent crafts.
Designing the Base Mask Shape
The base mask is the foundation for every woodland animal variation. Once a simple template fits your child’s face, it can be reused for multiple creatures by changing ears, nose shapes and decorations.
Measuring and Sketching
- Measure the distance between your child’s eyes and lightly note this on a scrap of paper.
- Sketch a simple rounded mask shape on card stock, roughly the width of the child’s face.
- Mark the eye centers based on your measurement and draw almond or oval eye openings that feel comfortable.
- Add a gentle curve at the bottom where the nose will sit, leaving the nostrils unobstructed.
Cut out the sketch and hold it up to the child’s face, adjusting eye size and position as needed until the mask feels right.
Adding Animal-Specific Features
- Fox and wolf: Extend the mask slightly downward into a point and draw triangle ears at the top.
- Deer: Keep the face soft and round, then sketch separate antler shapes to glue on later.
- Owl: Emphasize the area around the eyes with circular or scalloped shapes to suggest feathers.
- Bear: Use a wide, rounded base with small, circular ears placed slightly to the sides.
Step-by-Step Mask Construction
Once you have a template, you can follow these general steps to build each woodland mask. Consider making several bases at once so kids can switch between characters.
1. Trace and Cut the Mask Base
- Place the base template on sturdy paper or cardboard and trace around it with pencil.
- Cut out the outer edge carefully, then cut the eye holes from the center outward.
- Erase or ink over any visible pencil lines to tidy the edges.
2. Plan the Color Layout
Before reaching for paint or markers, invite kids to decide where darker and lighter areas should go. This simple planning step makes the final mask look more intentional and helps children think like designers.
- Draw light guidelines for patches, stripes or spots.
- Choose two or three main colors per animal for a cohesive look.
- Reserve bright or metallic colors for small highlights so the main features stay clear.
3. Add Color and Texture
- Begin with the largest areas of color first, such as the fox’s orange or the bear’s brown.
- Layer on mid-tones and shading around the cheeks, forehead and nose to create depth.
- Finish with small details like freckles, whisker dots, feather lines or fur strokes.
If using watercolor, allow the mask to dry completely before moving on to gluing or attaching elastic to prevent warping and smudging.
4. Attach Ears, Antlers and Other Pieces
- Cut ears, antlers, beaks or extra feather shapes from card stock or felt.
- Test placement by setting the pieces on the mask before gluing so balance and symmetry can be checked.
- Glue only once you are satisfied, pressing gently until the bond is secure.
For particularly tall antlers or ears, consider reinforcing the connection area with an extra strip of cardboard glued behind the mask.
5. Add the Elastic, Ribbon or Handle
- Measure a length of elastic or ribbon that fits comfortably around the back of the child’s head without pulling.
- Punch or carefully cut a small hole on each side of the mask, level with the eyes.
- Tie or glue the elastic securely, knotting or taping the ends on the back for extra strength.
As an alternative for younger children, attach the mask to a short dowel or sturdy stick at one side so they can hold it like a masquerade mask rather than tying it around their head.
Creative Styling Ideas for Woodland Masks
After the main mask is complete, small details can push the design from simple to spectacular. Encourage children to think about the personality of their animal and then add elements that support that story.
Nature-Inspired Details
- Glue on a row of artificial or paper leaves across the forehead for a forest crown effect.
- Add paper flowers or fabric rosettes between deer antlers for a gentle, whimsical character.
- Use muted greens, browns and creams for a subtle woodland palette, or brighter hues for party-ready masks.
Character Personality Touches
- Draw small glasses on an owl to suggest a wise storybook character.
- Add a tiny paper bow tie or collar just below the mask edge for a formal fox or bear.
- Use metallic pens sparingly to highlight stars, moon symbols or forest runes around the eyes.
Using Masks for Play and Learning
Once the masks are done, the fun is only beginning. Woodland masks can become tools for storytelling, social play and even gentle learning experiences about nature and animals.
Imaginative Games
- Create short skits where each child’s animal has a different role in the forest.
- Set up a “woodland parade” where kids walk, hop or prowl in character while music plays.
- Turn the masks into puppets by attaching them to sticks and using them behind a cardboard theater.
Educational Extensions
- Pair each mask with a quick fact card about what that animal eats, where it sleeps and how it behaves.
- Use the masks in a storytime circle where each child acts out their animal’s reaction to different forest events.
- Encourage older kids to research additional woodland animals and design new masks based on their findings.
Durability, Storage and Reuse Tips
With a little care, your woodland masks can last well beyond a single event. Simple storage and reinforcement steps help protect the time and effort your family invested in crafting.
Reinforcing the Masks
- Glue the decorated mask front onto a second layer of cardboard for extra strength.
- Reinforce stress points, such as where elastic attaches, with tape or an additional paper patch.
- Apply a light coat of clear-drying sealer (avoiding eye areas) if you want extra protection from smudging.
Storage Suggestions
- Keep masks flat in a low, wide box where children can still see and choose their favorite.
- Slip a sheet of tissue paper between masks to prevent decorations from catching on each other.
- Label the box “Forest Friends” or “Woodland Dress-Up” to keep the theme special and organized.
Frequently Asked Questions (FAQ)
How long does it take to make one mask?
For a simple design with basic coloring, plan about 20–30 minutes, plus any drying time for paint or glue. More detailed masks with layered felt or elaborate antlers may take closer to an hour, especially if several children share supplies.
What is the safest material to use near kids’ eyes?
Thick paper or light cardboard is usually safest for the area around the eyes, paired with non-toxic markers or pencils. Avoid loose glitter, sharp edges and heavy embellishments that might shift or flake close to the eyes during play.
Can toddlers participate in this project?
Toddlers can absolutely help color pre-cut mask shapes and stick on simple decorations. An adult should handle template design, cutting and attachment of elastic, while the youngest helpers focus on choosing colors and placing large, easy-to-grab decorations.
How can I make the masks more eco-friendly?
Use recycled cardboard, paper scraps and fabric remnants wherever possible instead of new plastic-based materials. Skip plastic glitter in favor of cut paper shapes, natural twine and dried leaves that can eventually be composted.
Are there no-sew options for sturdier masks?
Yes. Layered card stock and felt can be attached entirely with strong craft glue or double-sided tape if you prefer to avoid sewing. Allow plenty of drying time before wearing, and gently test all attached pieces by lightly flexing the mask before giving it to children.
Final Thoughts on Woodland Mask Making
Creating woodland animal masks is less about perfection and more about shared creativity. When children see their own drawings transformed into wearable characters, they gain confidence in their artistic choices and enjoy a deeper connection to the natural world these animals represent.
Whether you are preparing for a themed party, building a dress-up box or just looking for a screen-free afternoon activity, simple woodland masks offer a memorable, customizable and delightfully imaginative option the whole family can enjoy.