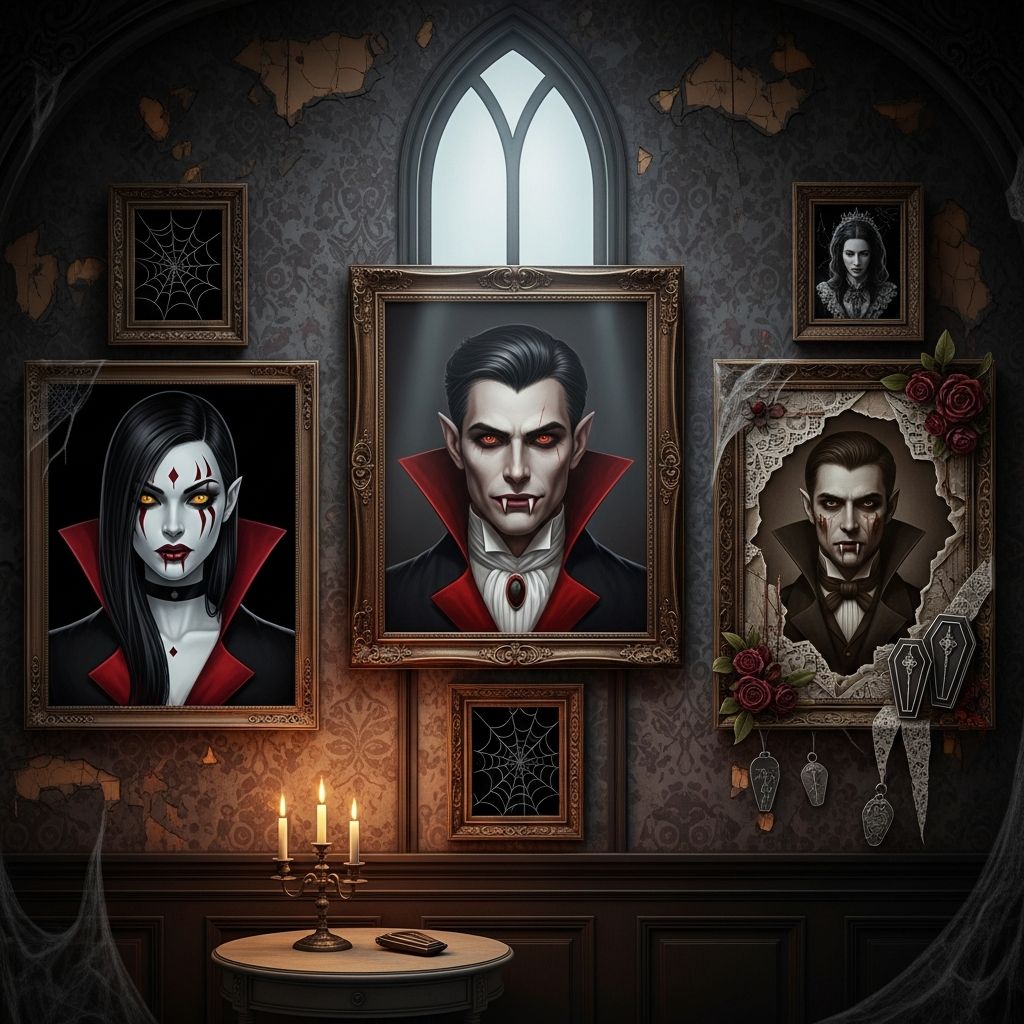
Vampire portraits are a dramatic, funny, and surprisingly easy way to transform your home into a haunted mansion for Halloween. Instead of buying generic store-bought decor, you can create eerie, custom wall art featuring your own family or friends as glamorous creatures of the night.
Why Vampire Portraits Make Perfect Halloween Decor
Out of all the Halloween decorating ideas, vampire portraits hit the sweet spot between creepy and classy. They are personal, reusable year after year, and can be styled to suit anything from kid-friendly whimsical themes to mature gothic elegance.
- They use photos you already have, making them budget-friendly.
- They double as a party activity and a conversation piece.
- They can be scaled up or down for doors, mantels, hallways, and entryways.
Planning Your Vampire Portrait Project
Before you start printing and framing, spend a few minutes planning your approach. Decide how many portraits you want, where they will hang, and what overall mood you want to create—campy and playful, or dark and sophisticated.
- Location: Hallways, staircases, and fireplace mantels work particularly well for a “gallery of ancestors” vibe.
- Style: Choose between modern vampire chic, vintage Victorian, or over-the-top movie monster.
- Budget: Determine how much you can spend on printing and frames so you can prioritize key pieces.
Choosing the Right Photos
The photos you start with will determine how convincing and striking your vampire portraits look. You can shoot new photos or repurpose existing ones from your phone or old albums.
- Pick photos with clear, well-lit faces and minimal background clutter.
- Head-and-shoulder shots or waist-up portraits work best for adding fangs, pale skin, and glowing eyes.
- Ask everyone to pose semi-serious or dramatically, rather than smiling broadly, for a more undead effect.
Supplies and Tools You Might Need
There are many ways to approach this project, from fully digital to mostly handmade. Mix and match these materials based on your style and what you have on hand.
- Digital photo editing software or apps (optional but very helpful)
- Color printer or access to a print shop
- Photo paper or heavy matte cardstock
- Assorted frames (thrifted, dollar store, or frames you already own)
- Black, red, and metallic craft paints
- Glue sticks or spray adhesive
- Fine-tip markers or paint pens (white, black, red, metallic)
- Decorative paper, lace scraps, ribbon, faux jewels, or plastic bats
- Scissors, craft knife, and cutting mat
- Adhesive hooks, removable poster strips, or picture-hanging hardware
Digital vs. Analog: Two Ways to Create the Vampire Look
You can build the vampire effect entirely on a computer or add the eerie details by hand after printing. Both methods work, and you can combine them to achieve the look you want.
| Method | Best For | Key Advantages |
|---|---|---|
| Digital editing first | Realistic, polished vampire effects | Smooth skin tones, precise fangs and eyes, easy duplication of the same style across many portraits |
| Hand-drawn after printing | Kids’ crafts, quick projects, and playful, illustrated styles | No software needed, easy to correct or exaggerate details, highly customizable textures |
| Hybrid (digital + hand embellishment) | Feature walls and centerpiece portraits | Realistic base image plus tactile details like faux blood, lace, and 3D embellishments |
Step-by-Step: Digital Vampire Makeover
If you are comfortable with basic photo editing, you can apply a convincing vampire transformation using only a few simple tools: saturation, contrast, and selective color adjustments. Many free apps offer presets that can be tweaked to look ominous without much effort.
- Desaturate skin tones: Slightly reduce saturation or increase cool tones to give skin a pale, undead look while keeping lips and eyes more vivid.
- Increase contrast around the eyes: Darken shadows under the brow bone and around the lower lash line to create a sunken or dramatic effect.
- Add subtle red to the eyes: Use a small brush to tint the irises or the whites of the eyes very lightly for an unsettling glow.
- Create fangs: Either draw small, sharp canines digitally or paste in a fanged smile from a separate image and blend it in.
- Enhance the background: Add a faint vignette, fog overlay, or gothic texture behind the subject instead of leaving a plain backdrop.
Step-by-Step: Hand-Drawn Vampire Details
For a hands-on, family-friendly version of this craft, print your photos first, then use markers, pens, and basic crafting materials to add the vampire elements. This approach works especially well with children and large groups.
- Print the photos: Use standard printer paper for casual crafts or heavier photo paper for a polished finish.
- Outline features: Trace around the eyes, eyebrows, and mouth lightly with a pencil to plan where fangs, dark circles, and shadows will go.
- Add fangs: Draw small, triangular teeth extending from the canines, then color them with white paint pen for extra brightness.
- Shade the eyes: Use gray or black pencil to deepen the eye sockets and add sharp, arched eyebrows for a dramatic expression.
- Create blood effects: Draw thin red lines from the corners of the mouth or along the neck in stylized drips rather than realistic gore.
- Highlight clothing: Add collars, capes, amulets, or high-necked jackets with black and red markers to suggest vampire fashion.
Transforming Ordinary Frames into Gothic Showpieces
The right frame instantly signals that these are not just any photos but a macabre gallery of immortal beings. You do not need expensive frames; inexpensive or secondhand options can be easily upgraded with paint and embellishments.
- Paint wooden or plastic frames in matte black and then dry-brush with metallic silver or gold for a distressed, antique finish.
- Glue faux jewels, plastic spiders, bats, or tiny skulls onto corners of the frame for added theatrical flair.
- Wrap a strip of lace or black ribbon around the top or bottom edge of the frame and secure it at the back with tape or hot glue.
Arranging a Vampire Portrait Gallery Wall
Once the portraits are finished and framed, the fun part begins: arranging them to create maximum impact in your space. A gallery wall can turn a blank hallway or living room wall into a vampire family shrine.
- Mix frame sizes and shapes, but keep a consistent color palette—such as black, red, and antique gold—to unify the display.
- Arrange your portraits in a loose grid or clustered salon-style layout, starting with the largest piece at eye level.
- Fill gaps with small mirrors, gothic quotes (printed or hand-lettered), or bat silhouettes cut from cardstock.
Creating a Backstory for Your Vampire “Family”
Adding fictional biographies to your vampire portraits turns them into an interactive storytelling feature. This works especially well for parties, where guests can read the backstories and guess who is who.
- Give each portrait a title, such as “The Countess of the Crimson Moon” or “The Librarian Who Never Sleeps.”
- Print or handwrite a short, two- or three-line origin story on small cards and mount them beneath or beside each frame.
- Encourage kids to invent powers, centuries of birth, and favorite midnight snacks for each character.
Kid-Friendly Variations (Less Scary, More Silly)
If you are decorating for younger children or a school event, lean into humor and color rather than true horror. The vampire theme can become playful very easily by exaggerating features and using bright accents.
- Swap realistic blood for cartoon-style red hearts, stars, or swirls around the mouth.
- Add goofy accessories like oversized bow ties, neon sunglasses, or sparkly fangs drawn directly on the print.
- Use colored markers and stickers instead of dark shading to keep the overall tone lighter and more whimsical.
Party Ideas Using Vampire Portraits
Vampire portraits do not have to remain static decorations. They can become part of games, photo booths, and favors that guests take home after the party. Combine them with mood lighting and music for a full immersive atmosphere.
- Set up a photo booth with a plain dark backdrop, fake fangs, capes, and props, then print portraits on the spot.
- Turn the portraits into a guessing game by disguising who is who with costumes and asking guests to match names to faces.
- Give each guest a mini framed portrait of themselves as a vampire as a take-home souvenir.
Safety, Mess, and Storage Tips
Even simple crafts run more smoothly when you plan ahead for mess and long-term use. A few precautions will help you avoid damage to your walls and make it easier to re-use your work in future Halloweens.
- Lay down newspaper or a plastic tablecloth before painting frames or using glue, especially with children helping.
- Use removable adhesive strips or hooks to hang frames on walls without leaving holes or peeling paint.
- Store portraits and frames in flat boxes with tissue paper between each layer to prevent sticking and scratches.
Quick Troubleshooting Guide
If your first attempt at a vampire portrait is not as dramatic as expected, some small adjustments usually fix the problem. Think of these as tiny edits that can push the look from ordinary to satisfyingly spooky.
- Portrait looks too bright: Darken the background with a marker or paint wash, or print the image with slightly lower brightness.
- Fangs do not stand out: Outline them with a very thin gray line and add a tiny white highlight to the tips for shine.
- Frame feels too plain: Add a strip of red ribbon or a single plastic bat in the top corner to tie it into the Halloween theme.
Frequently Asked Questions
How long does it take to make a set of vampire portraits?
For a small set of three to five portraits, expect about one to two hours, including editing or drawing details and preparing frames. The time can stretch a bit more if you are painting and embellishing frames or involving younger children.
Do I need special photo-editing skills or software?
No specialized knowledge is required. Free apps with basic filters and brush tools are usually enough to pale the skin, enhance shadows, and add simple fang and eye effects. Hand-drawn details on printed photos work just as well and may actually feel more personal.
Can I make vampire portraits without printing at home?
Yes. You can edit photos on your phone or computer and then send them to a print shop or an online service. Once printed, you can still add hand-drawn touches, embellishments, and custom frames at home.
What if my kids are scared of vampires?
Turn the concept into a cartoon-style monster gallery instead of realistic vampires. Focus on capes, silly expressions, and colorful backgrounds rather than blood, dark shadows, or intense eyes, so the mood stays humorous rather than frightening.
Can I reuse the frames after Halloween?
Definitely. If you want reusable frames, lightly tack your vampire portraits inside with removable tape or photo corners. After Halloween, you can swap in everyday photos, seasonal art prints, or other holiday decor without buying new frames.
Bringing Your Haunted Gallery to Life
Vampire portraits combine everything that makes Halloween fun: transformation, imagination, and just enough spookiness to make people look twice. With a few basic supplies and a free afternoon, you can turn a plain hallway into a moody vampire gallery that your family and guests will look forward to seeing year after year.