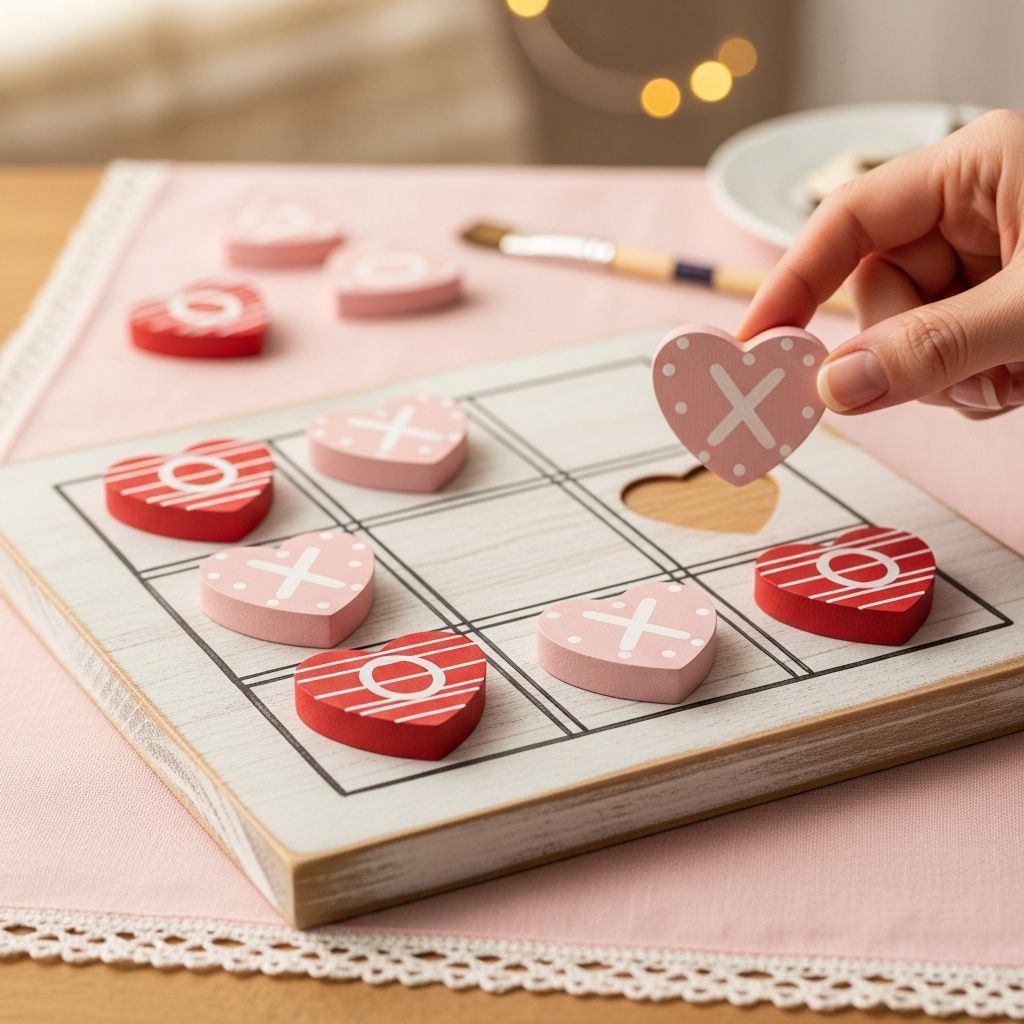
Valentine’s Day is the perfect excuse to combine creativity, quality time, and just a little bit of friendly competition. A homemade tic-tac-toe hearts game checks all three boxes: it is a simple craft, a reusable game, and a sweet keepsake you can bring out every February.
This guide walks you through how to design, assemble, decorate, and play with your own Valentine’s tic-tac-toe hearts set, using affordable materials you probably already have at home.
Why Make a Valentine’s Tic-Tac-Toe Game?
Instead of buying disposable cards or plastic trinkets, this project encourages kids and adults to make something they will actually use. The finished game is sturdy enough to last year after year and small enough to tuck into a drawer or gift bag.
Because tic-tac-toe is familiar and easy, it is an ideal game for young children, visiting grandparents, or friends who drop by for a Valentine’s playdate.
- Encourages fine motor skills and creativity while decorating the hearts and board.
- Promotes turn-taking, patience, and basic strategy in a playful way.
- Creates a reusable, eco-friendly Valentine’s activity instead of single-use items.
Materials and Tools You Will Need
You can adapt this list to suit what you already have on hand. Feel free to swap wood for cardboard, or fabric paint for markers, as long as your game pieces contrast clearly.
Suggested Base Materials
- One flat surface for the board (wood plaque, cork tile, thick cardboard, or foam board).
- Ten small hearts for playing pieces (wood cutouts, felt hearts, heavy paper hearts, or bottle caps with heart stickers).
- Painter’s tape or a ruler (for marking the grid).
Decorating Supplies
- Acrylic paint or washable paint in red, pink, white, and a contrasting color for the board.
- Permanent markers or paint pens for details and outlines.
- Glue (craft glue or hot glue with adult supervision).
- Glitter, sequins, rhinestones, or small foam stickers (optional embellishments).
- Clear sealer such as brush-on varnish or decoupage medium for durability (optional).
Useful Tools
- Paintbrushes in various sizes.
- Scissors (for cutting paper or felt hearts).
- Pencil for sketching your grid.
- Fine-grit sandpaper (if using wood, to smooth edges).
Planning Your Game Design
Before the paint comes out, take a moment to decide the overall style of your game. A little planning helps keep the final result clean and cohesive, even when young children are involved in decorating.
Decide on a Theme
- Classic Valentine: Red and pink hearts on a white or pastel board with simple lines.
- Modern Minimalist: Monochrome hearts (for example, white and gold) on a dark board.
- Kids’ Doodle Style: Bright markers, rainbow hearts, and playful patterns all over the board.
Choose Team Colors and Shapes
Tic-tac-toe is easiest when the two sets of pieces look obviously different. For Valentine’s Day, you can do this with color, pattern, or small add-ons instead of traditional X and O symbols.
- Paint five hearts solid red and the other five solid pink.
- Draw tiny polka dots on one set and thin stripes on the other.
- Add miniature stickers or initials to distinguish each side.
Step-by-Step Instructions
The process can be broken into four main stages: preparing the board, creating the hearts, decorating, and sealing. Adjust the level of detail depending on the age and patience of your crafters.
1. Prepare and Paint the Board
- Size your surface. Cut or choose a board roughly the size of a small book so it is easy for kids to handle.
- Sand if needed. Lightly smooth any rough wooden edges and wipe away dust.
- Paint the background. Apply a base coat in a color that will contrast with your grid lines and hearts. Allow it to dry fully.
- Mark the grid. Use a ruler and pencil to draw two vertical and two horizontal lines, creating nine equal squares.
- Paint the grid lines. Trace over your pencil lines with a fine brush and paint or a paint pen. Let everything dry completely before moving on.
2. Make and Decorate the Hearts
- Cut or sort your hearts. If using paper or felt, trace a heart template and cut out ten hearts of the same size. If using wood or pre-cut pieces, simply group ten together.
- Separate into two sets. Divide the hearts into two groups of five so each player has a complete set.
- Paint the base color. Paint one set of hearts in your first color and the other set in your second color. Allow them to dry.
- Add details. Use markers or small brushes for faces, patterns, or letters. Keep the style simple so children can recognize their pieces quickly.
3. Optional Embellishments
- Add a thin line of glitter glue along the edge of each heart.
- Glue a small sequin or rhinestone in the corner of each heart for a little sparkle.
- Stamp tiny hearts or dots around the edges of the board for extra decoration.
4. Seal and Finish
- Check for loose decorations. Press gently on sequins or stickers to make sure everything is secure.
- Apply a clear sealer. Brush on a thin, even coat over the board and hearts if you want them to be more durable. Allow plenty of drying time.
- Store safely. Place the hearts in a small pouch or box and keep them with the board so your set stays together.
Table: Quick Reference for Materials and Age Suitability
This table can help you adapt the project to different ages and attention spans.
| Age Group | Suggested Board Material | Heart Material | Decorating Focus |
|---|---|---|---|
| Toddlers (with help) | Thick cardboard or foam board | Large craft foam or felt hearts | Big stickers, washable markers, simple color blocks |
| Preschoolers | Cork tile or sturdy cardboard | Wood hearts or felt hearts | Dots, stripes, simple faces, glitter glue lines |
| Early elementary | Wood plaque or sturdy board | Wood hearts or layered paper hearts | Patterns, lettering, themed designs and borders |
| Older kids & adults | Wood board, slate, or decorative tile | Painted wood or clay hearts | Detailed illustration, metallic accents, sealed finish |
Ideas for Personalizing Your Game
The most charming sets are the ones that reflect the people who made them. Encourage kids to add their own jokes, symbols, or favorite colors so the game feels special every time you bring it out.
- Use initials: Put one child’s initials on one color of hearts and another child’s initials on the other set.
- Incorporate tiny messages: Paint or write short, positive words like “joy,” “kind,” or “smile” on each heart.
- Match your décor: Choose a color palette that coordinates with the room where the game will be stored or displayed.
- Create themed sets: Instead of plain hearts, decorate one set as “sun” and the other as “moon,” or “flowers” and “stars,” while keeping the heart shape.
Playing and Learning with Your Valentine’s Tic-Tac-Toe
Once the paint is dry, it is time to play. Beyond the usual three-in-a-row objective, you can turn this simple game into a tool for learning and connection.
Ways to Play
- Standard tic-tac-toe: Take turns placing one heart at a time, aiming for three in a row horizontally, vertically, or diagonally.
- Speed rounds: Use a timer and see how many games you can complete in two minutes.
- Team play: Pair an adult and child on each side so younger kids can get help with strategy.
Skill-Building Benefits
- Practice counting moves, turns, and wins.
- Talk about patterns and lines (rows, columns, diagonals) while you play.
- Encourage good sportsmanship by modeling how to celebrate wins and handle losses kindly.
Safe Crafting Tips for All Ages
A little preparation goes a long way in keeping this craft fun and stress-free, especially when small children are involved. Plan for drying time and protect your surfaces before you open the paints or glues.
- Cover your table with newspaper or a reusable craft mat to guard against spills.
- Choose washable, non-toxic supplies when possible, particularly for young kids.
- Have an adult handle hot glue guns, sharp scissors, or craft knives used to cut thick boards.
- Let each layer of paint dry before adding details to prevent smudging and frustration.
Storing, Gifting, and Reusing Your Game
This little game makes a thoughtful gift for teachers, grandparents, babysitters, or classmates. Include a brief note with simple instructions so the recipient understands how the hearts and board work together.
- Slip the hearts into a small drawstring bag and tie it to the board with ribbon.
- Store the whole set in a labeled box or bin with your other seasonal decorations.
- Bring it out for Valentine’s parties, family nights, or classroom centers year after year.
Frequently Asked Questions
How many hearts do I need for a tic-tac-toe game?
You will want ten hearts in total: five for each player or team. This number ensures there are enough pieces to potentially fill the entire grid in a single game.
What if I don’t have wood hearts or a wooden board?
You can still make a durable and attractive game using cardboard, foam board, or cork for the base and paper or felt hearts for the pieces. The key is to keep the pieces thick enough that they are easy to pick up and move.
Can very young children help with this project?
Yes. Toddlers and preschoolers can participate by helping paint large areas, place stickers, and choose colors, while adults handle tracing, cutting, and any detailed work that requires precision tools.
How do I protect the game so it lasts for years?
Using a clear sealer over the finished board and hearts will help prevent paint from chipping and make it easier to wipe away minor spills. Storing the game in a safe container when not in use also extends its life.
Is this a good classroom or group activity?
This project works well for classrooms, clubs, or parties if you pre-cut the board and hearts. Set up stations for painting, decorating, and drying so multiple children can work at once without crowding.
Final Thoughts
A Valentine’s tic-tac-toe hearts craft is more than just a quick holiday project. It is a chance to slow down, laugh together, and create a family tradition you can pull off the shelf every February. With simple materials and a bit of imagination, your homemade game can become a cherished part of your Valentine’s celebrations for years to come.