Hosting a summer camp at home, planning a backyard adventure day, or just looking for a bold decoration to kick off vacation? A handmade summer camp banner is the perfect project. It’s large enough to feel special, simple enough for kids to help with, and flexible enough to match any theme you dream up.
Why Make a Summer Camp Banner?
A banner does more than decorate a wall. It signals to kids that something fun and different is happening, turning an ordinary space into a camp lodge, cabin, or clubhouse. The process of making it together is also a relaxed way to talk about expectations, activities, and memories you hope to create over the summer.
- Build excitement: Unveil your banner on “opening day” of camp-at-home or the first day of school break.
- Encourage ownership: When children help design and assemble it, they feel proud and more engaged in camp activities.
- Practice skills: Cutting, arranging, simple stitching, gluing, and planning all sneak in fine-motor and creative thinking practice.
- Create a keepsake: Save the banner and add new details each year to track your family’s camp memories.
Choosing Materials and Style
There are many ways to build a banner, from rustic and outdoorsy to bright and modern. Start by deciding how sturdy you want it to be and where it will hang. Then pick a base fabric or paper that suits those goals.
| Base Material | Best For | Pros | Things to Consider |
|---|---|---|---|
| Rough fabric (like burlap-style or canvas alternative) | Rustic camp vibes, nature themes | Looks woodsy and textured; durable; hangs nicely | Can fray at edges; works best with fabric glue or stitching |
| Thick craft felt sheet | Bold colors, simple shapes, indoor display | Soft, no fraying, easy to glue felt-on-felt | Less breathable; large pieces can feel heavy if not well supported |
| Poster board or heavy cardstock | One-time party use, quick projects | Inexpensive; simple to cut; easy to draw and paint on | Not great outdoors; can curl or bend over time |
| Drop cloth or old sheet | Huge banners, backyard fences, garage doors | Covers large areas; great for big groups of kids | Needs more paint or larger cutouts to stand out visually |
If you are crafting with younger kids or first-time crafters, pick a material that doesn’t fray and takes glue well, such as felt or thick paper. Older kids may enjoy the extra challenge of stitching a fabric banner sleeve or trimming a strong fabric to shape.
Essential Supplies Checklist
Gather all your materials before inviting kids to the table. This keeps the energy upbeat and minimizes waiting time, which can lead to frustration. Adjust the list to match what you already have at home.
- Banner base: A rectangle or pennant shape cut from sturdy fabric, felt, or poster board.
- Support rod: A wooden dowel, smooth stick, curtain rod, or even a cardboard tube for hanging.
- Hanging cord: Yarn, ribbon, twine, or string to tie to both ends of the rod.
- Adhesive: Child-safe craft glue for younger kids, fabric glue or hot glue (adults only) for heavier decorations.
- Cutting tools: Sharp scissors for adults, safety scissors for kids, plus a craft knife for adults if needed.
- Decorative materials:
- Sheets of felt or colored paper for shapes and letters.
- Markers, fabric markers, or paint pens.
- Buttons, faux leaves, shells, or other lightweight objects.
- Stickers, washi tape, fabric scraps, or ribbon pieces.
- Optional sewing tools: Blunt tapestry or yarn needles and yarn or embroidery thread for simple stitching.
- Surface protection: Old newspaper, a plastic tablecloth, or cardboard to protect your table.
Plan the Banner Design With Your Kids
Before anyone starts cutting or gluing, pause to plan the banner together. Sketching rough ideas on scrap paper helps kids think about layout and stops the center from becoming too crowded. Treat planning as part of the fun instead of a chore.
Ask a few guiding questions:
- “What do you want our camp to be called?” (Examples: “Camp Sunrise”, “Backyard Explorers”, “Camp STEM Stars”.)
- “What colors feel like summer to you?”
- “Which pictures show what we’ll do at camp?” (Tents, trees, books, sports, planets, etc.)
- “Where should the name go so we can see it from far away?”
Encourage older kids to lightly draw a rectangle on paper and experiment with letter placement, picture size, and border ideas. Younger children can circle the shapes or colors they love, then adults can translate those choices into a simple, bold layout on the real banner.
Step-by-Step Assembly Instructions
The basic process stays the same regardless of your theme: create a hanger, add the camp name, and layer on decorative elements. Feel free to rearrange steps to suit your materials and your child’s attention span.
1. Shape and Prepare the Banner Base
- Cut your base material into a large rectangle, long pennant, or shield shape. A width between shoulder and fingertip of your child often feels big and special without being unmanageable.
- If using fabric that frays, fold and glue or sew a narrow hem along raw edges, or embrace a slightly rustic look and leave them as-is.
- Lay the base flat on a protected work surface, making sure it is oriented the way you plan to hang it.
2. Attach the Hanging Rod
There are two main ways to secure a rod: by creating a top sleeve or by wrapping and tying. Choose the method that feels realistic for your time and tools.
- Sleeve method (best for fabric or felt):
- Place the rod along the top edge of the wrong side of the banner.
- Fold the edge over the rod to create a tube wide enough for the rod to slide through.
- Secure the folded flap with a line of fabric glue, small stitches, or a combination of both. Allow glue to dry completely before hanging.
- Wrap-and-tie method (works for paper and fabric):
- Punch or carefully cut two small holes near the top corners of the banner.
- Thread ribbon or twine through the holes and tie around the rod multiple times.
- Add a dab of glue to knots for extra security.
3. Add the Camp Name or Slogan
The text is usually the focal point. To keep it readable from across the room, aim for bold, simple letters and high contrast between letters and background.
- Cut large block letters from felt or colored paper and glue them in a gentle arc or straight line.
- Use letter stencils and markers or paint pens for kids who enjoy tracing.
- Let older children sketch letters directly onto the banner with pencil, then fill them in with paint or markers.
- Keep words short and punchy, such as “CAMP FUN”, “ADVENTURE WEEK”, or your chosen camp name.
4. Decorate With Themed Images
Now comes the part most kids enjoy the most: adding pictures. Encourage them to think of the banner as a story about the summer they want to have. Mix large, simple shapes with a few small details to keep the design from feeling cluttered.
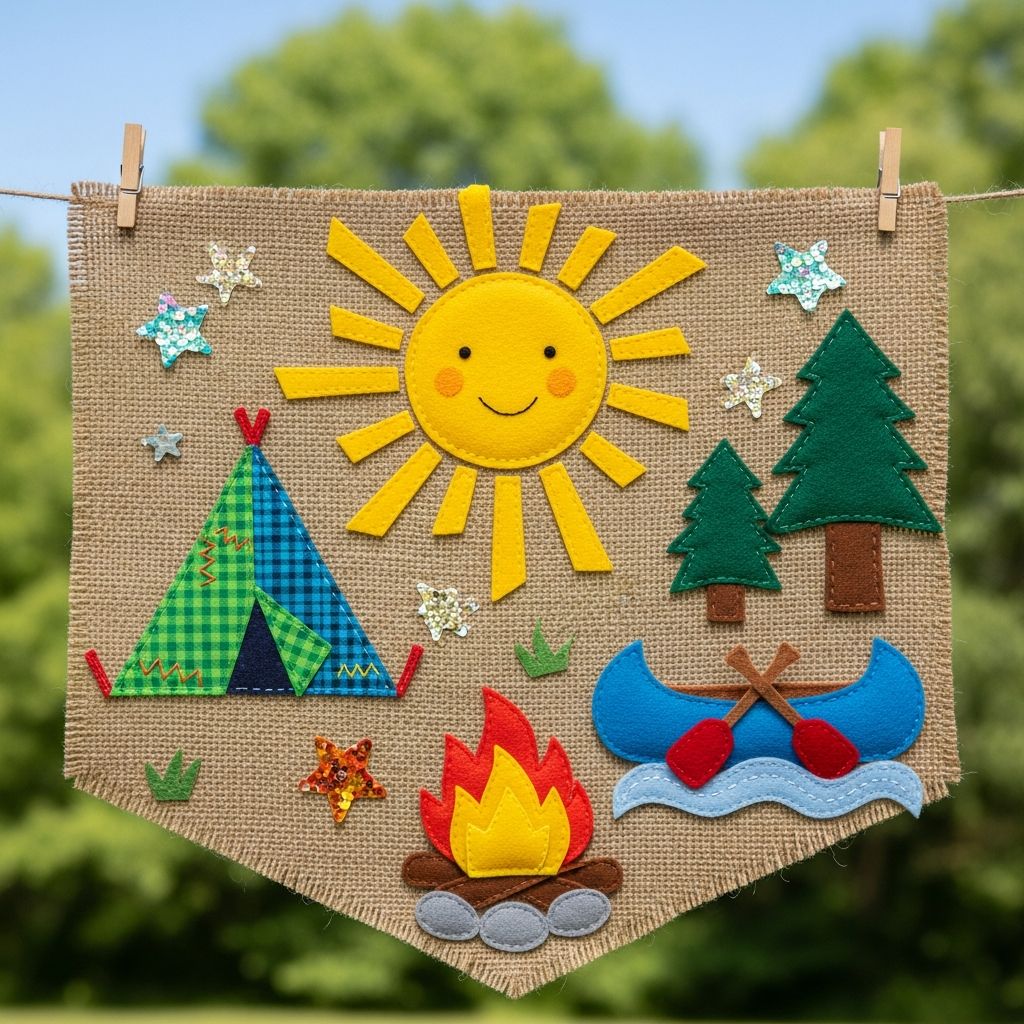
- Pre-cut basic shapes for younger kids: triangles for tents, circles for suns, tall rectangles for trees, ovals for canoes.
- Offer reference photos or printed icons for older children who want to design their own symbols.
- Layer shapes (tree trunks plus leafy tops, tents plus tiny flags) to give the banner more depth.
- Glue down items one section at a time so kids can see the design build up gradually.
5. Add Texture, Borders, and Finishing Touches
Once main elements are in place, invite kids to step back, look from a distance, and decide what else the banner needs. This is a good moment to talk about balance and spacing in a gentle, age-appropriate way.
- Draw a simple border around the edges with paint pens or markers.
- Glue on lightweight 3D elements like ribbon “streamers”, faux leaves, or paper badges.
- Add small details last: stars in the sky, dotted campfire sparks, paths, or waves.
- Let everything dry completely before hanging, especially if you used thicker glue or layers of paint.
Creative Theme Ideas for Your Banner
The theme of your banner can match the focus of your at-home camp or party. You can keep the same banner and change smaller details each week as the theme changes, or create smaller add-on pieces that clip to the main banner.
- Classic wilderness camp: Trees, mountains, a tent under the stars, and animal tracks along the bottom.
- Ocean explorers: Waves, fish, a lighthouse, and a big sun with rays that stretch across the top.
- STEM or space camp: Rockets, planets, gears, simple robots, or constellations spelled out with dots and lines.
- Art camp: Paint splashes, brushes, palettes, and frames for kids to draw mini self-portraits inside.
- Sports and movement: Silhouettes of kids running, balls, sneakers, and bold action words like “Play” or “Move”.
For long-running camps, consider leaving one open area labeled “Memory Corner” where kids can add a new symbol or mini badge each day to represent an activity they loved.
Age-Specific Tips and Adaptations
This project can flex to suit toddlers through tweens with a few simple adjustments in tools and expectations. The key is to let kids do as much as is safely possible while adults quietly handle tricky or risky steps.
- Ages 3–5: Pre-cut most shapes; let them glue pieces, press on stickers, and dab paint with sponges. Keep the session short and consider working in several mini sessions.
- Ages 6–8: Introduce simple tracing and cutting, plus basic stitching on large holes with thick yarn and a blunt needle. Offer two or three layout choices, not endless options.
- Ages 9–12: Allow more design control, including choosing the camp name, sketching letters, and planning the composition. Challenge them with layering, shading, or textural details.
Safety and Setup Considerations
Because banners can be large and involve multiple tools, a bit of preparation makes the experience smoother and safer. Set up a clear workspace and talk through safety rules before anyone touches scissors or glue.
- Keep sharp scissors, cutting knives, and strong adhesives under adult control, bringing them out only when needed.
- If using a very hot or fast-setting glue, have an adult handle the gluing while kids place pieces where they want them.
- Use non-toxic, washable markers and paints whenever possible, and have wipes or a damp cloth handy.
- Hang the banner securely so it cannot fall onto children or be pulled down during energetic play.
Fun Ways to Use and Display Your Banner
Once the glue has dried and the banner is ready, celebrate the moment. A dramatic “reveal” turns a simple decoration into a meaningful ritual that marks the start of your summer adventures.
- Hang it above a doorway as the official entrance to “camp” each day.
- Place it behind a snack table, crafting station, or reading corner.
- Use it as a backdrop for first-day and last-day photos.
- Add mini clothespins along the bottom edge for hanging artwork, nature finds, or achievement badges.
- At the end of the season, roll or fold it carefully and store it with a note about that summer’s favorite memories.
FAQs About DIY Summer Camp Banners
How long does it take to make a banner?
For a simple banner with a pre-cut base and basic shapes, expect 45 minutes to an hour, plus drying time. More detailed designs or stitched elements can stretch into a longer afternoon project, which can be split into several shorter sessions for younger kids.
What if I don’t have fabric?
You can absolutely use a large piece of cardboard, poster board, or taped-together cardstock instead of fabric. Focus on bold colors and lightweight decorations, and avoid very heavy objects that might cause the paper to bend or tear.
Can this project work outdoors?
Yes, but choose materials accordingly. For outdoor use, opt for sturdier fabric, weather-resistant paint or markers, and strong adhesive. Hang the banner somewhere protected from heavy rain, and bring it indoors during storms if you want it to last all summer.
How do I keep the design from looking cluttered?
Leave breathing room around the camp name, and encourage kids to use a few large shapes rather than many tiny ones. If they want to add more details, designate one section as the “detail zone” and keep the rest simpler for balance.
Is sewing required?
No sewing is required to make a great banner. Glue alone is enough for most projects. Simple stitching can be offered as an optional skill-building activity for kids who are ready and interested, but it is not necessary for a successful, eye-catching result.
A DIY summer camp banner doesn’t have to be perfect to be powerful. The goal is not professional polish but shared ownership and joy. When kids see their ideas hanging on the wall, they step into summer feeling like true campers, even if the “camp” is the living room, backyard, or neighborhood park.